Before starting, you must have:
An active Airbnb host account
Listings already created on Airbnb
Access as the main host, not a co-host
Clear knowledge of which listings belong to each Airbnb account
If you have already got a channel manager connected to Airbnb, disconnect your old channel manager first by following these steps:
Log in to Airbnb.
Open Account Settings.
Click Privacy
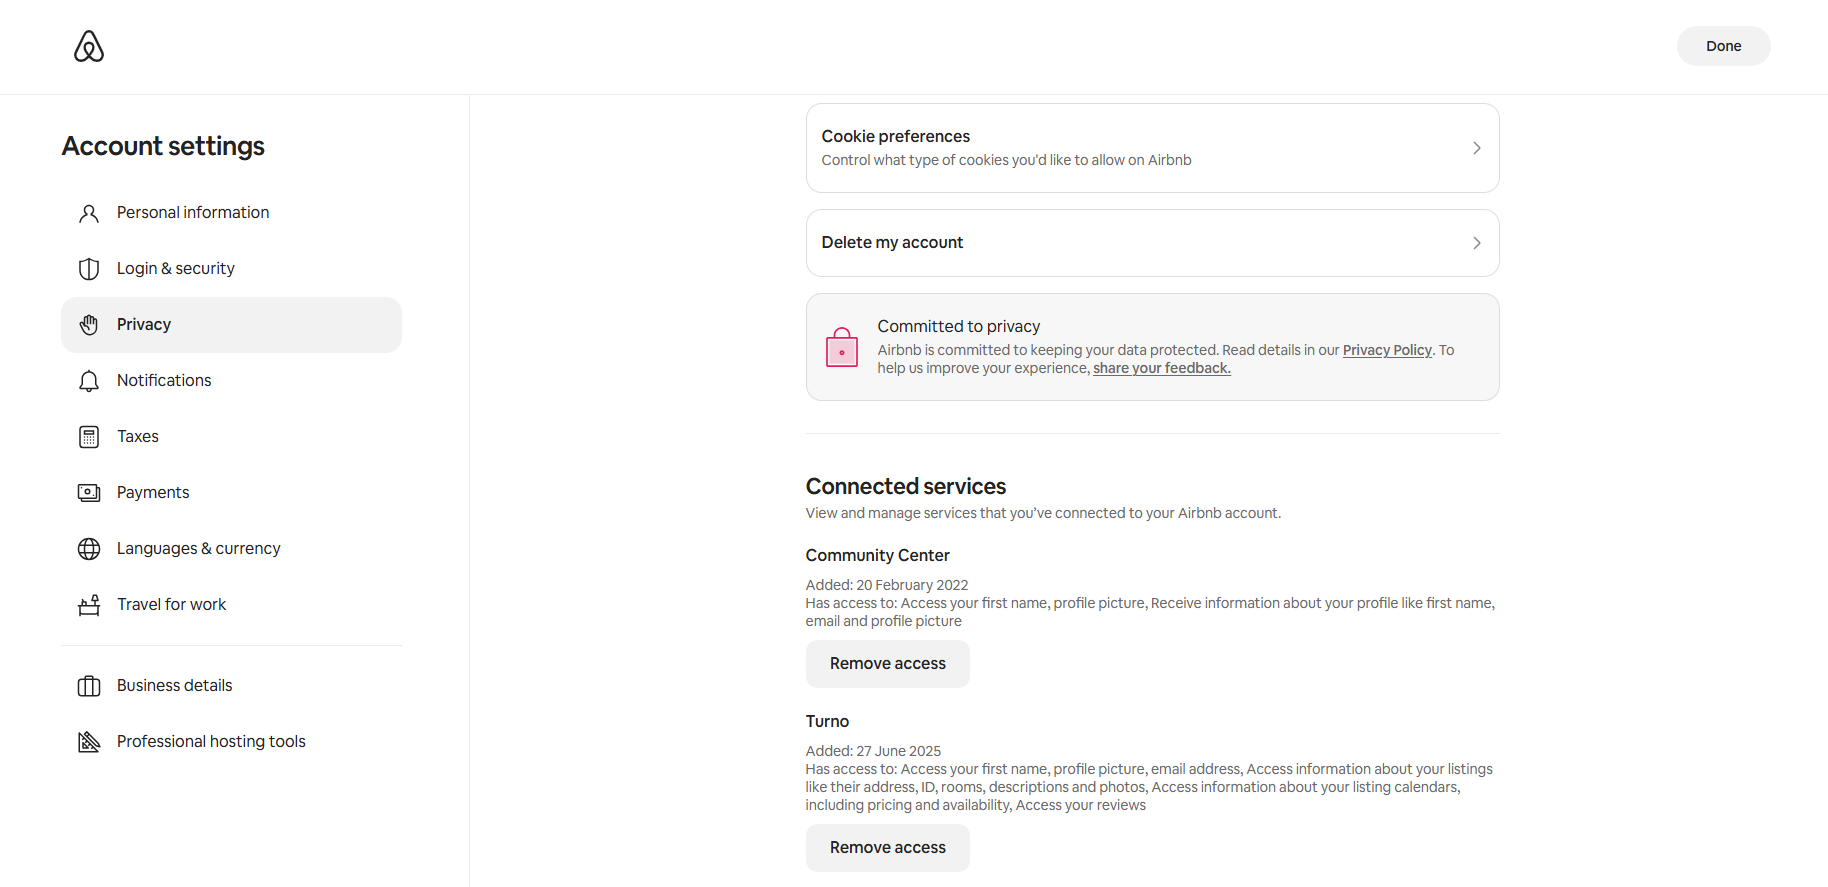
Under Connected Services (at the bottom), you should see the name of your old Channel Manager.
Click Remove Access.
After disconnecting your old channel manager from the channel, turn all your listings to "Request to Book." This ensures you don't receive bookings with incorrect dates or rates while completing the connection to Zeevou and verifying that everything is syncing correctly. Once you've confirmed that rates and availability are pushing accurately, you can turn Instant Book back on.
Steps to deactivate Instant Book on Airbnb
Click Listings in Airbnb.
Open a listing.
Click Booking settings.
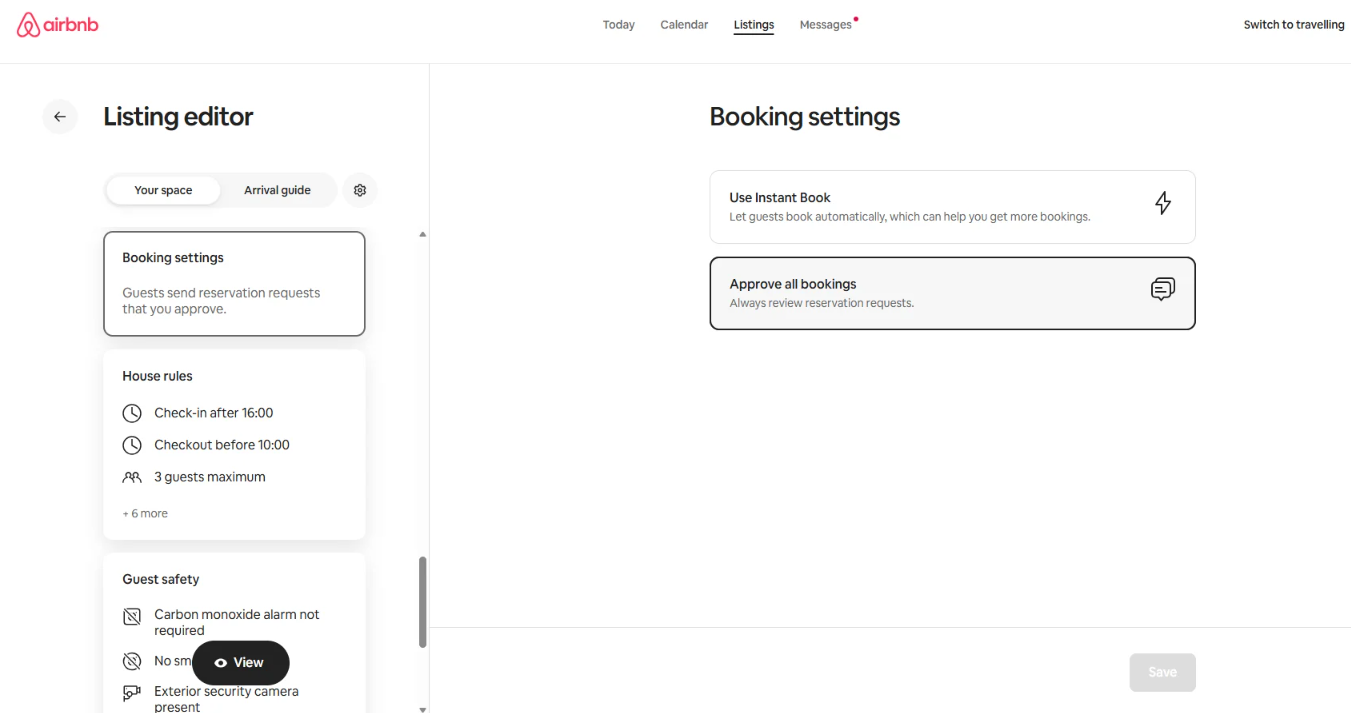
Select Approve all bookings.
Click Save.
Next, determine your Connection Type. If you have just signed up, you will be on Connection Type A.
Most new accounts use Connection Type A. You can confirm this inside Zeevou.
How to check your connection type
Log in to app.zeevou.com.
Click Listings.
Look for Manage Channels in the top right corner.
If you see it, use Connection Type A instructions.
If not, use Connection Type B.

Click on the Airbnb card.

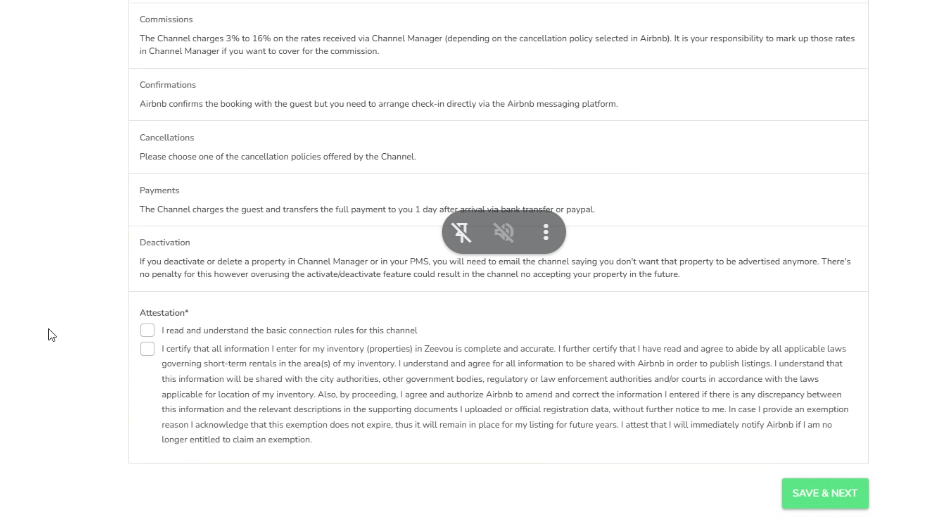
Tick both checkboxes under Attestation.
Click Save & Next
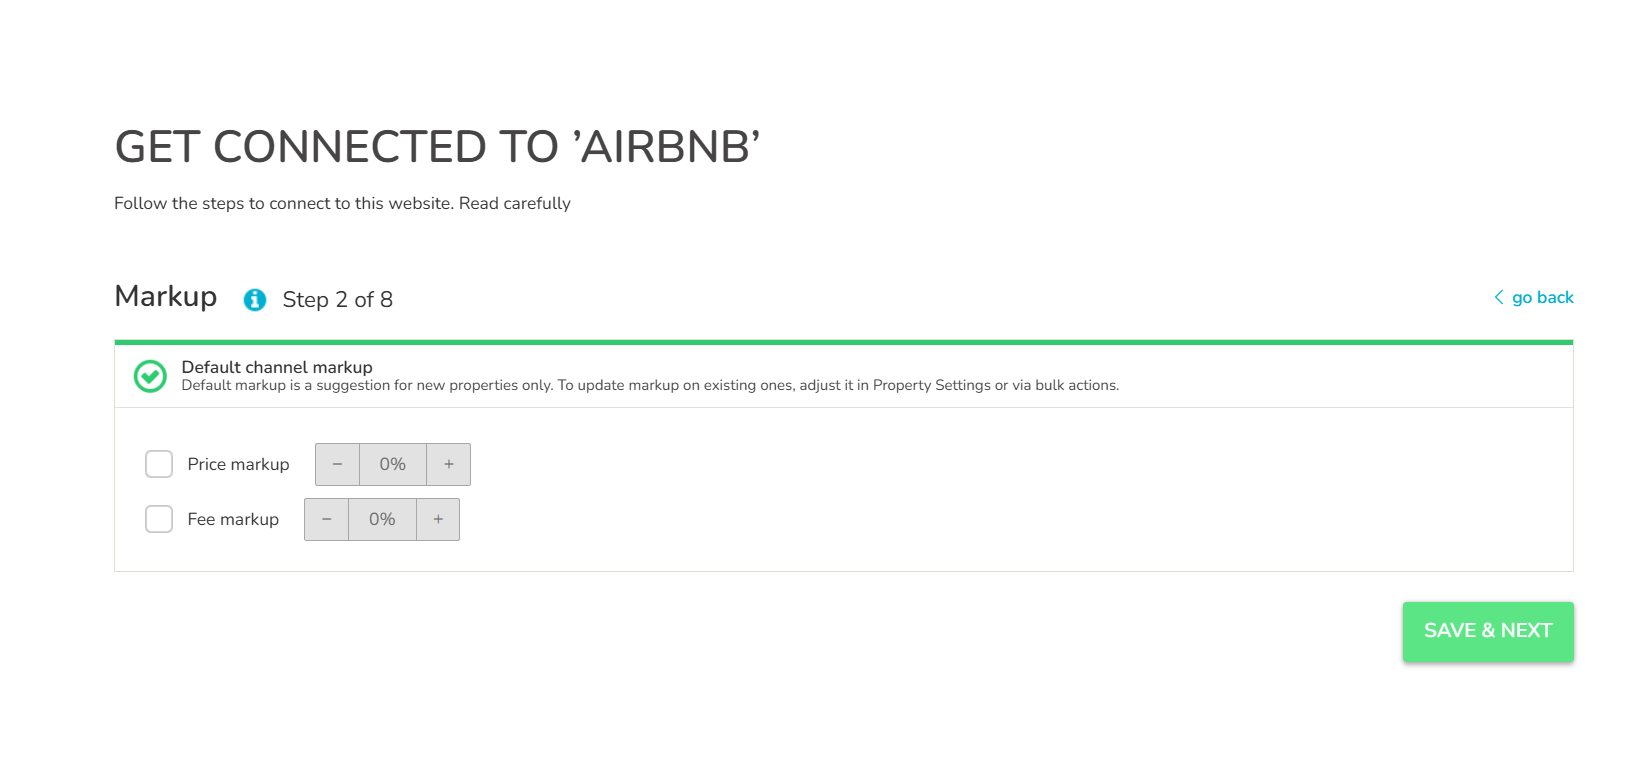
Set your Fees and Channel Mark-up.
Note: Setting a channel markup will increase your prices on Airbnb. To apply this, enter your desired percentage in the 'Markup' field during the mapping process.
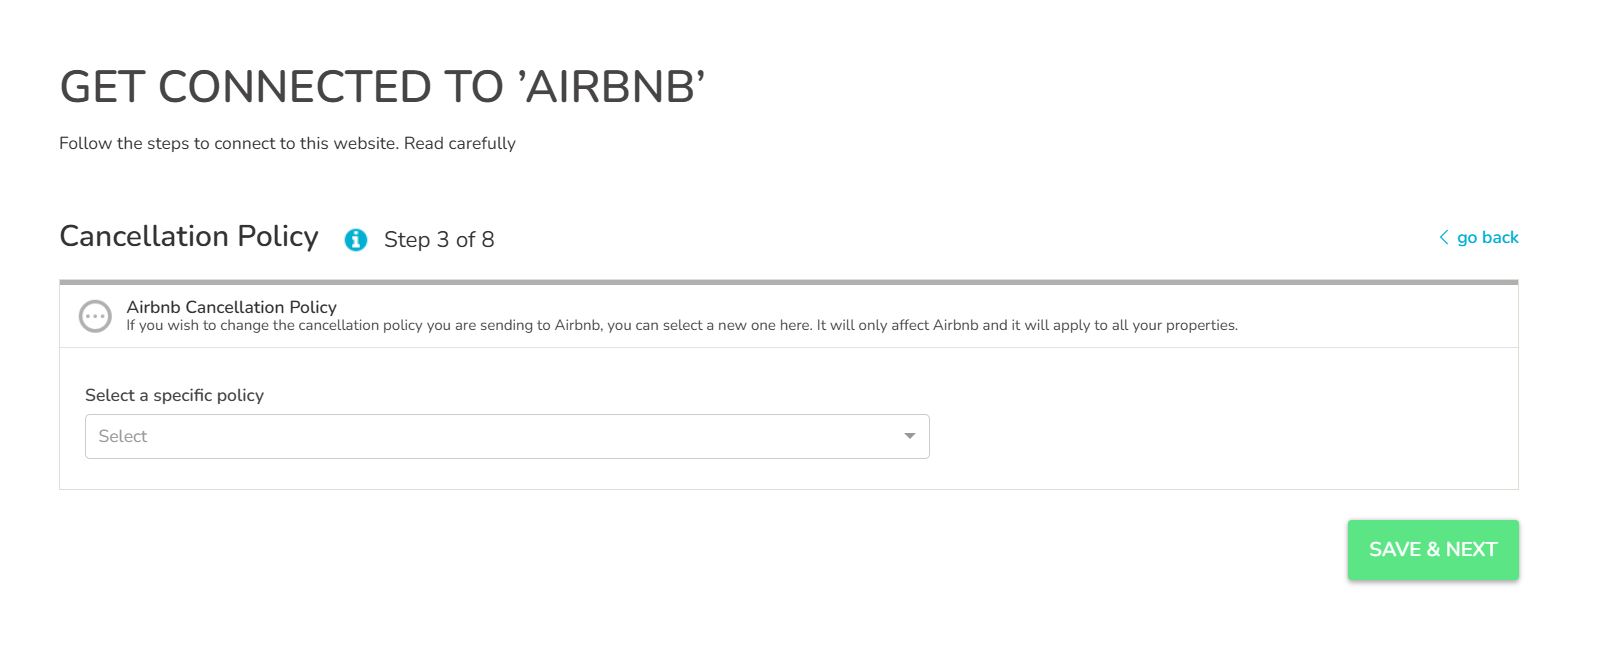
Select your Cancellation Policy by clicking the drop-down under ‘Select a specific policy’ to control this at the property level.
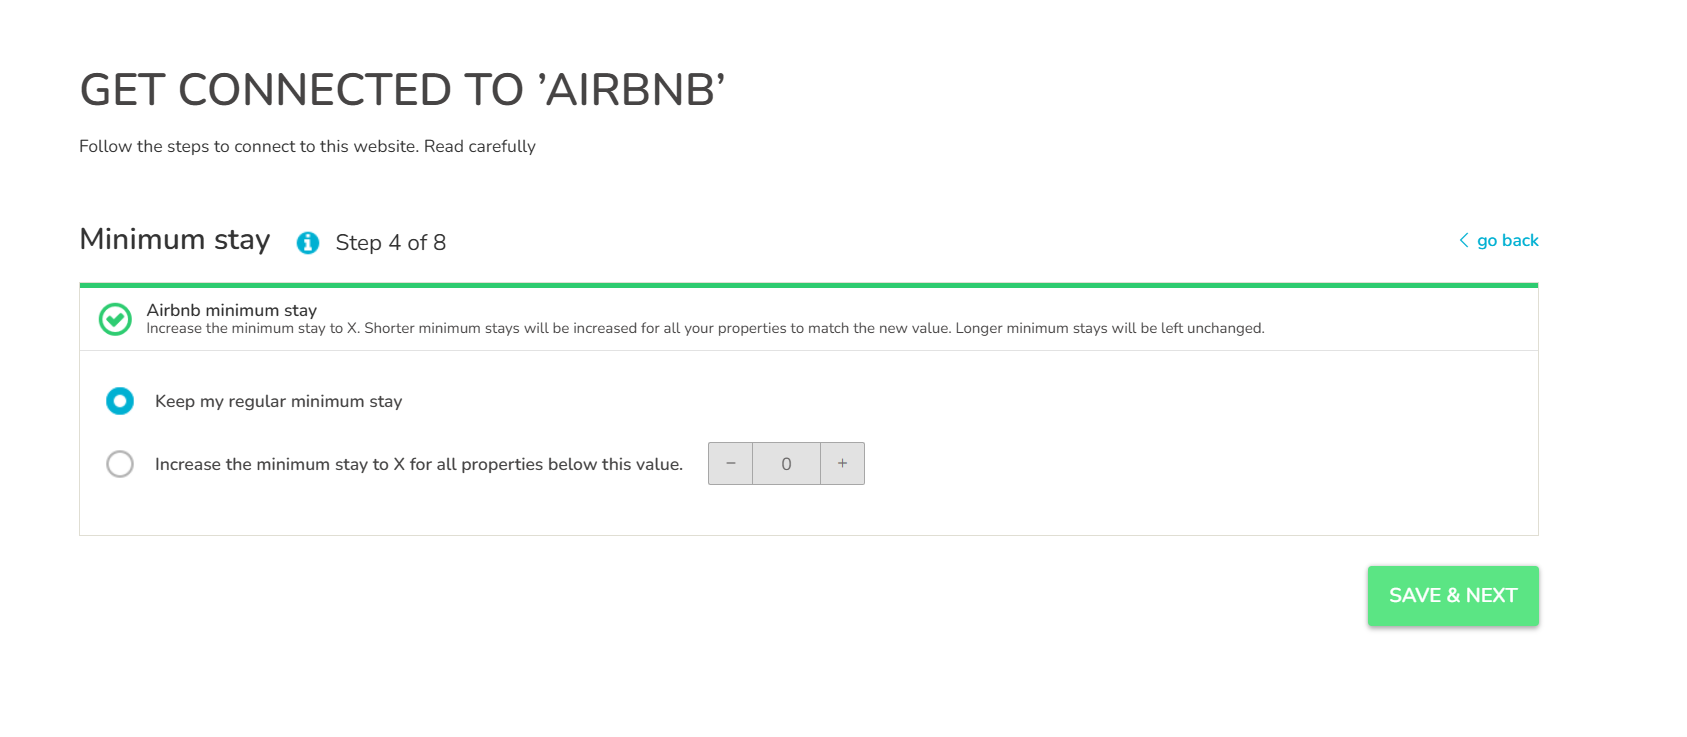
Click on Keep Regular Minimum Stay to make sure that your minimum stay requirements sync from Zeevou or your dynamic pricing provider.
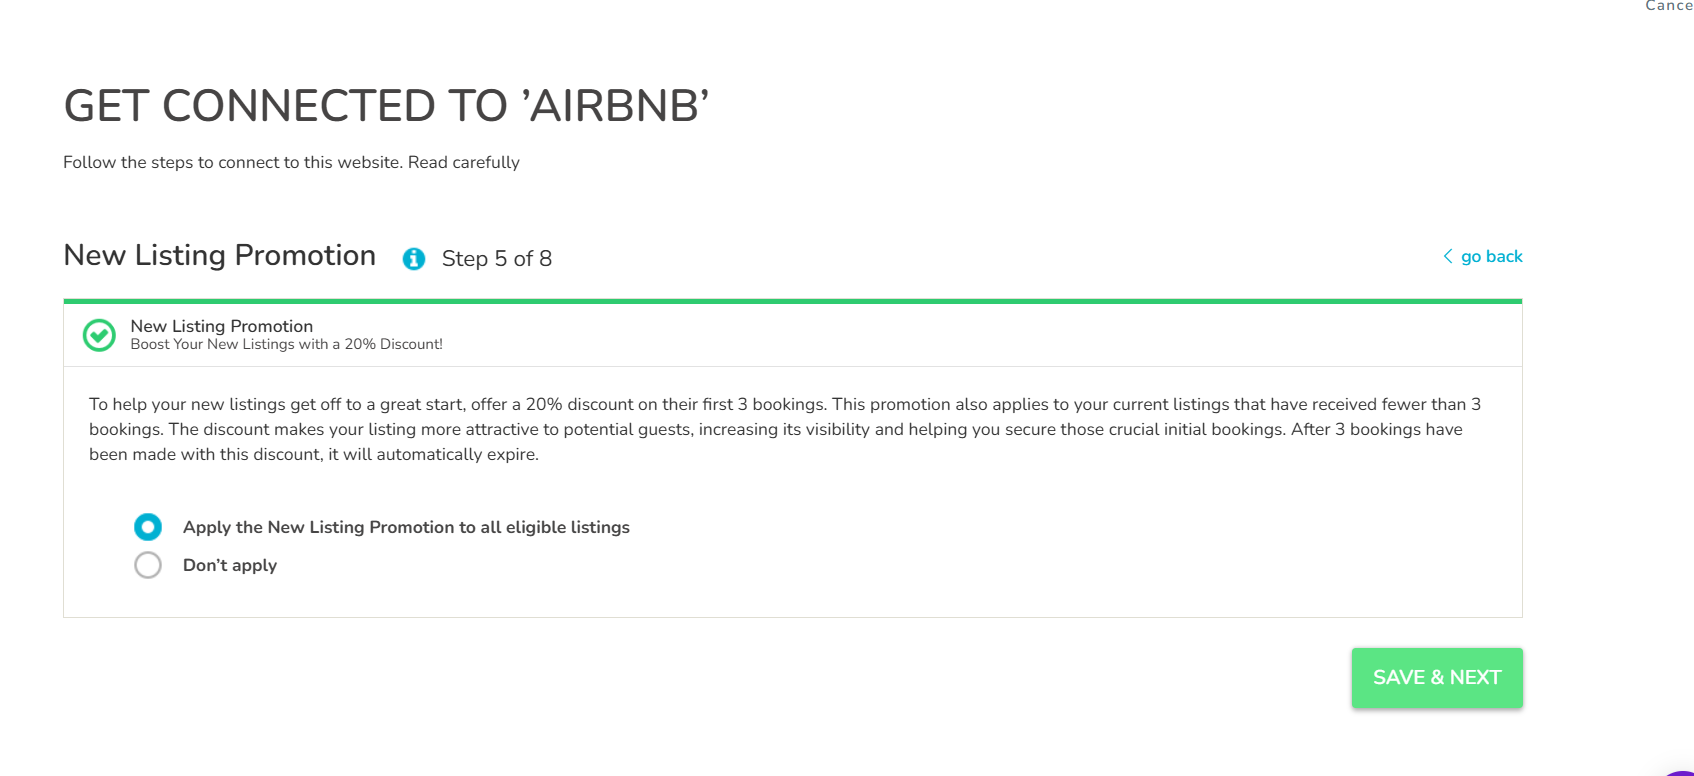
Decide whether to activate the New Listing Promotion.
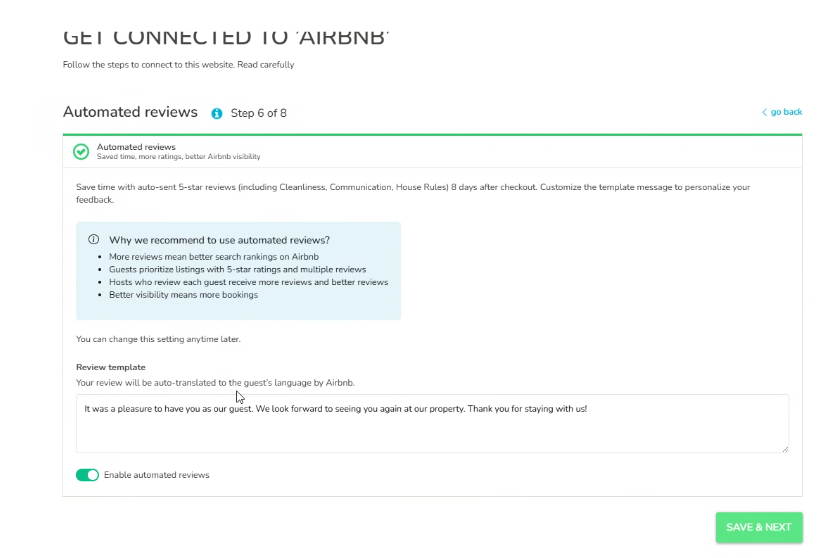
Specify your settings for Automated Reviews.
Note: By enabling this toggle, guest reviews will post automatically to Airbnb, meaning you won't be able to check them before they go live.
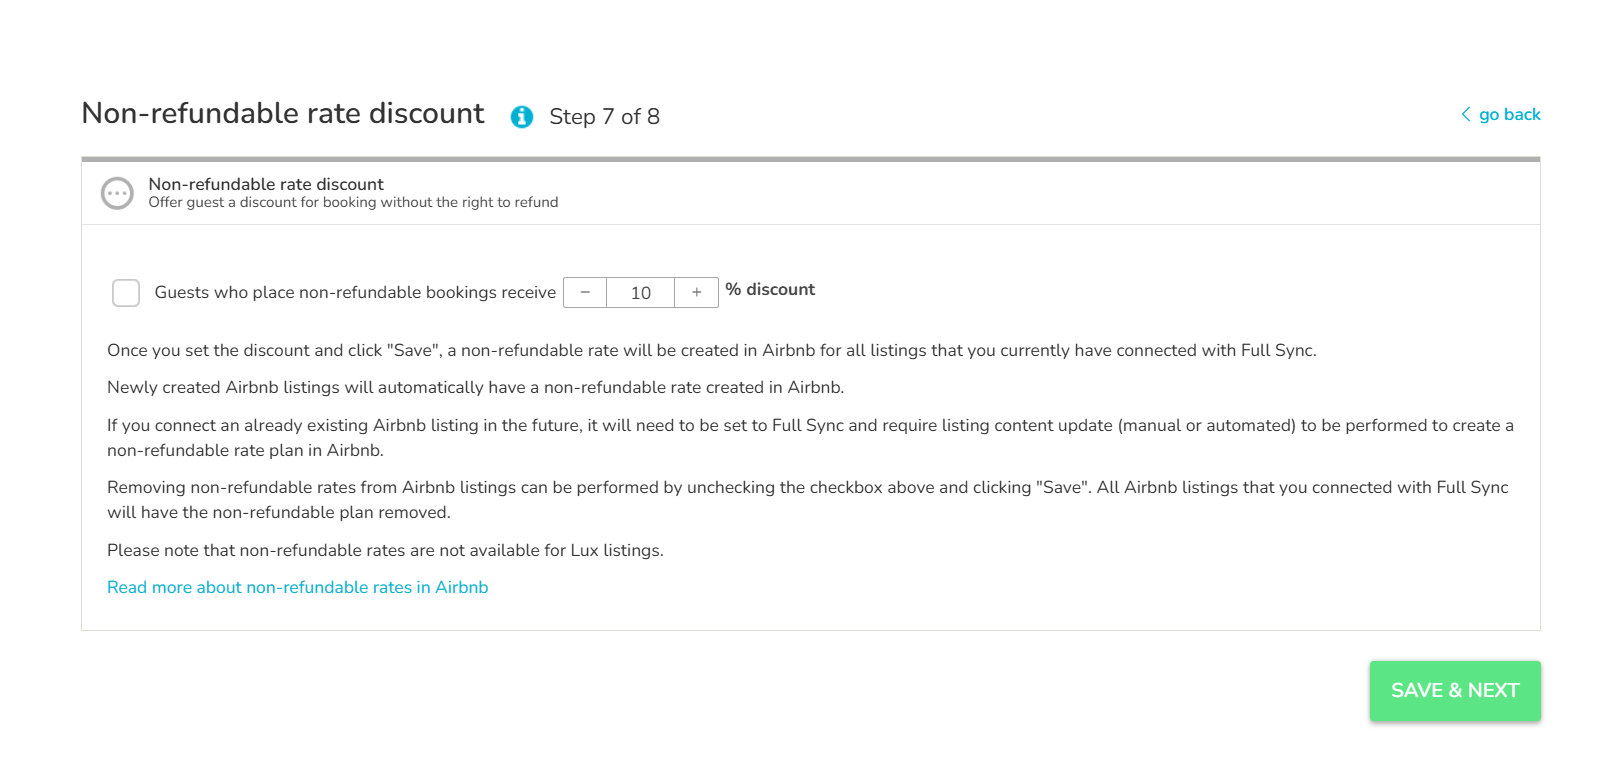
Specify the discount percentage to set up a non-refundable rate. Otherwise, leave this field empty.
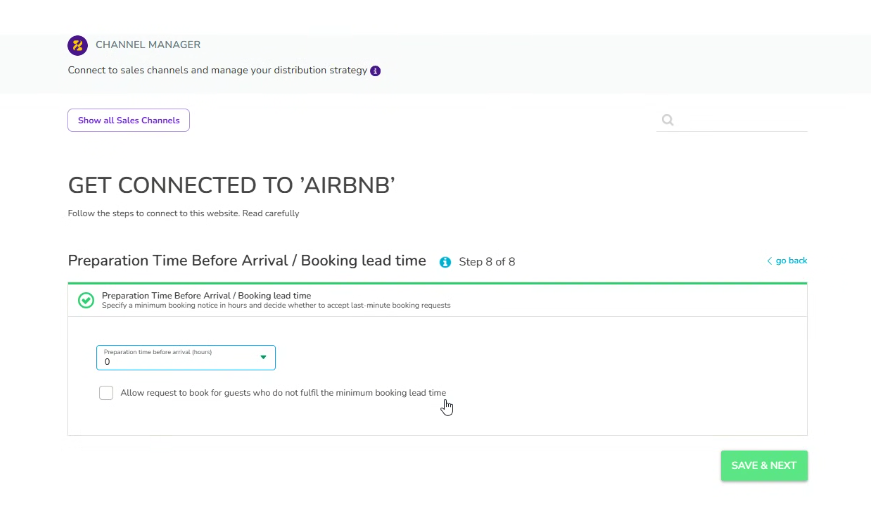
Set Preparation Time Before Arrival.
Click Synchronise Your First Account.

In the pop-up that opens, click Let’s Go button. (If a new page opens, close that and come back to the next step)
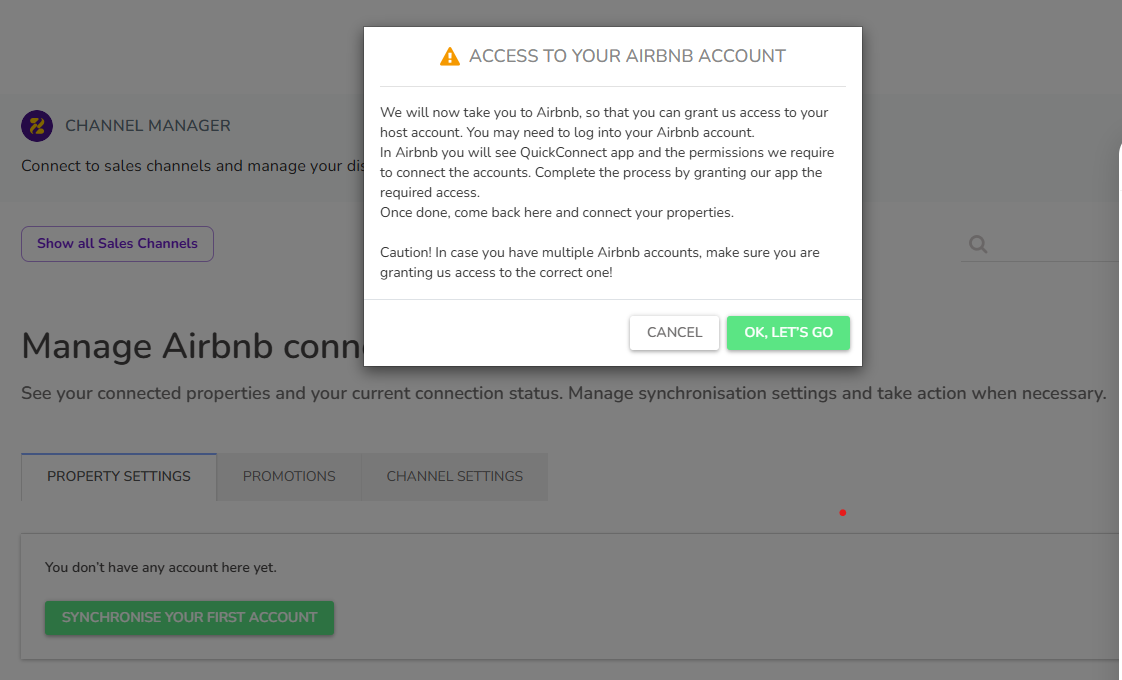
Grant access to your Airbnb account by selecting the blue ‘Click here’ link before going to the next step.
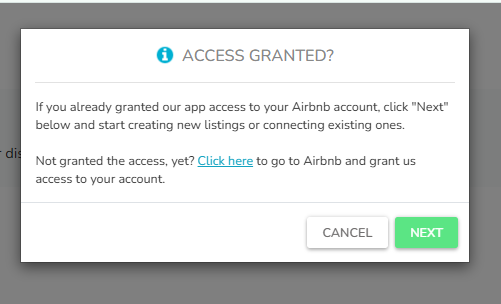
Log in to your Airbnb Host Account and click the Allow button to confirm the connection request. Make sure you are logged in to the correct Airbnb account before granting access.
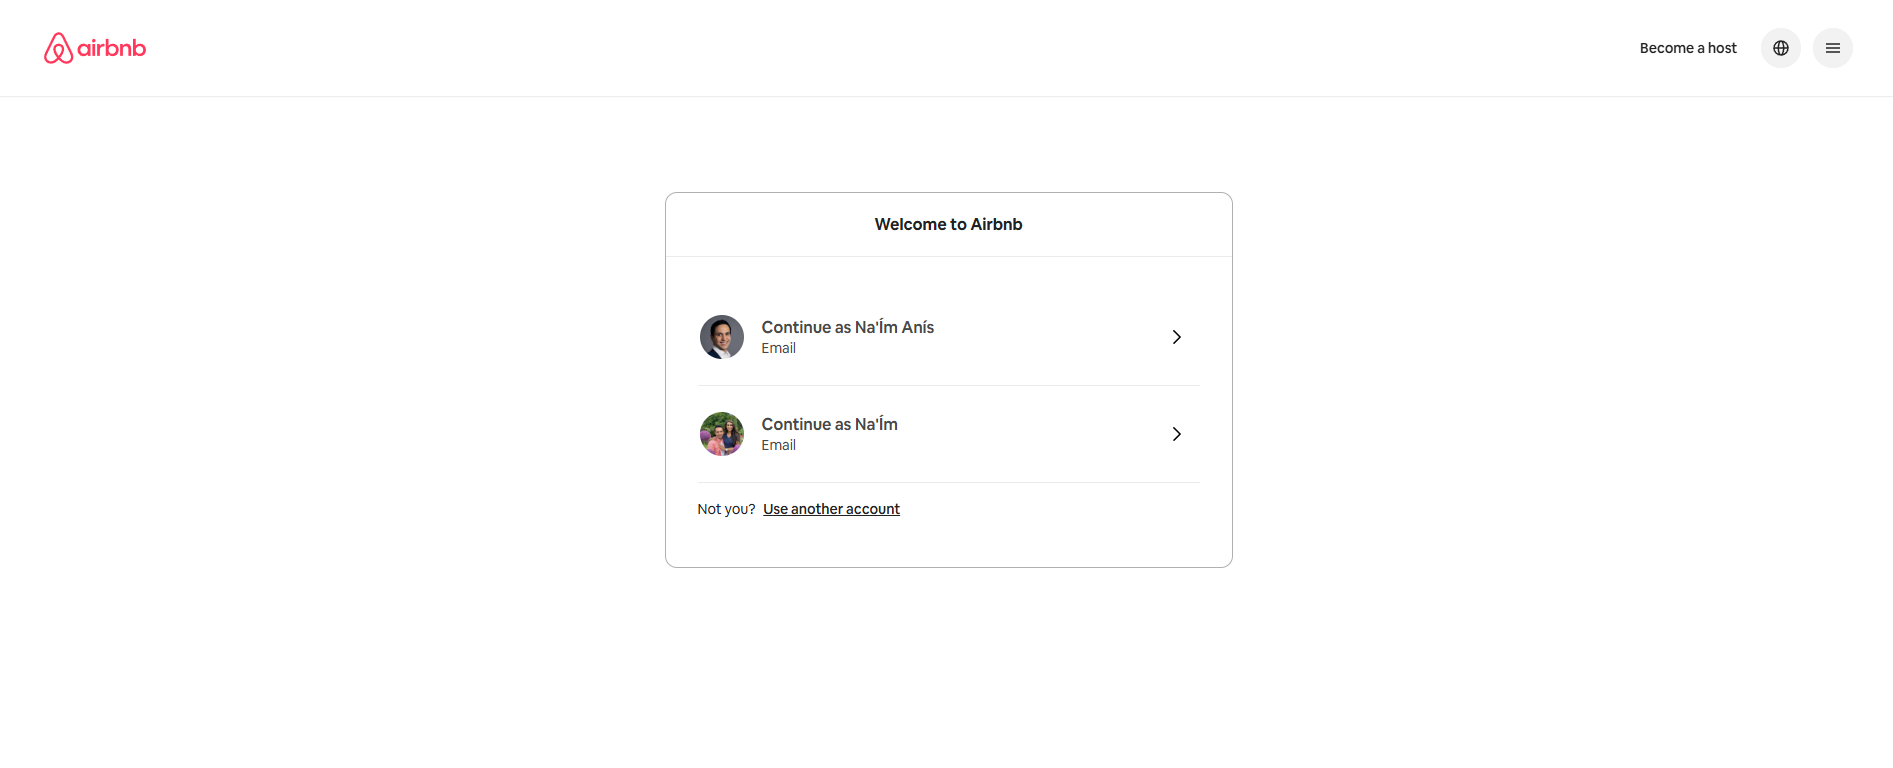
Close the Airbnb window.
Then, return to the Zeevou Channel manager page to view the list of your Airbnb Listings.
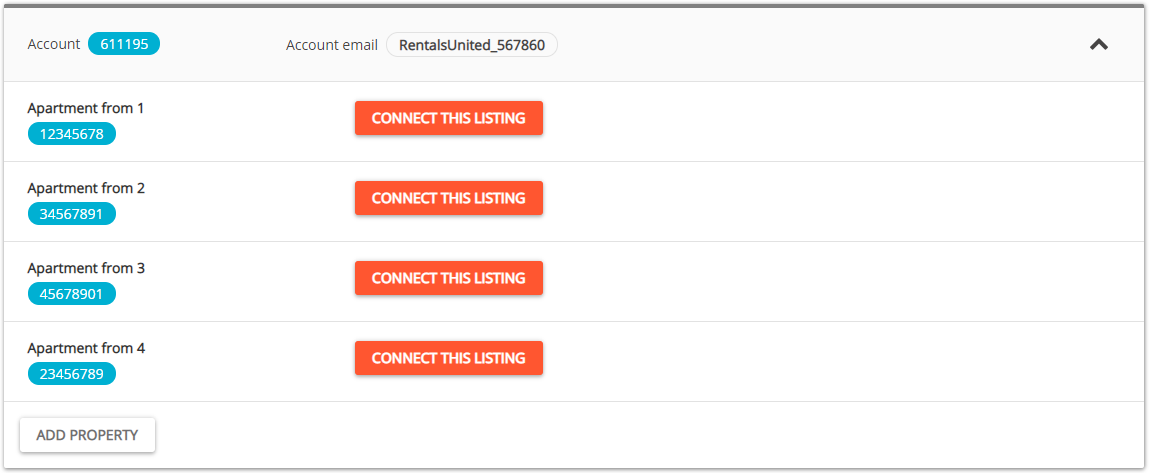
Depending on whether you have existing properties connected to Airbnb, you will see two different options.
If it is the first property to be connected, click the Connect your first property button.

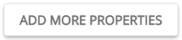
If you already have properties connected, click 'Add more properties' to sync your next unit.
A dialog box appears, asking whether the property is already published on Airbnb.
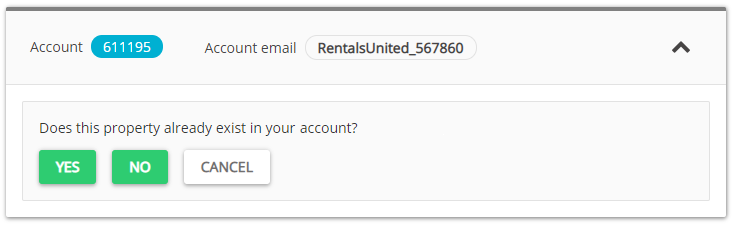
If the property is already listed on Airbnb, continue with these steps.
If the property is not yet listed on Airbnb, continue with these steps.
Click Yes.
A list of unmapped listings for that cluster is retrieved from Airbnb.
Click Connect this listing button next to the listing you want to map.
From the list, select the property to map and click Next.
Note: If the property that you are looking for is not available, it may mean that:
The property has already been mapped to Airbnb and is not referenced in the dropdown. It is not possible to map them multiple times.
The property has been recently added to Airbnb and is currently being processed by the channel (Pending).
The connection to Airbnb has been recently established and the listings have not all imported yet. This process can take up to 24 hours from when the connection to an account is established.
The summary of the Properties’ content is displayed.
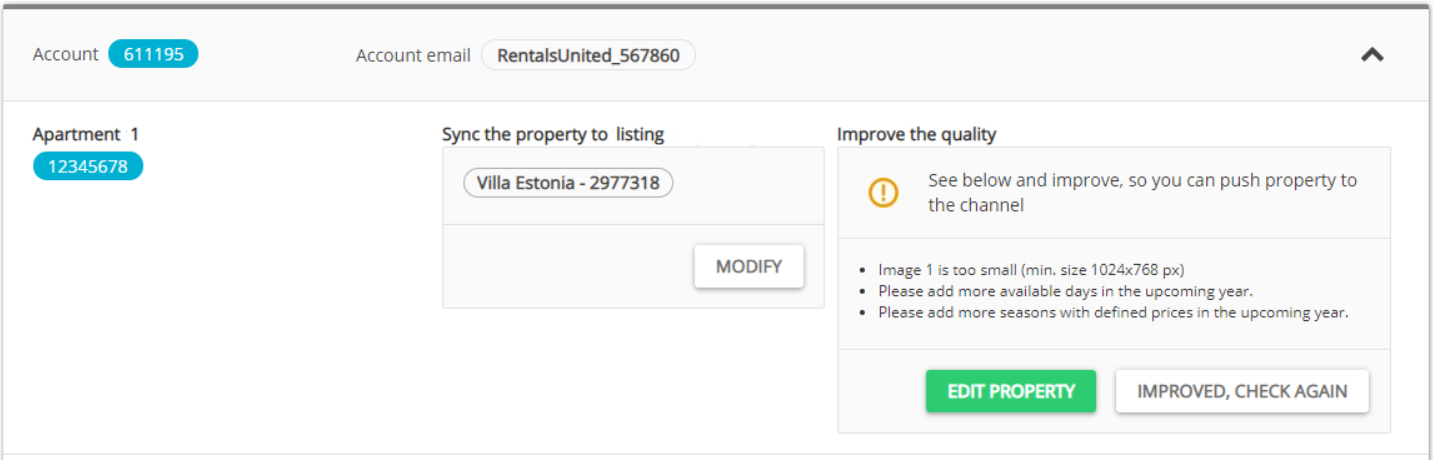
If the property is ready for mapping, move to the next step
If you want to select a different property, click the Modify button.
If you receive the 'Improve Quality' error, click Edit Property to complete or correct the data
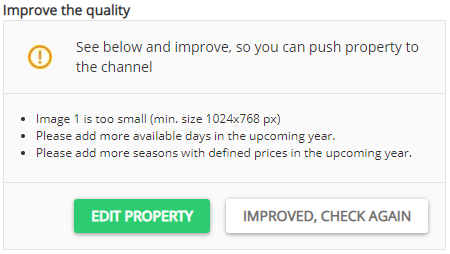
Correct the content indicated in the report in the Edit property page and Save.
Once the data is updated, return to the Property List and click the 'Improved, check again' button.
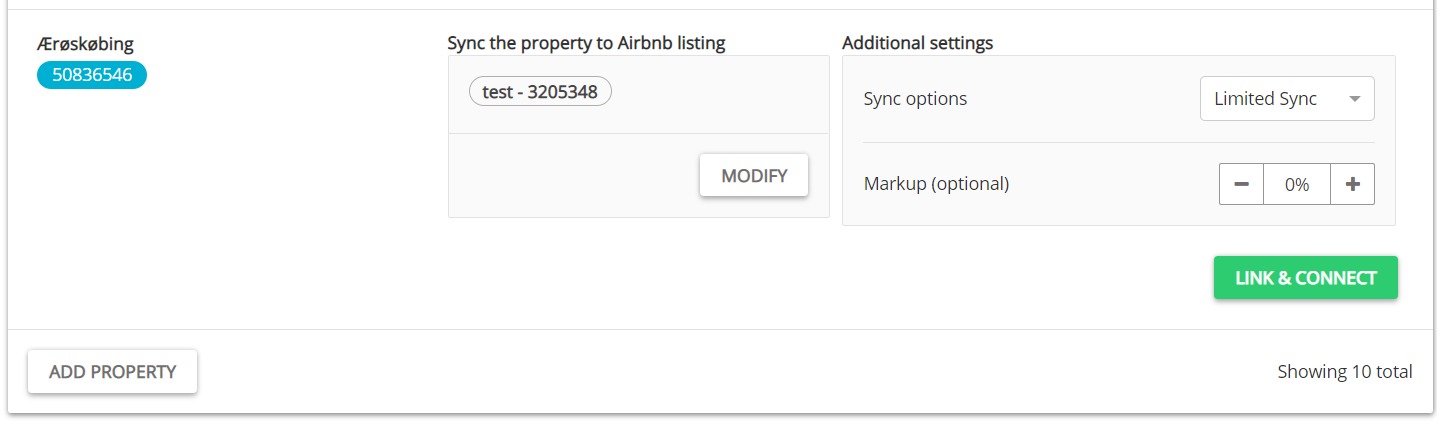
Choose whether you want to sync 'Everything' or 'Limited' data from the dropdown. Review the differences between these synchronisation types in the following before proceeding.
Limited Sync: Synchronises availability (including minimum stays and changeovers) and pricing (including fees, taxes, and extra guest charges).
Sync Everything: Provides full synchronisation of all availability, pricing, and property descriptive content. Note: This option will override any existing information in your Airbnb dashboard with the data from Zeevou.
If needed, adjust the mark-up value to increase your default prices on Airbnb.
Click Link&Connect to complete the mapping process.
Note 1: Connecting your listing may take a few moments. Published properties will initially show a "Pending" status while the channel reviews them. Once the review is complete, your listings will become available on Airbnb almost instantly, and the status will automatically update from "Pending" to "Active."
Note 2: All listings connected as Limited Sync will stay as Limited Sync, however the synchronisation category in Airbnb will always be Sync Everything.
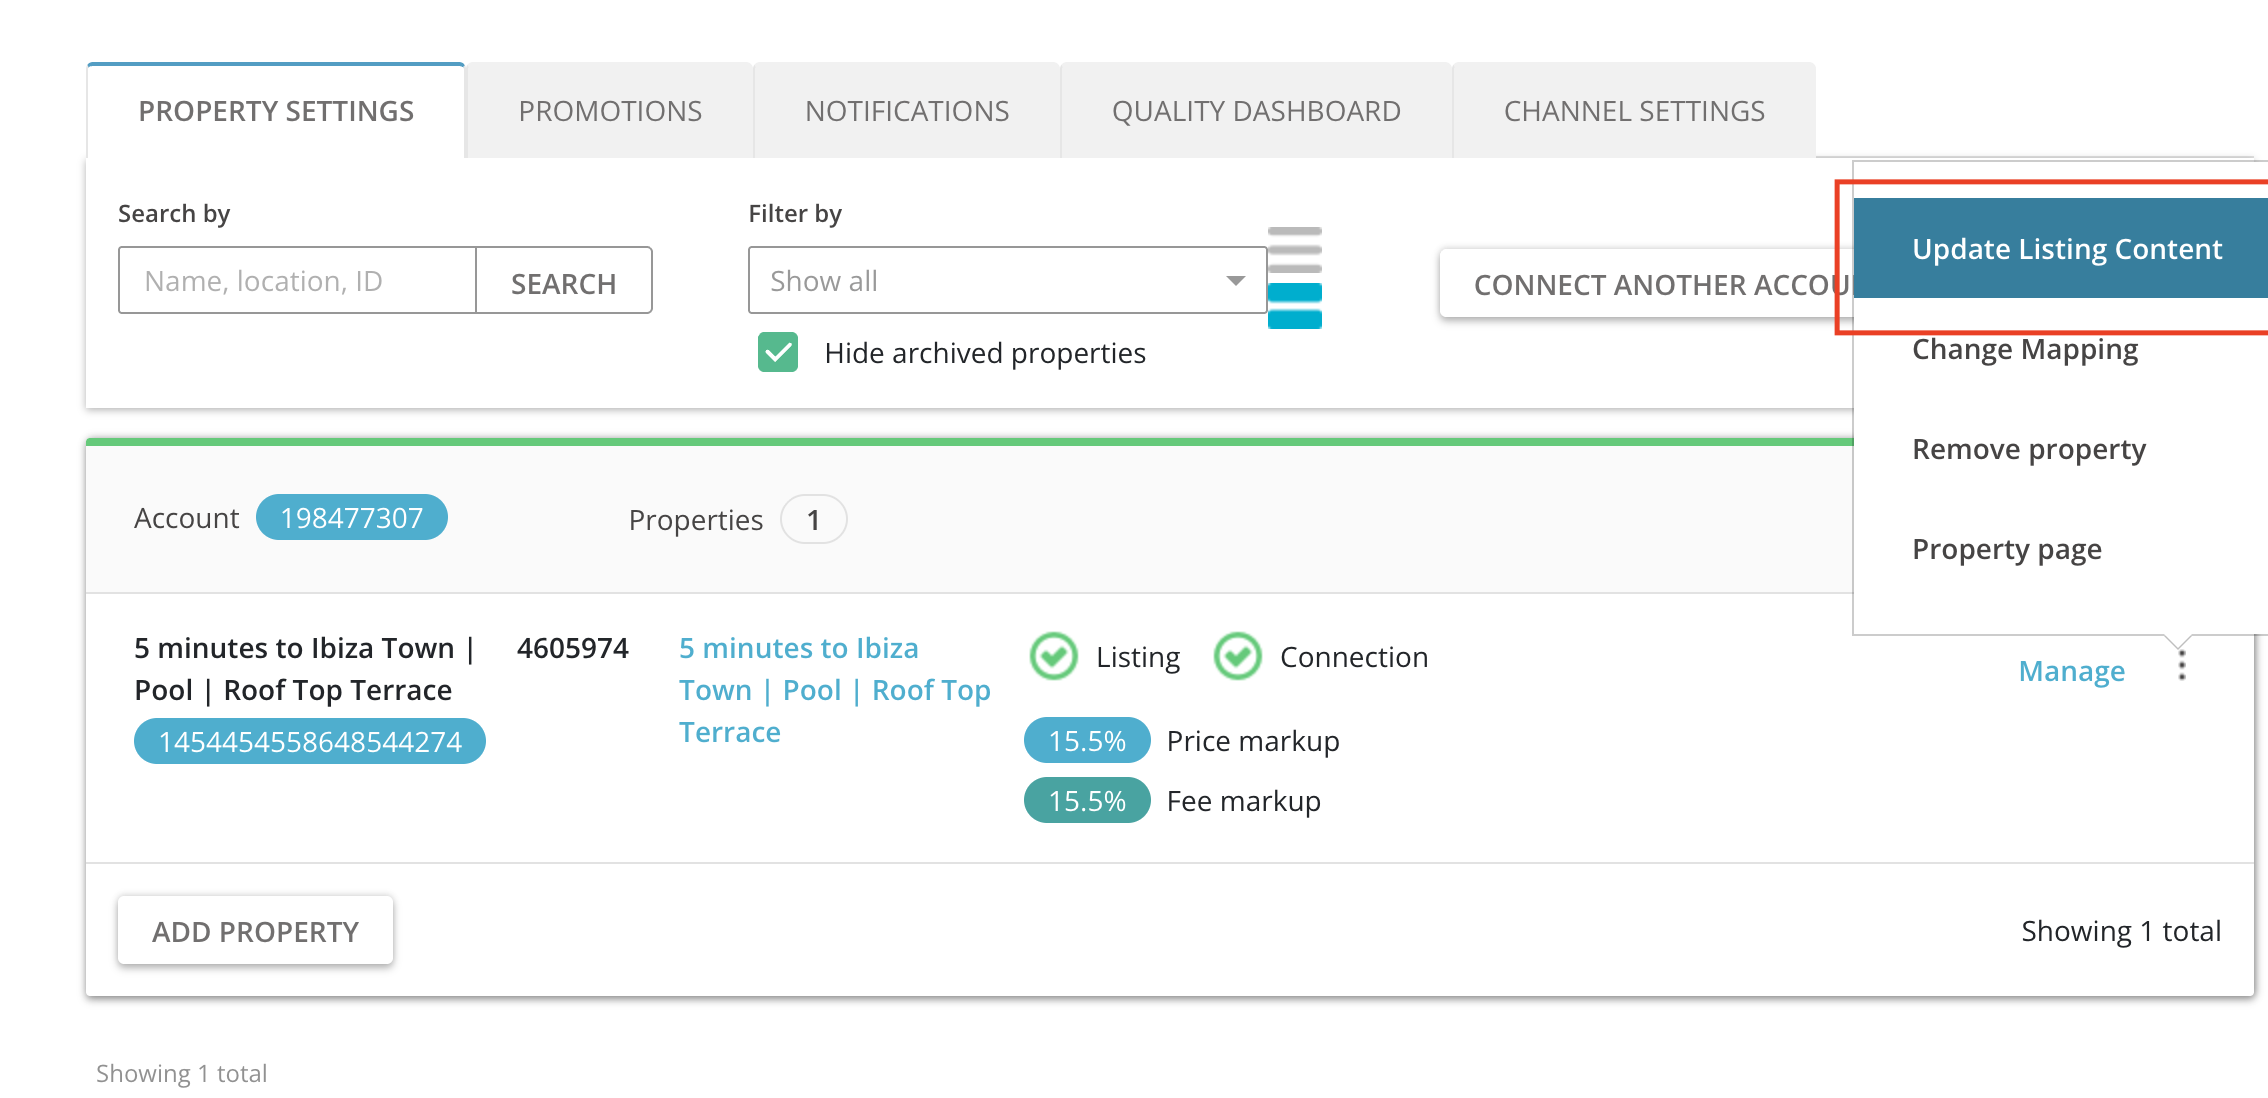
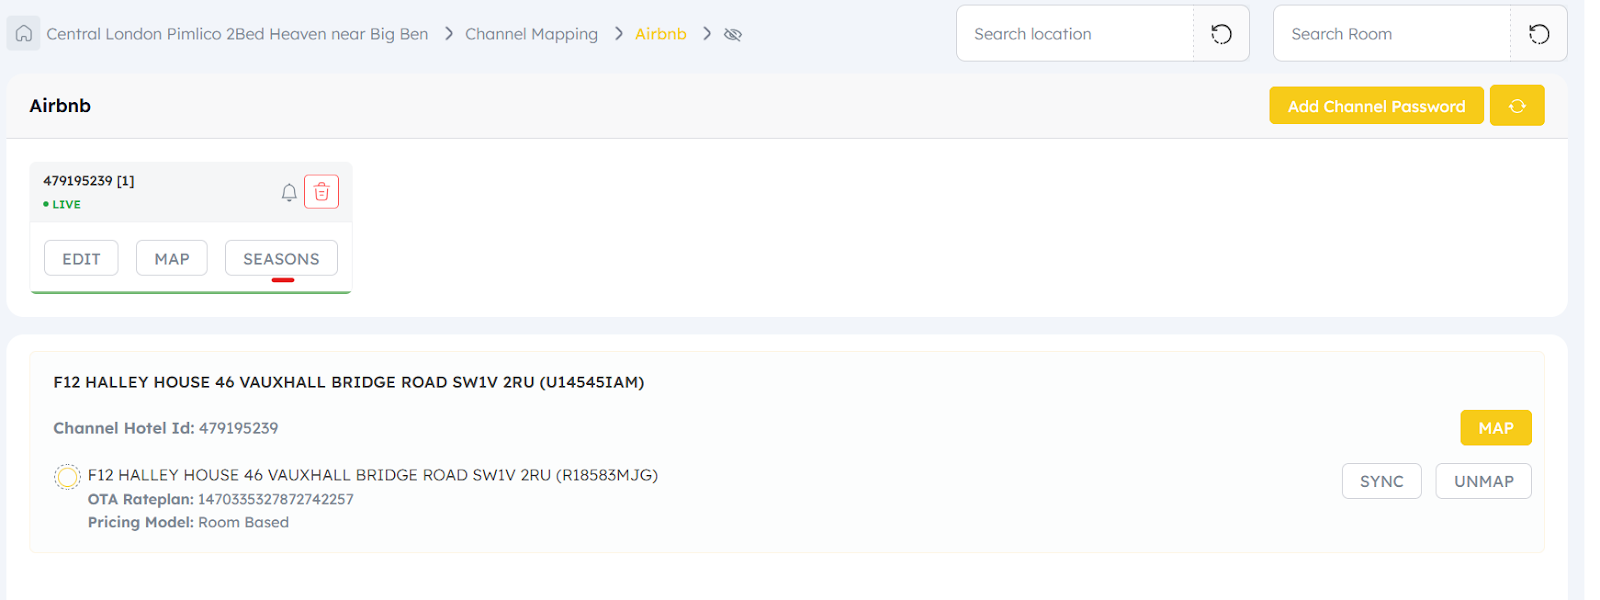
Note 3: You can always change the mapped property. To do this, click the three-dot menu and select the Change mapping option.
Note 4: If you need to edit the number of guests included in price after mapping a listing, you require a full content push to Airbnb after applying the changes. To do so, make the changes to your rate plan in Zeevou, then go to Listings → Manage Channels → Content Sync Update.
Now, your property is connected. To review and manage your property connection settings, click Manage.
Under Advanced Settings, you can adjust the Number of people included in the price, then click Save Changes.
Airbnb bookings are not imported into Zeevou automatically. Once all listings for a specific account are connected, you need to either import them manually or create them manually in Zeevou.This is a one-time action to sync bookings created before the mapping was completed.
Note that only future bookings with a check-in date from tomorrow onwards will be imported.
Bookings are imported at the account level. This means the system will import bookings for all mapped listings within that specific account. If you have multiple Airbnb accounts, you must repeat this process for each one individually. Please make sure all listings for the account are fully connected before starting the import.
Note: Past guest messages for these bookings will not be imported and will not appear in the Zeevou Unified Inbox.
How to Import Existing Bookings:
To start the booking import, click the three dots on the right side of the connected listing and select Import Airbnb Bookings.
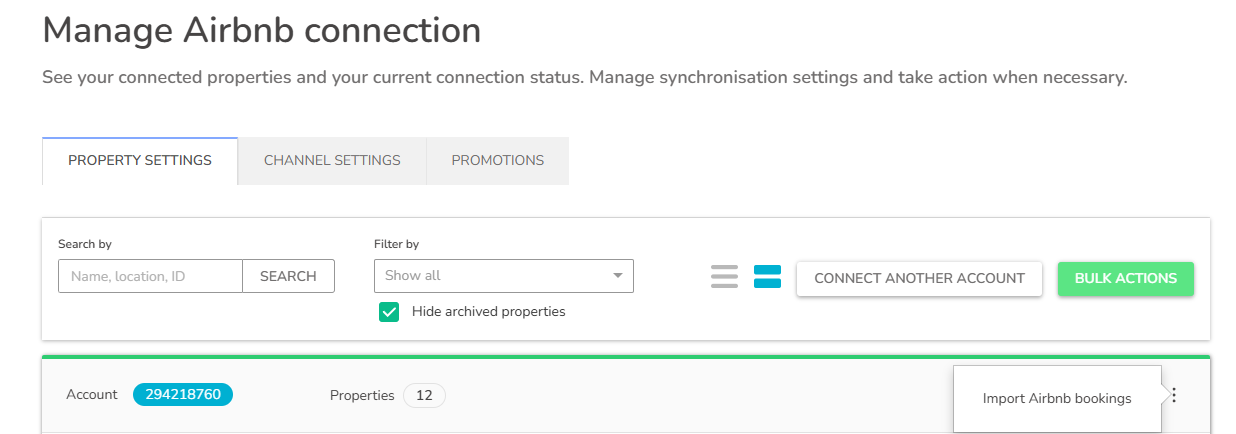
On the next screen, click Proceed and Import. The import process will begin; please do not exit the page until it is finished. It may take some time, depending on your total number of Airbnb bookings. The page will reload once the import is successful. If the process fails, try again. If the error persists, please contact [email protected].
To map the properties that are not yet listed on Airbnb, follow the below steps:
Click No. (in response to the question: Does this property already published on Airbnb?)
Click Add Property button.
Select the property from the dropdown menu and click Continue.
Then, under Additional Settings, you can add Markup and Sync Options
click Link & Connect.
Note that under Sync Options, you should select either of these options:
Limited Sync: push only rates and availability not the content.
Sync everything: push picture, description, etc from Zeevou to Airbnb plus rate.
How it works:
Tick Attestation, then click Save & Next.
Airbnb Minimum stay: It is recommended to select Keep my regular minimum stay to manage min stay from Zeevou directly
Automatic listing content update.
Airbnb cancellation policy : Select your desired one.
Default channel markup: Keep it as zero, it is better to increase it via listing's mapping page.
Further Instructions: Click on Yes and then Connect.
Note:
To set a Preparation Time Before Arrival (booking lead time), click the Manage button next to the connected listing, scroll to the bottom of the page, and select a minimum booking notice from the drop-down menu.
Before connecting your Airbnb account, make sure to remove the Preparation Time field on Airbnb. Once the connection is established, you won’t be able to modify this setting on your own.
Test Your listing Connection
Block a Date on your Zeevou calendar and make sure it reflects on Airbnb. If pushing correctly, remove the block.
Increase the price slightly for one night on Zeevou and make sure it reflects on Booking.com. If pushing correctly, reset the price to what you would like it to be.
Re-Activate Instant Booking on Airbnb
Click Listings and then click the listing you want to change
Click Booking settings, and switch Instant Book on
If you turn Instant Book on, select your guest requirements
Click Save
Fee Mark-up Activation
To apply or edit a fee mark-up to certain listings or set different values per listing, you can use the following option on the Listing Mapping page:
Update Listing Content:
* Go to Update Listing Content
* Tick Fees & Taxes mark-up
* Add the required percentage
* Click Save
Please note that this must be applied individually per property.
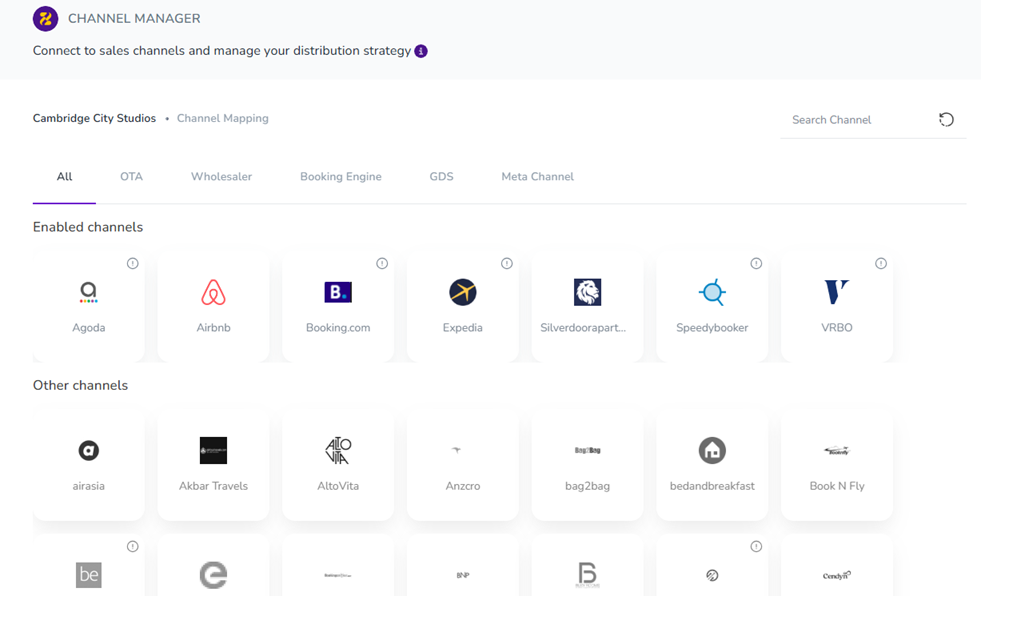
Connecting your Airbnb listings to Zeevou is done entirely from the Channel Mapping section in your Channel Manager. This guide walks you through how to integrate Airbnb using the Type B connection process, how to map rooms and rate plans, and how to ensure everything is synced correctly.
Please note: You can create new listings through the connectivity provider on your Airbnb account once your host account is set up with Airbnb and the connection with Zeevou is established.
Open your desired Listing in Zeevou.
Click Manage Channels.
Choose Airbnb from the channel list and click it.
To initiate the connection:
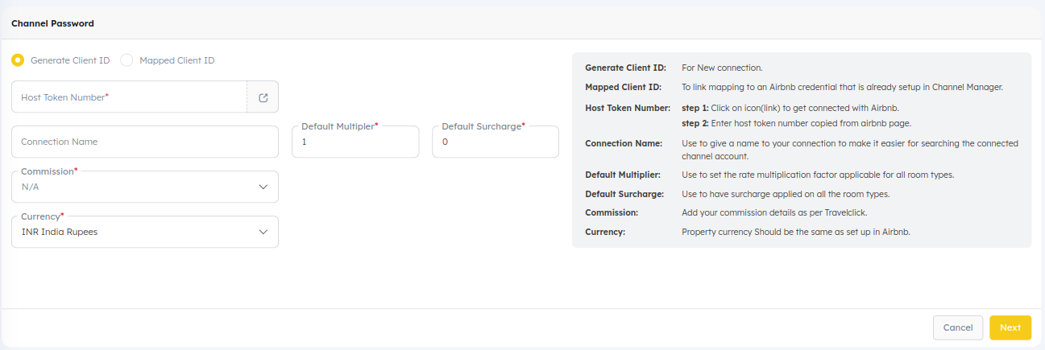
Click Generate Client ID if this is your first time connecting to Airbnb.
To get the Host Token ID, click the arrow to the right of Host Token ID
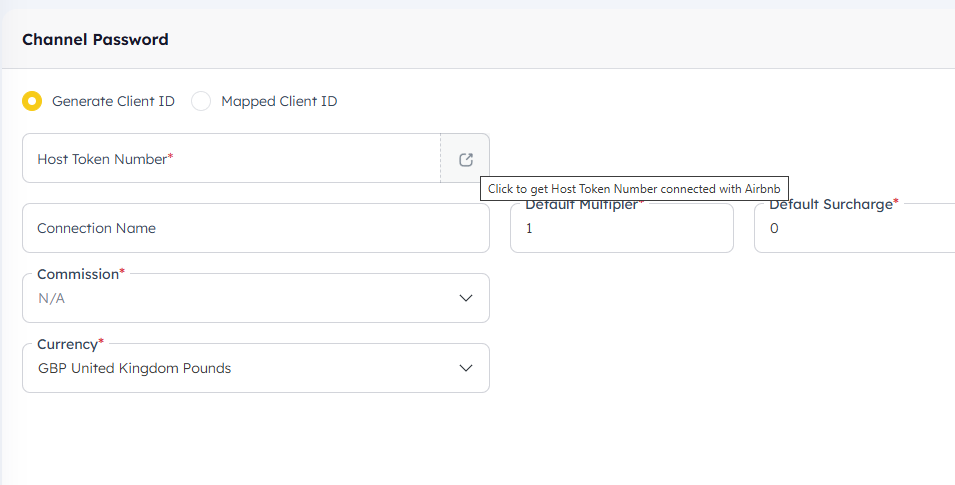
You will be redirected to the Airbnb login page.
Log in using your main host credentials.
You’ll be taken to an authorization screen.
Scroll down, check “I agree”, Click on Allow to approve the connection. After that Host token number will be generated.
Copy the Host token Number and return to Zeevou’s Airbnb mapping page.
Paste the Host Token Number into the field provided and proceed.
Choose your Currency and click Next.
If you’ve already connected your first listing, use the Mapped Client ID instead of Generate Client ID and select the corresponding Property ID and Airbnb Account ID."Then, click Next.
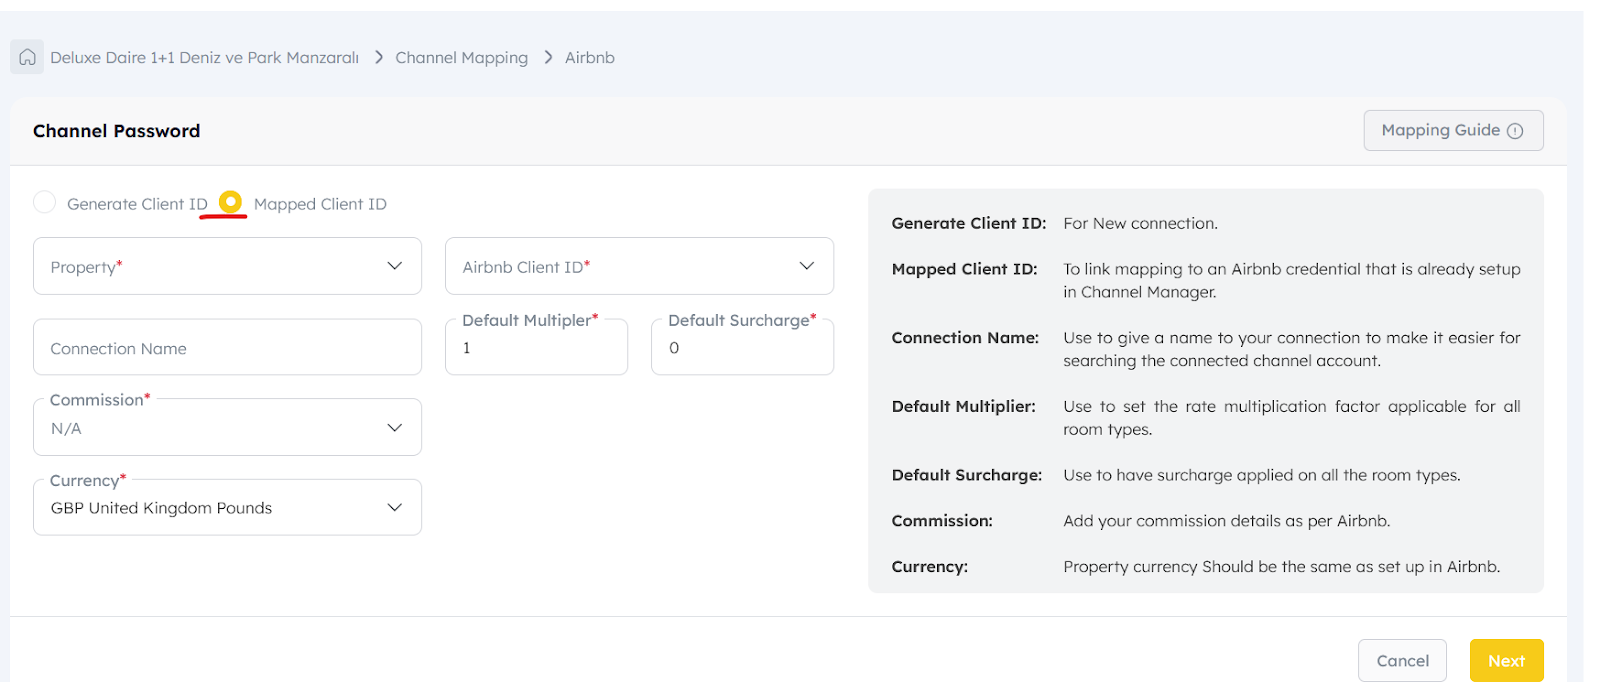
Important: For multiple listings on the same Airbnb account, reuse the same Mapped Client ID to avoid duplication.
Note 1: It only relates to the authorisation step and will not map the listing to the shown Airbnb one.
Note 2: The Mark-up / Mark-down Commission (found in the Commission dropdown) is applied only within Zeevou. It increases or decreases the booking total amount internally after a reservation is created. (It does not affect the rates the guests see)
Because this adjustment happens only in Zeevou, the booking total in Zeevou may differ from the total shown on the channel. Zeevou recalculates the price for internal records, but this adjusted amount is not sent back to the channel, which can result in a pricing mismatch between the two systems.
After authentication, Zeevou will retrieve your Airbnb listings for mapping.
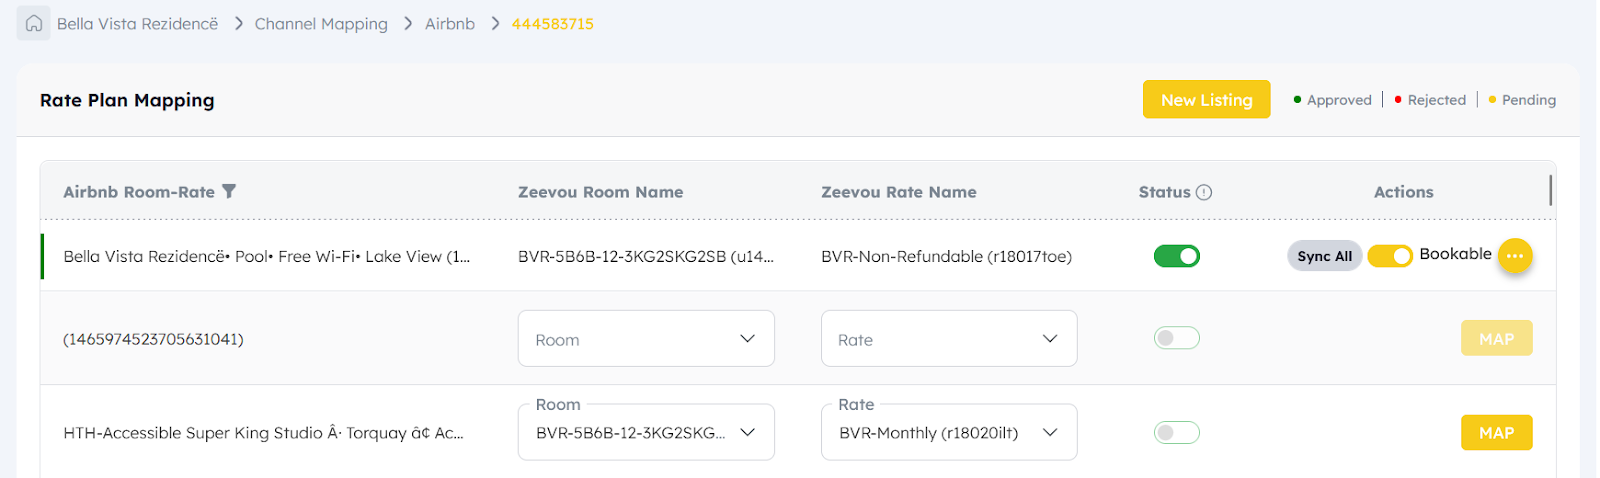
The list of Airbnb Room-Rate (Airbnb Listing name and ID).
Zeevou Room Name (Unit Type) & Zeevou Rate Name (Rate Plan)
For each room/unit type:
Select the corresponding Room Name and Rate Name.
Click Map to open the configuration popup.
In the mapping popup, configure:
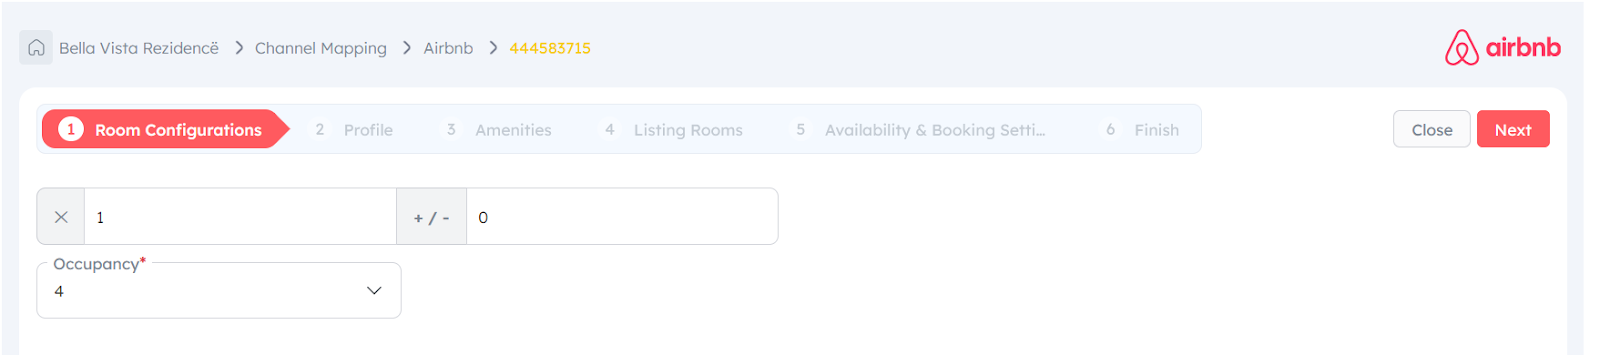
1. Room Configurations:
Multiplier –if you would like to keep one rate plan for all channels in Zeevou and increase or decrease your rate on a specific channel like Airbnb, you can adjust the markup percentage using this option (e.g., 1.10 adds 10%)
Surcharge – fixed value to be added to the rate (e.g., +5)
Occupancy – Select Applicable No of Guest included in your rate.
At the end of this stage, you will be asked if you would like to edit the content of your listing now. If you only want to map the listing, select “No” and click “Save”.
After a few mintues your Airbnb listing has been successfully mapped with the existing content on Airbnb, and your rate and availability data have been synced. You can edit the mapped listing later to update any listing information
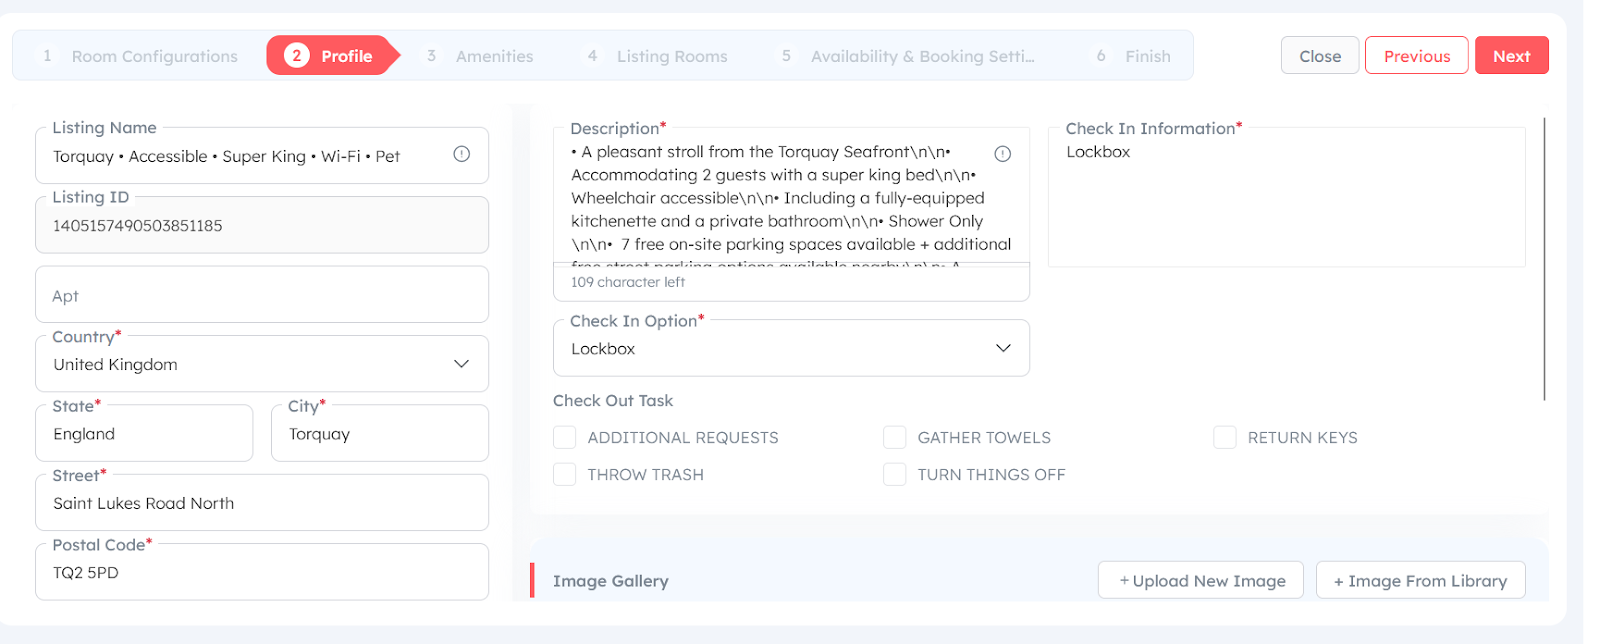
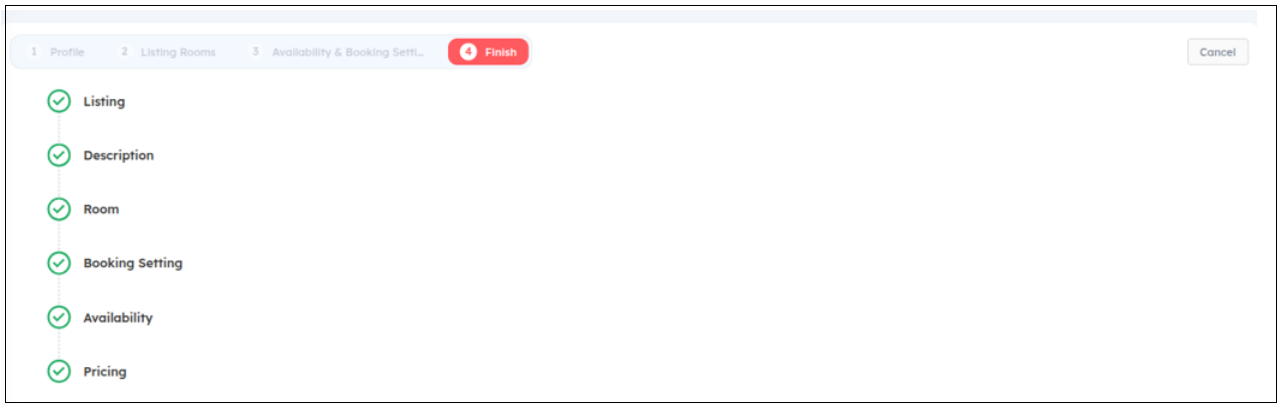
2. Profile
To complete mapping, Airbnb requires certain content standards. Make sure your listing has:
A headline (minimum 8 characters)
A description (minimum 50 characters)
At least 7 high-quality images (JPEG, min 800×500 pixels)
You need to fix all errors for Starred Sections(*).
No watermarks, logos, or text overlays on images are allowed for pictures.
Then click Next.
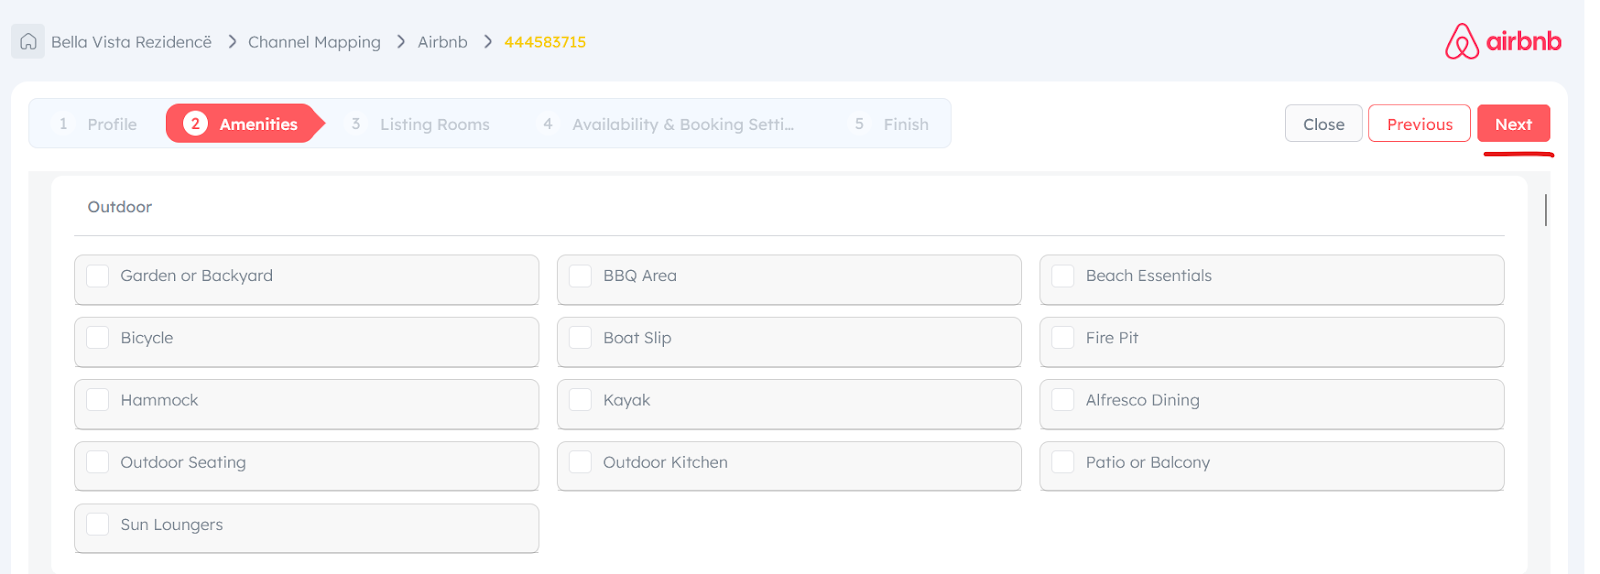
3. Amenities:
It should include at least 5 amenities. Then click Next.
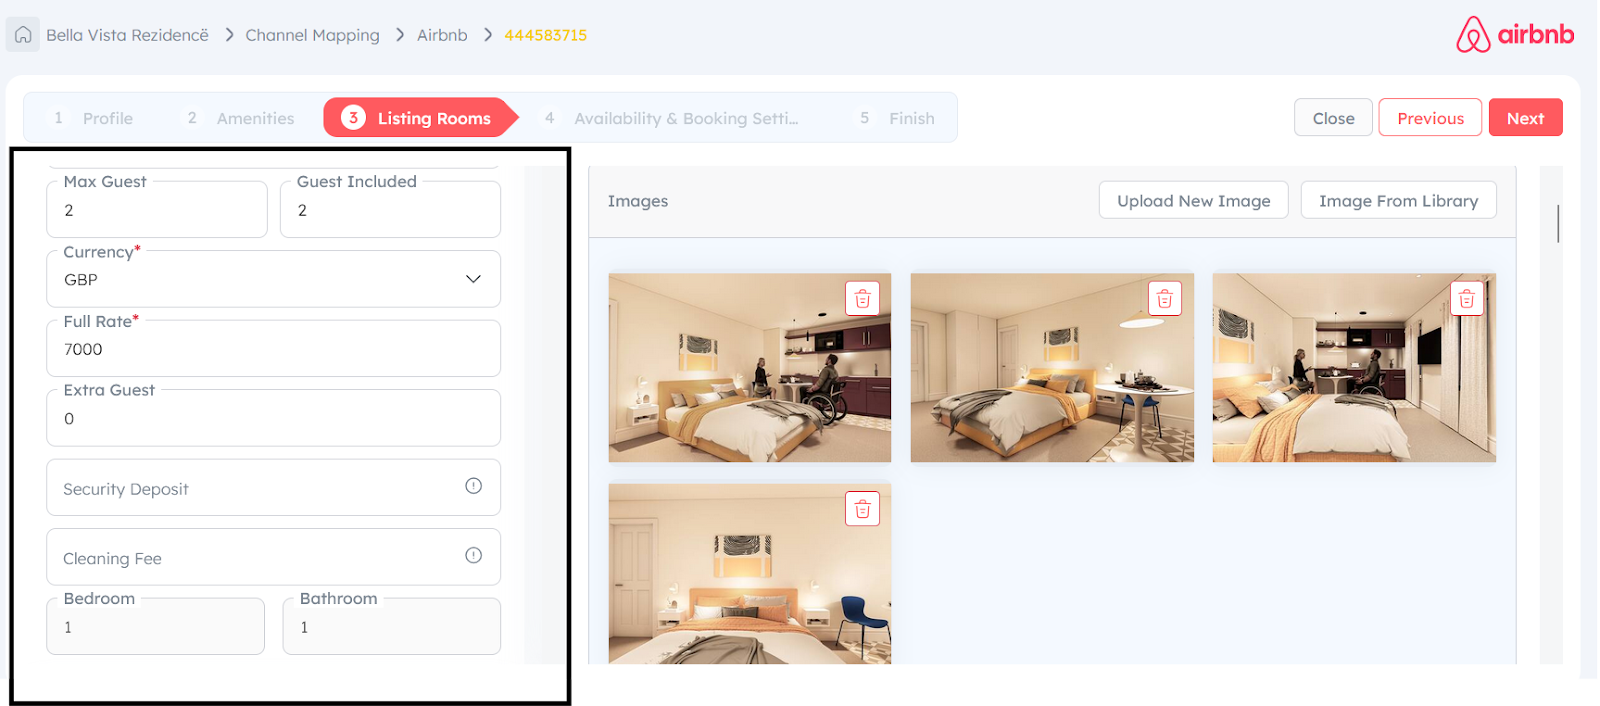
4. Listing Rooms:
You need to fix all errors for Starred Sections (*).
Make sure you have the right value for guests and fees here.
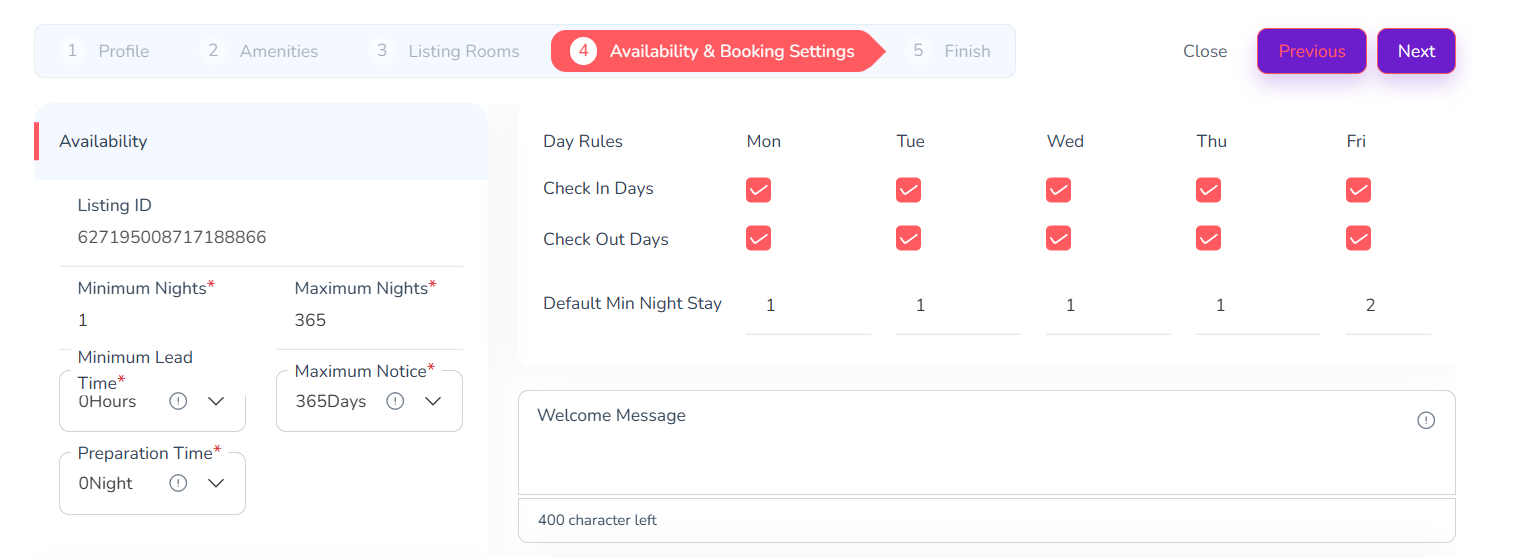
5. Availability & Booking Settings
You need to revise values for Availability, Booking Rules, Permitted, Day Rules here.
Note that you must select a valid Maximum Notice period from the restriction settings before saving changes.
Do not close your browser until all setup steps are green.
If you tried to push listing from channel manager, meaning create listing from Zeevou side, then it will need step 5 for confirmation.
After submission, Airbnb will review your listing.
Status will show as “Ready for Review” in Zeevou.
Airbnb may take 1–3 business days to approve.
Until approval, the listing is not visible or bookable on Airbnb.
Once approved, the sync status changes to Active in the Airbnb extranet.

Final Tips
You should map all existing Room types in Zeevou with corresponding Airbnb Listings.
For listings under the same Airbnb account, reuse the existing token (Mapped Client ID).
You can generate a new token ID, if you wish to map a listing under another airbnb host account.
Zeevou lets you manage Rates & availability, images, content, amenties and restrictions across Airbnb through the channel manager.
Test Your Connection
Block a Date on Zeevou and make sure it reflects on Booking.com. If pushing correctly, remove the block.
Increase the price slightly for one night on Zeevou and make sure it reflects on Booking.com. If pushing correctly, reset the price to what you would like it to be.
Re-Activate Instant Booking on Airbnb
Click Listings and then click the listing you want to change
Click Booking settings, and switch Instant Book on
If you turn Instant Book on, select your guest requirements
Click Save
Airbnb promotions—such as seasonal discounts, early bird rates, and last-minute offers—can be configured directly in Zeevou using the Season Adjustment feature. Once your Airbnb listing is connected, you can manage these discounts entirely through the Channel Mapping module in your Channel Manager.
This guide walks you through how to add, edit, and manage Airbnb promotions (Seasons) step-by-step.
What Is the Airbnb Season Adjustment Feature?
Once your Airbnb property is API-connected, Airbnb disables its native Smart Pricing feature. Instead, Zeevou allows you to:
Create custom promotional seasons
Apply length of stay, early bird, and last-minute discounts
Push changes directly to Airbnb calendars via the channel integration
Where to Find It:
Locate on your desired Listing in Zeevou.
Click Manage Channels.
Click the Map button in front of Airbnb.
Click Seasons under your Airbnb account ID.
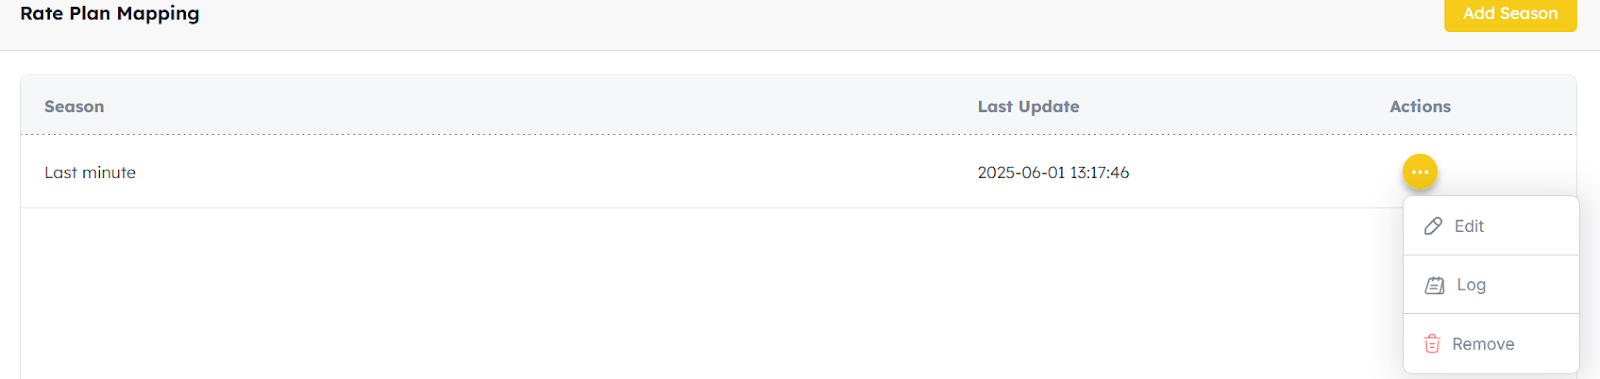
List of all current promotions will appear. You can edit the existing one or add a new season.
How to Add a New Airbnb Season:
Click Seasons > Add Season.
A form titled Add/Edit Season will appear.
Under Airbnb Season Adjustment, the main Season type settings, fill out following information:
Season Name – Give your promotion a recognizable name (e.g., Summer Sale).
Listing(s) for Seasons – Choose one or more connected Airbnb listings to apply the promotion to.
Colour Code – Choose a color to represent the season on your Airbnb calendar.
Airbnb Season Adjustment: Surcharge / Discount.
Amount: A discount or surcharge amount over your base rate.
Select: Percentage icon
Date Range – Define the valid period of the promotion. You can add multiple date ranges.

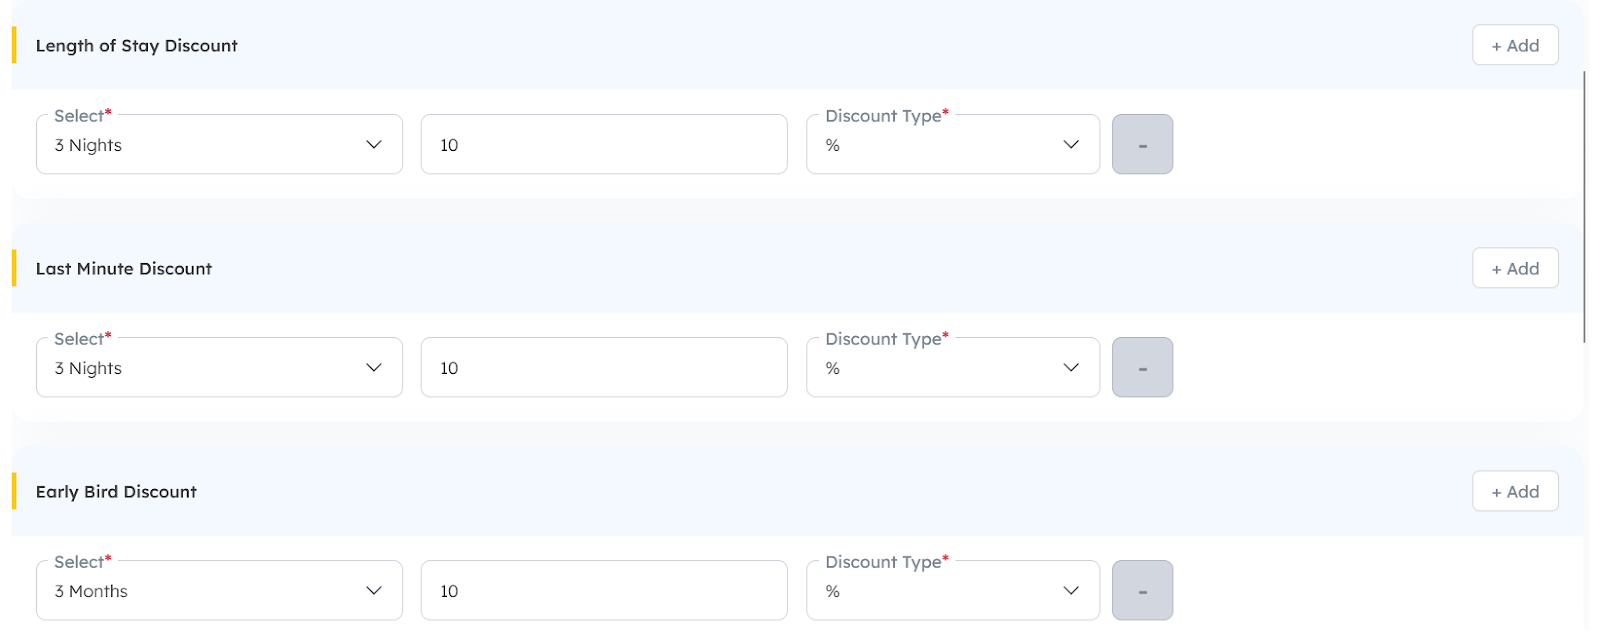
Additional Types of Promotional Rules:
You can apply one or more of the following discount/surcharge rules:
Length of Stay Discount
Discount based on a minimum number of nights booked.
Last Minute Discount
Discount applied when a booking is made shortly before the check-in date.
Early Bird Discount
Discount applied when a booking is made well in advance of check-in date.
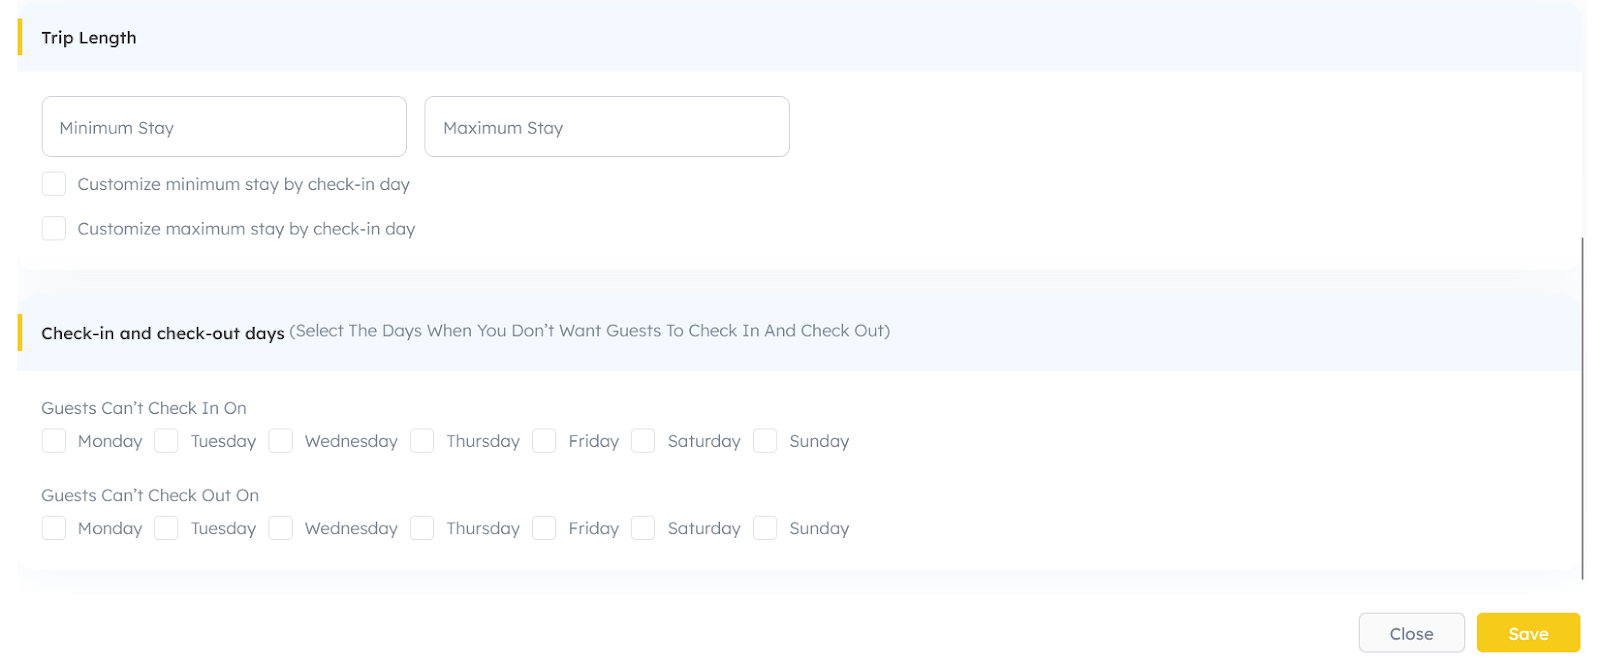
Trip Length:
Minimum/Maximum number of nights to stay
Check-in and check-out days: Select the days when you don’t want guests to check in and check out.
You can stack multiple rules (e.g., Early Bird + Length of Stay) for the same date range. Airbnb will automatically apply the combined effect.
Saving and Syncing
Once all fields and rules are set, click Save button.
Zeevou will send the season and associated rules to Airbnb.
The applied dates will appear in the Airbnb Extranet Calendar, color-coded based on your selection.
Note that all listings linked to the same Airbnb account will show under the Season Settings panel and you can assign the created season.
Editing or Removing a Season
To edit:
Locate on your desired Listing in Zeevou.
Click Manage Channels.
Click Map button in front of Airbnb.
Click Seasons under your Airbnb account ID.
Click Edit next to the desired season name.
Make changes and Save.
To Remove:
Click the Remove icon next to the season.
The season will be removed from all affected listings.
How Airbnb Applies Overlapping Seasons
If multiple promotions overlap, Airbnb applies the rule with the latest update to that date range.
Example:
Promotion A: April 1–30 (10% discount)
Promotion B: April 15–May 15 (20% discount)
On April 20, Promotion B’s discount will apply (as it was created/updated last).
If rules overlap (e.g., Early Bird + Last Minute), Airbnb will apply both if the booking meets all conditions.
How to View Promotions in Airbnb
Log in to Airbnb Extranet > Calendar.
Dates with active promotions will be color-coded. (if not showing, turn on Rule-sets from Layers menu)
Click a date to see the exact rule(s) applied.
Guests will see the final discounted prices based on all applicable discounts when booking.
Final Tips
Always review the Airbnb calendar to confirm promotions have synced.
Avoid overlapping seasons with conflicting discount types unless intentional.
Use clear naming and color coding to keep track of active promotions.
For Connection Type A,existing Airbnb bookings are not imported automatically into Zeevou during the initial connection. To sync bookings that already exist, you only need to import them or add them manually once. After that, all new Airbnb bookings will be imported automatically.
For Connection Type B, Airbnb bookings usually sync instantly to Zeevou. However, in some cases, the process may take up to a few hours. If a booking is still missing after a few hours, make sure that your Airbnb listing was fully connected to Zeevou at the time the booking was made. If the issue persists, please contact our Support Team for assistance.
