The “Check-in Ready” feature helps streamline the check-in process, ensuring that all necessary steps are completed before a guest arrives. The flexibility to define these conditions ensures that each host can tailor the check-in process to their specific needs.
Common conditions include:
Guest Info is completed
Terms & Conditions is signed
Guest is verified
Payment and Deposit are paid and authorised
Go to the Bookings Dashboard.
Click on the More arrow.
Select Settings.
In the pop-up, choose your brand.
Click on Proceed.
Under Bookings tab, on Check-in Ready card, click on Manage Conditions.
In the open drawer, choose the conditions you wish to be completed for a booking to become ready for check-in (e.g., Guest Info, Terms & Conditions, Guest Verification, Security Deposit, and Payment)
Click on Save.
Under Each Booking: Under the Overview tab, Check-in Ready conditions are shown. Status turns green when all conditions are met.
In the Arrivals List: Go to the Bookings Dashboard and then Arrivals to see the Check-in Ready status.
In the Booking Calendar: The colours of bookings clarify the Check-in Ready status: green (ready), yellow (almost ready), and red (not ready). Hover over a booking to see which items are incomplete.
You can also add Check-in Ready as a condition in Automated Messages:
Click on the gear icon.
Go to Automated Messages.
Click on New Automated Message or open an existing message.
Go to the Condition card and click on Add a Condition.
Select Check-in Ready and click on Add.
Watch this tutorial video on how to configure the Online Check-In Process steps:
Log in to your Zeevou account.
Click on the gear icon in the top right corner.
Select Online Check-In Process.
Step 1: General Info
General: Turn on your desired items to be shown to the guests during confirmation (e.g., Booking Purpose, Arrival/Departure Time).
Person Booking: Enable your desired items regarding the guest personal info and add custom questions.
Click on + Ask a Custom Question to add.
Select or create new questions.
Make questions Optional or Mandatory.
Marketing Consent: Enable and customise text for GDPR compliance.
Toggle Enable/Disable.
Click on Edit to change Opt-in Prompt text.
Select marketing platforms for consent.
Privacy Policy: Include your privacy policy for guests.
Step 2: Guest Info
Note: You can fill this the same as you did for the Person Booking section. If the Lead Guest and Person Booking are one person, the system will sum up the fields related to both. Otherwise, related fields will be shown for each.
Enable sections for Lead Guest Info and Additional Guests (ADULTS and CHILDREN).
Note that the Guest Info will appear as incomplete if additional guest information is marked as Mandatory in the online check-in process.
Add custom questions as needed.
Note: Disabled sections are hidden from guests.
Step 3: Terms & Conditions
Enable the Terms and Conditions toggle.
Specify which bookings should this Terms & Conditions be required for.
Click on Revise this Terms & Conditions to edit it.
Step 4: Upsells & Payment
Upsells: Upsell lists will be based on each Listing’s settings.
Payment Note: Edit the Payment Note shown to guests.
Step 5: Security Deposit
Security Deposit Note: Edit Security Deposit Note for guests.
Please note that this step will be shown only if the booking has a Security Deposit amount other than 0.
Step 6: Success Page
Edit the Success Page text shown after booking completion.
Profile View: Click on Lead Guest or Person Booking Name to view/edit their profile and custom question responses.
Custom Questions: Add hints, edit or remove questions anytime.
Marketing Consent: Inform guests of promotions and discounts.
To get the online check-in link, open the booking. You will see 3–5 cards showing the steps the guest needs to complete for check-in. If any step is incomplete, a link icon will appear on the corresponding card. Click the icon to copy the link.
Alternatively, you can go to the Manage Booking button in the top-right corner, select Copy Links from the dropdown, and choose the relevant link.
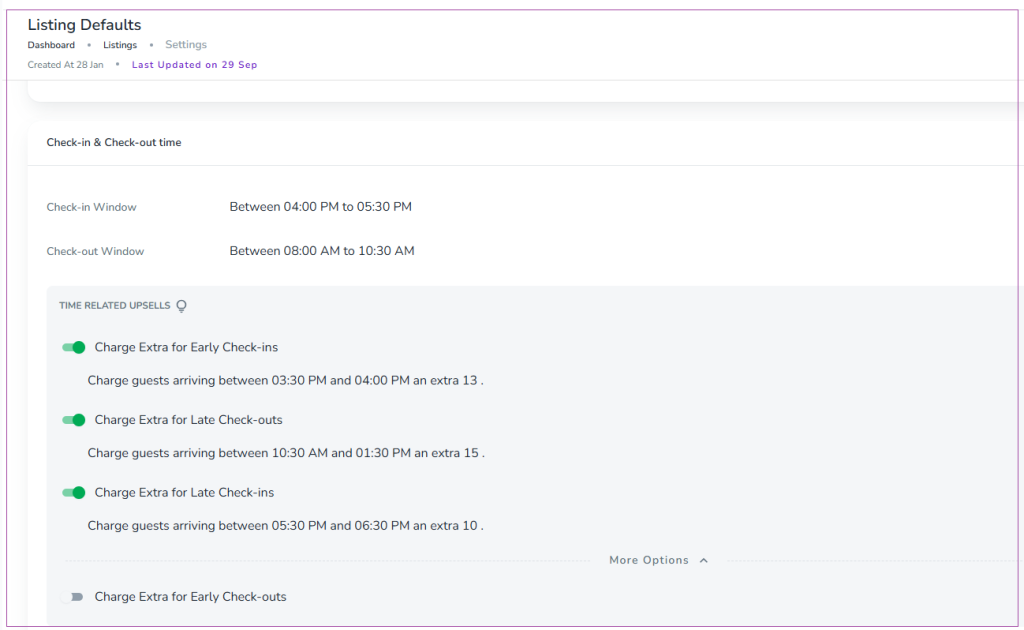
To do so, log into app.zeevou.com and go to Listings. On the Listings Dashboard, click on the More arrow and select Set Listings defaults. Then, you will be redirected to the Settings page. On the Check-in & Check-out time card, you can manage options for check-ins and check-outs by clicking on the pencil and setting your desired time. You can also turn on or off the toggles of Charge for Extra Early or Late Check-in or Check-outs. So, when the guests select their desired Check-in and Check-out times in the Booking Confirmation Process, they will be able to see the fees for paid time slots and select them.
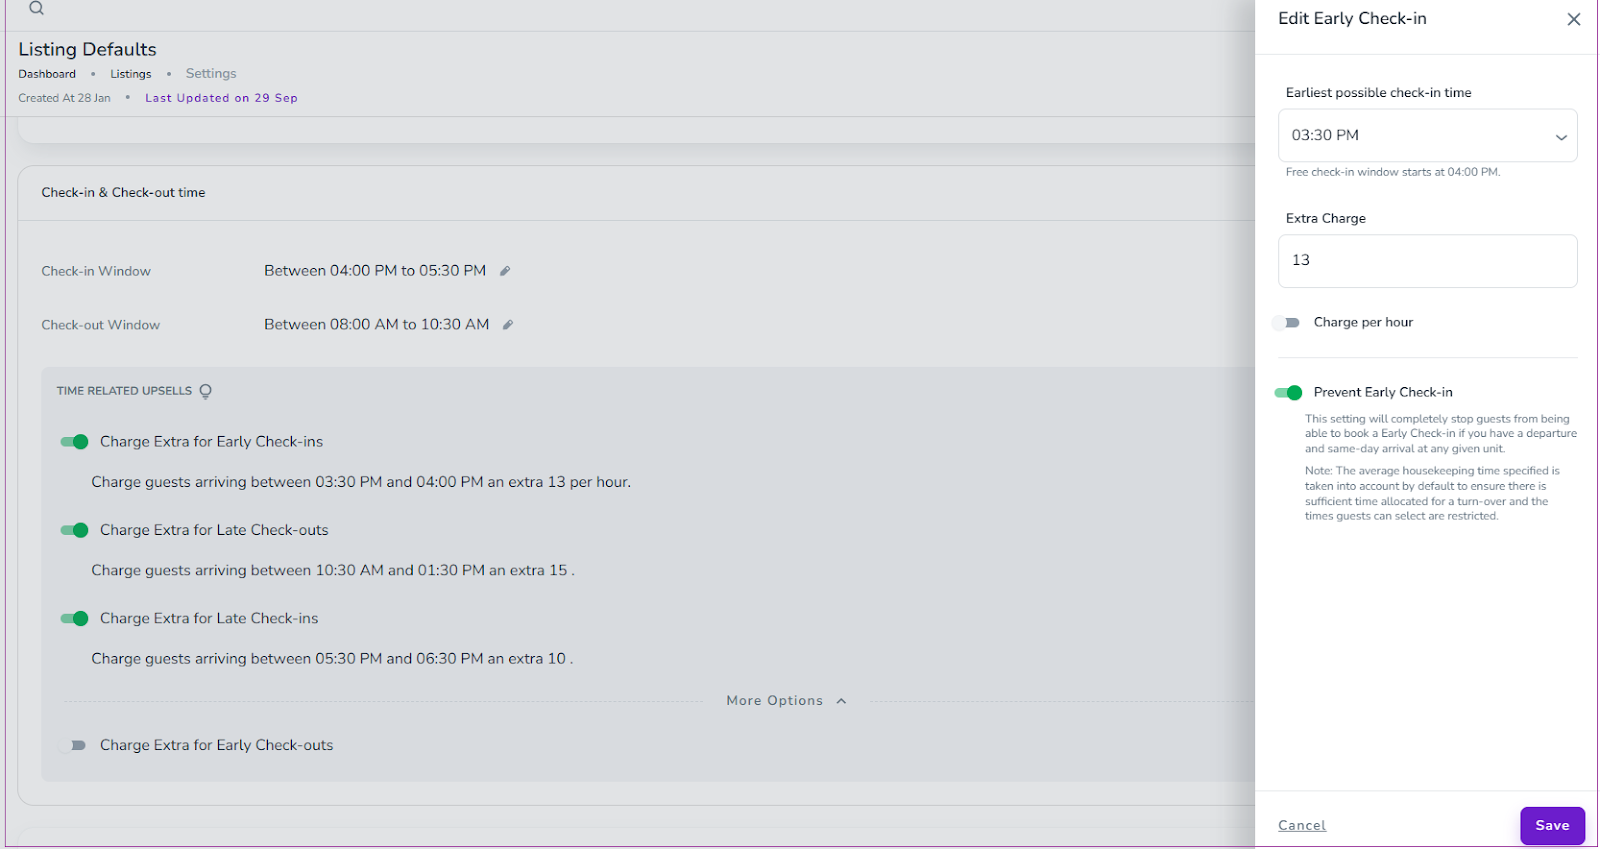
To prevent Early Check-in or Late Check-out, you can click on the pencil in front of the toggle of Charge Extra for Early Check-in or Late Check-outs. Then, a drawer opens in which you can turn on the toggle of Prevent Early Check-in and click on Save. This setting will completely stop guests from being able to book an Early Check-in or a Late Check-out if you have a departure and same-day arrival at any given unit.
Note: The average housekeeping time specified is taken into account by default to ensure there is sufficient time allocated for a turn-over and the times guests can select are restricted.
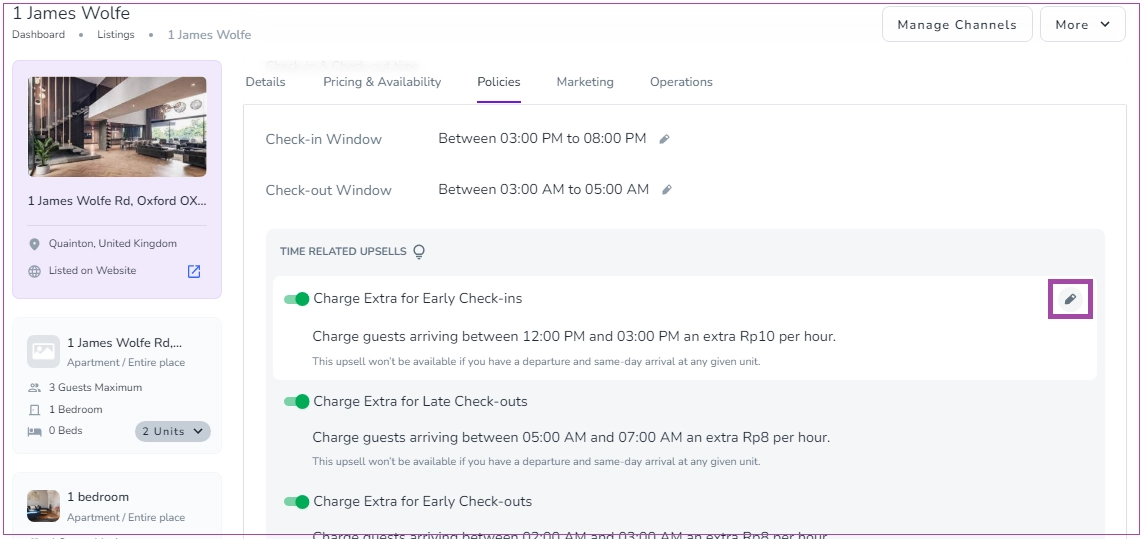
However, you can override the default in the Property level. To do so, navigate to Listings, Property level, under Policies tab, on the Check-in & Check-out time card and click on the pencil to edit.
Note that when Prevent Early Check-ins is enabled and a booking’s departure date coincides with the arrival date of the next booking, the system does not return the standard earliest possible check-in time; instead, it calculates the earliest free check-in time, ensuring that this time does not conflict with the previous booking’s departure plus the configured housekeeping duration.
Ensuring Deliverability of Messages through Booking.com/Pulse API
You can go through specific settings in Booking.com to prevent removing the links sent to the guest by the channel. This setting allows you to specify which email addresses you use to communicate with your guests, and which can be shared with your guests via BDC messaging platform. Any messages sent from unregistered email addresses will not reach your guests.
Here’s the link that guides you how to specify email addresses that can reach your guests: https://partner.booking.com/en-us/help/legal-security/security/all-about-our-messaging-security-settings
Note that you can find your domain in Zeevou by going to Marketing -> General Settings -> Site Management tab -> Domain Setting card.
Discover the easy steps guests go through when booking via Airbnb and completing the online check-in process. Watch this demo video to understand the process. Save time and gain confidence in your Airbnb experience. Follow our guide and answer the questions provided. Ensure a smooth process by filling in the required fields. Find out more about General Info, Guest Info, Payment, and Security Deposit. Start your hassle-free booking journey now.
