Setting up invoicing and payment collection ensures your guests know what they need to pay, how they can pay, and when payment is due. You can choose your payment methods, connect a payment gateway for online card payments, and customise the invoices guests receive.
There are three different concepts to keep in mind:
Payment method — how your guest pays you, such as by card or bank transfer.
Payment gateway — the service that processes online card payments, such as Stripe, PayPal, or Opayo.
Payout method — how funds collected through the relevant booking source are handled and paid out to you.
Understanding the difference makes it easier to choose the right settings for your business.
Online payments make it easier for guests to complete their bookings and reduce the amount of payment administration you need to handle manually.
With online payments, you can:
Collect payment during the booking journey
Reduce manual payment follow-ups
Give guests a smoother booking experience
Confirm bookings when the required payment has been received
Offer guests a convenient way to pay online
If you do not collect payments online, you may need to provide guests with payment instructions and follow up with them manually before receiving payment.
There are three main steps to setting up online payments in Zeevou:
Choose your payment method
Connect a payment gateway
Enable the gateway for that payment method
You can then customise your invoices and configure additional payment options.
Zeevou allows you to configure the payment methods available to your guests:
Click on the Gear Icon in the top-right corner.
Select Settings.
Select your Brand, then navigate to the Finance tab.
Scroll down to Payment Methods.
Select your preferred payment method.
Card payments
Enable Card Payment if you want guests to pay online by card.
A payment gateway must be connected before card payments can be processed.
Depending on your setup, you can connect:
Bank transfer
Enable Bank Transfer if you want to allow guests to pay by bank transfer.
When bank transfer is enabled, you can display your bank account information on the guest invoice so that guests know where to send their payment.
You can configure your bank account information as part of your invoice settings.
A payment gateway processes online card payments between Zeevou and your payment provider. Zeevou currently supports the following gateways:
Gateway | Best For | Key Benefit | Monthly Fees | Suitable if | What you need |
Most property managers globally | Easy 15-minute setup, 135+ currencies, automatic payouts | None - pay per transaction only | You are setting up online payments without an existing gateway | A Stripe account | |
Properties with international guests | Guests trust PayPal, familiar checkout, buyer protection | None - pay per transaction only | You want to accept payments through PayPal | A PayPal Business account and PayPal API credentials | |
UK/Europe with existing merchant account | Works with Elavon, WorldPay, FirstData accounts you already have | Varies by merchant account | You already use Opayo and a supported merchant account | An Opayo account and a supported merchant account |
Choose Stripe if:
You're starting fresh (no existing payment accounts)
You want the fastest, easiest setup
You need to accept multiple currencies
You want automatic bank transfers
Choose PayPal if:
Your guests frequently request PayPal
You already have a PayPal Business account
You operate globally and want guest payment protection
Choose Opayo if:
You already have an Elavon, WorldPay, or FirstData merchant account
You operate primarily in UK/Europe
Your accountant or bank requires a specific merchant account
Still unsure? Start with Stripe - it's the quickest to set up and works for most property managers.
Connect Stripe to accept instant guest payments in 135+ currencies with automatic bank transfers.
What You'll Need
Approximately 15 minutes
A Stripe account (create a free account if you don't have one)
Your business information, if you are creating a new Stripe account
Log into app.zeevou.com.
Click the gear icon in the top-right corner.
Go to Integrations.
Select the Payments tab.
Select Stripe.
Click Connect to Stripe.

Choose where payments should be received:
Organisation - All payments go to your company account. (most common)
Owner - Each property owner gets paid separately. (for property management companies splitting revenue)
We have three different ways to connect a Stripe account with Zeevou:
Creating a new account through Zeevou
In this case, we explicitly create a Standard Stripe account:
$account = $stripe->accounts->create(['type' => 'standard']);
Using an existing account previously created through our platform
If an account_id already exists, we don't create a new account. We simply use the existing account, which follows the same setup as above.
Connecting an existing Stripe account via OAuth
We also support connecting an existing Stripe account using Stripe's OAuth flow. According to Stripe's documentation, this OAuth flow is used for connecting Standard accounts.
You can check Stripe Connect OAuth Reference to learn more.
Option A: Create New Stripe Account (Recommended if starting fresh)
Click the message button (bottom right) to get your unique setup link.
Open the setup link to go to Stripe.
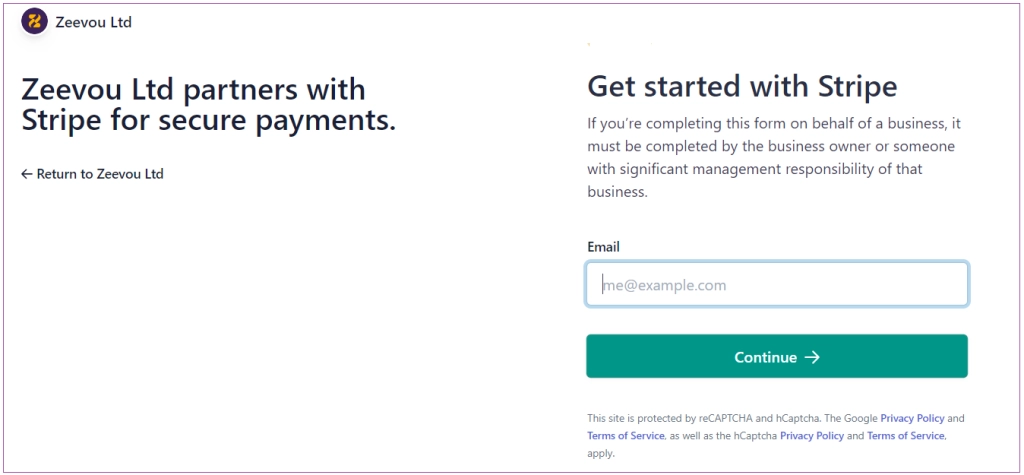
Enter your email address.
Complete Stripe's signup. (business details & bank account)
Stripe confirms the connection and shows your Account ID.
Copy your Account ID.
Return to Zeevou and paste the Account ID.
Click Proceed.
Option B: Connect Existing Stripe Account.
Select "Connect to an Existing Stripe Account".
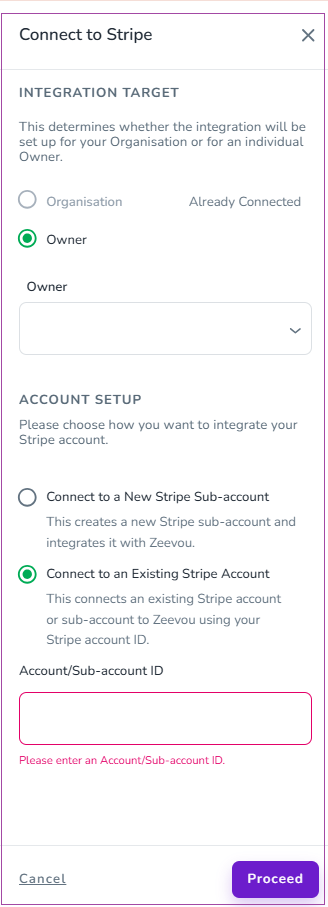
Log in to your Stripe Dashboard.
Click your profile picture in the top-right corner.
Locate your Account ID. It starts with "acct_".
Copy the Account ID.
Return to Zeevou.
Paste the Account ID.
Click Proceed.
Important: Only Standard, Express, or Custom Stripe accounts work. If you have a Platform account, contact our support.
Click the gear icon.
Go to Settings → Finance.
Find the Payment Methods section.
Turn on the Card toggle.
Select Stripe from the gateway dropdown.
Click Save.
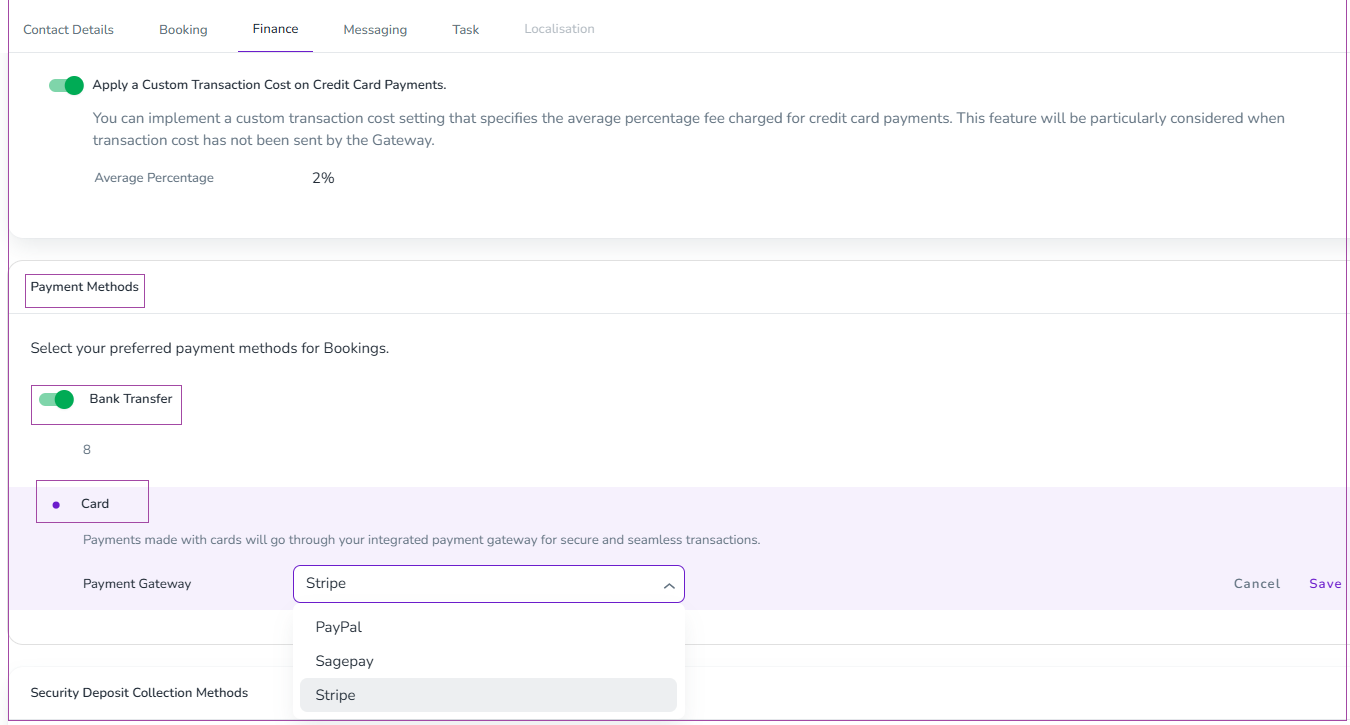
Your Stripe connection and card payment method are now configured.
If you want to collect a refundable security deposit by card, you can configure Stripe as the collection method.
Set the Security Deposit Timeline under
For new listings: Listings → Set Listing Defaults → Security Deposit Timeline
For existing listings: override it within the Listing → Policies → Security Deposit Timeline

Select Stripe as the collection method by going to Settings → Finance → Security Deposit Collection Methods
Turn on the Card toggle.
Select Stripe.
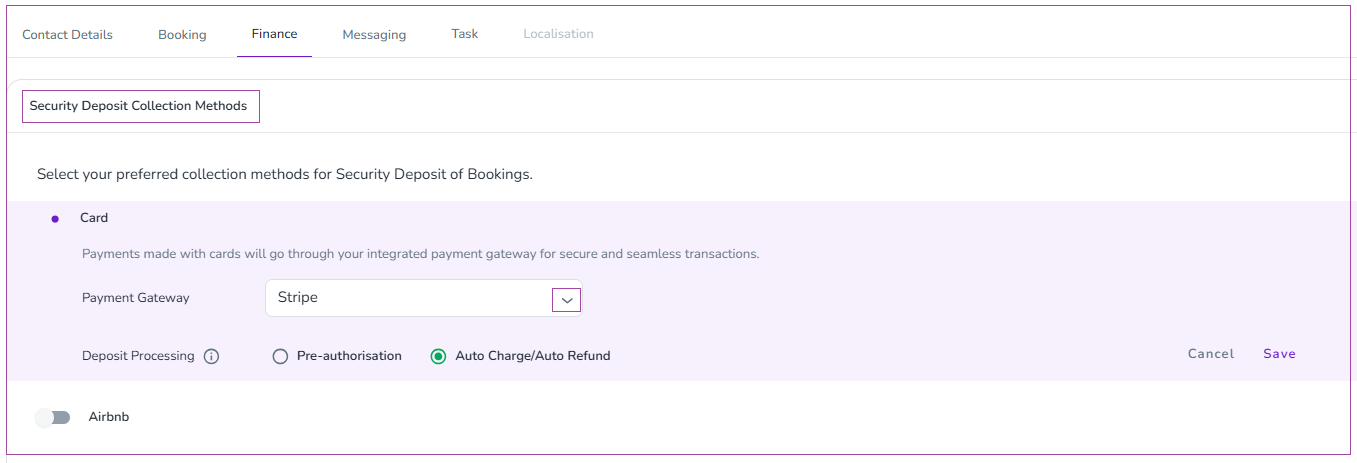
Select one of the boxes (Important: Read this section before deciding.)
Auto Charge/Auto Refund (automatically collects the deposit before arrival and refunds it after check-out).
Pre-authorization (only freezes funds in the guest’s account and releases them after their departure).
Click Save.
Stripe can only hold pre-authorisations for 4/5 days. We have developed two options to reduce the risk of being out of pocket for longer bookings. You can choose either method, but they both have their disadvantages:
Pre-authorisation Holds - Automatically attempts to renew the authorisation every 4/5 days until checkout.
Disadvantages:
There is no guarantee that a renewal will succeed (e.g., the guest may use the funds post expiry before the renewal attempt can be processed).
Guests will see multiple transactions on their account and may think you are capturing multiple lots of funds rather than renewing the hold.
Auto-Charge/Auto-Refund - the deposit is treated as an actual charge (captured) and then automatically refunded based on your configured timeline.
Disadvantage:
Stripe will charge you when the system charges the deposit and when it refunds the deposit.
You can select Auto-Charge/Auto-Refund for the most reliable security deposit handling.
Visit your booking website.
Use Stripe's test card numbers:
Successful payment: 4242 4242 4242 4242.
Use any future expiry date and any 3-digit CVC.
Complete the test booking.
Check your Stripe Dashboard - the test payment should appear.
You're Ready!
Guests can now book and pay instantly on your website. Stripe will automatically transfer funds to your bank account based on your payout schedule (usually 2-7 business days).
View your payments: Log into your Stripe Dashboard anytime to see transactions, payouts, and guest details.
Connect PayPal to allow guests to pay through PayPal at checkout.
Depending on PayPal's checkout configuration, guests may be able to pay using their PayPal account or an eligible card.
What You'll Need
Approximately 15 minutes
A PayPal Business account (create free account if you don't have one)
Access to PayPal Developer Dashboard
You need to create an "app" in PayPal to get your connection credentials:
Log into the PayPal Developer Dashboard.
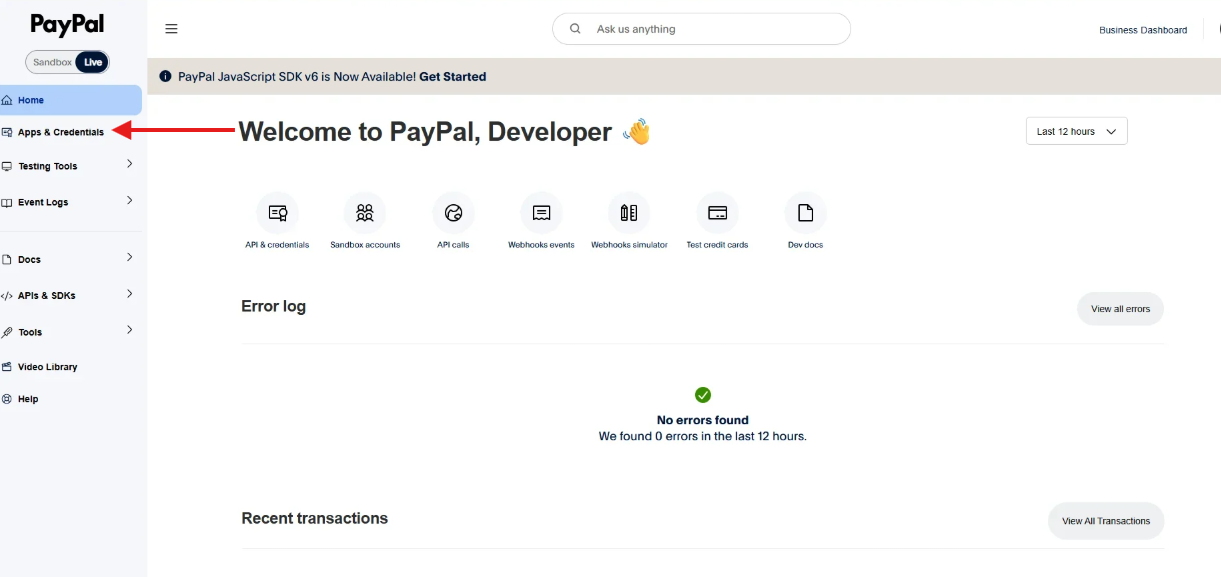
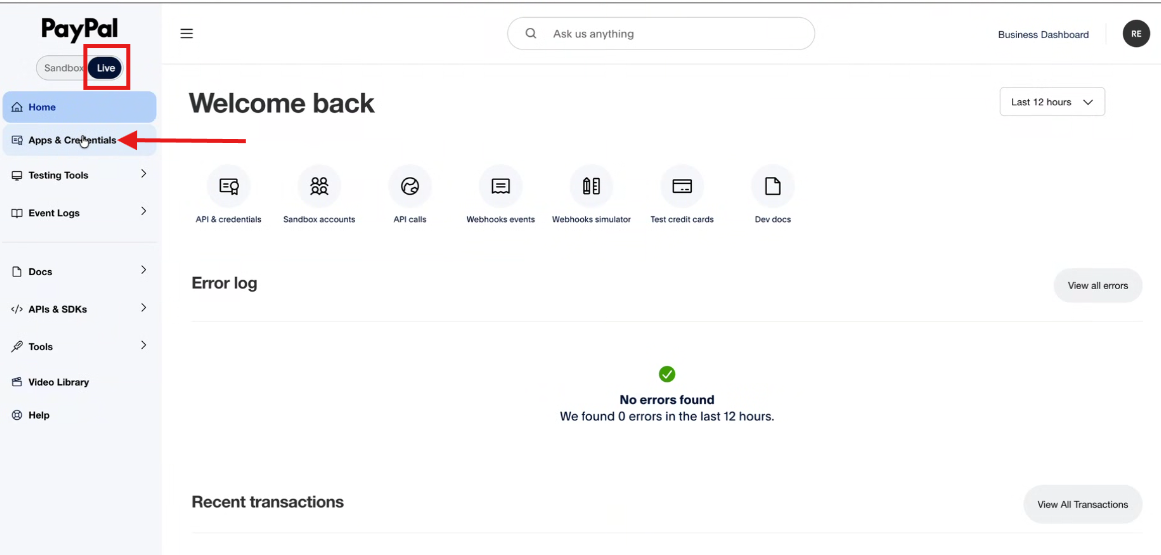
Make sure you're on the Live tab (not Sandbox).
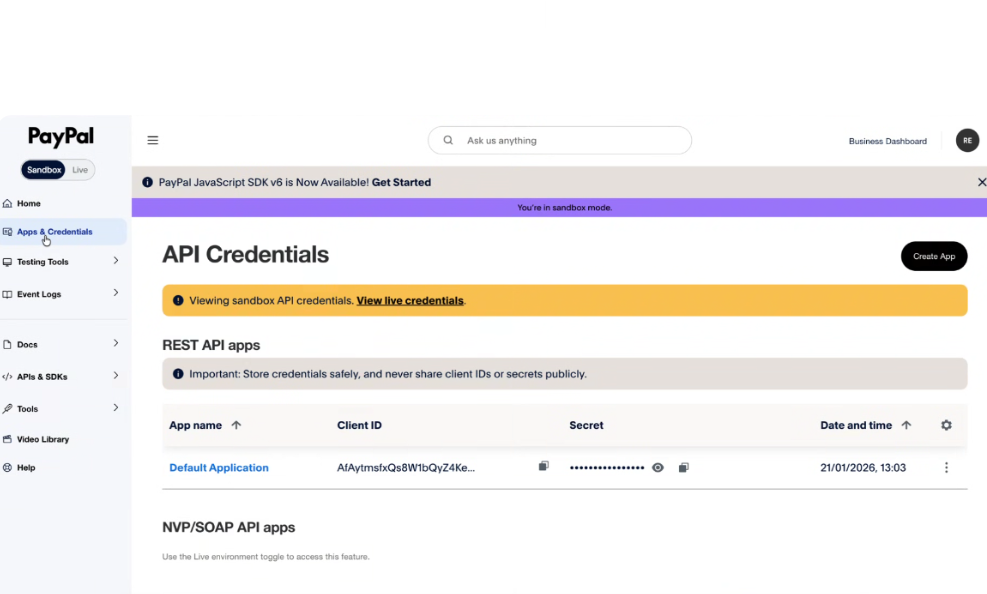
Click My Apps & Credentials (left sidebar).
Click Create App.
Enter an app name, such as Zeevou.
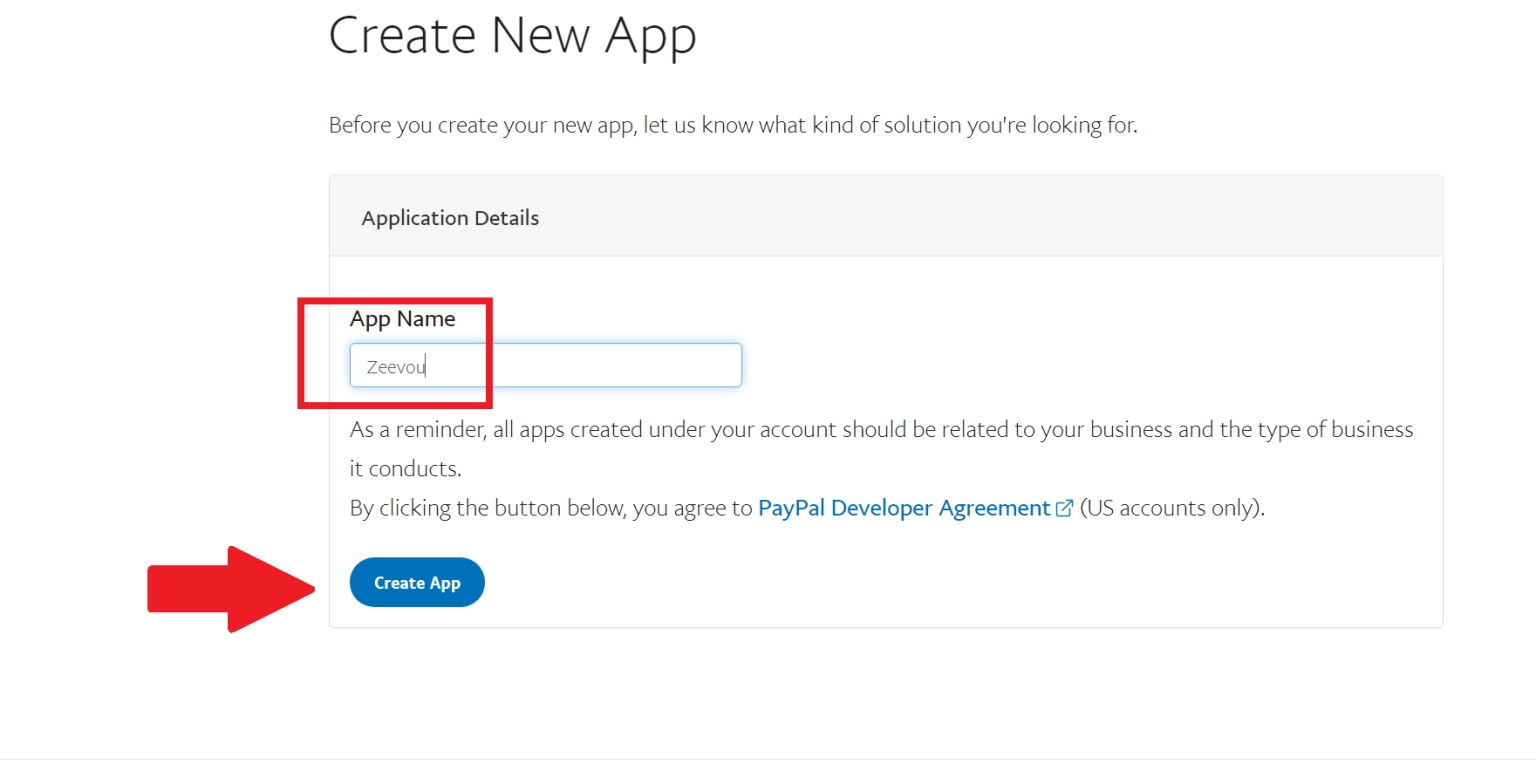
Click Create App.
Locate your credentials:
Client ID (copy this)
Secret (click "Show" then copy this)
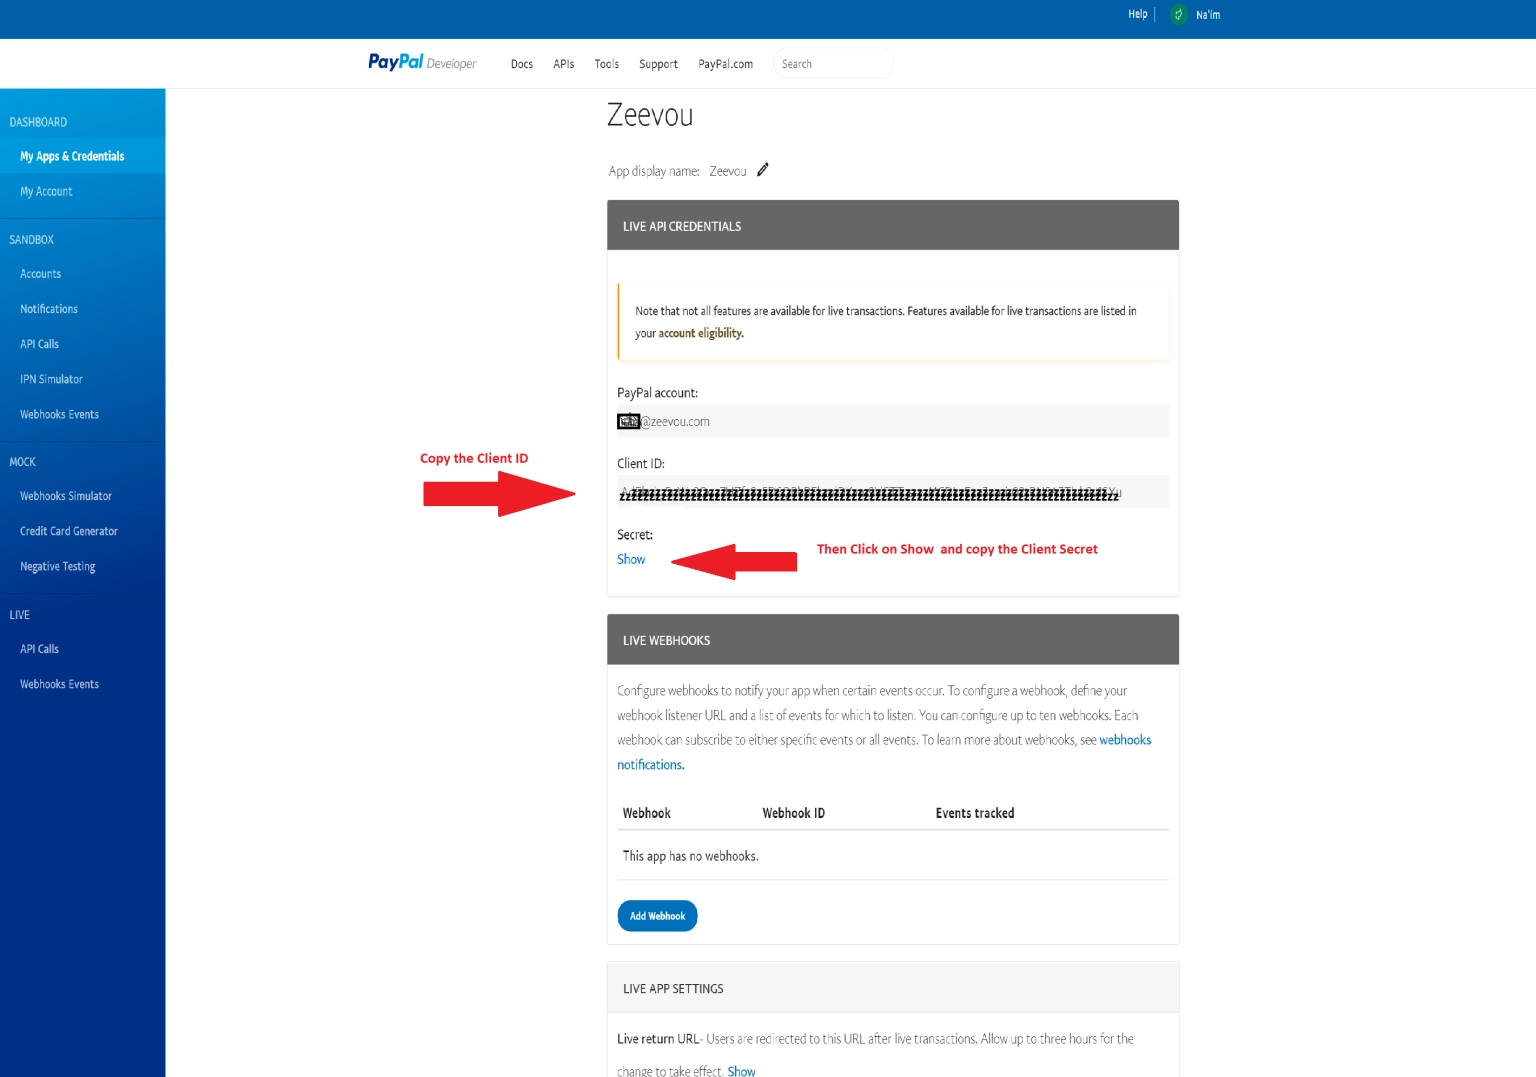
Security: Treat your PayPal Secret as sensitive information. Do not share it publicly or include it in screenshots or support requests unless specifically instructed by Zeevou Support.
Log into app.zeevou.com
Click the gear icon.
Go to Integrations.
Select the Payments tab.
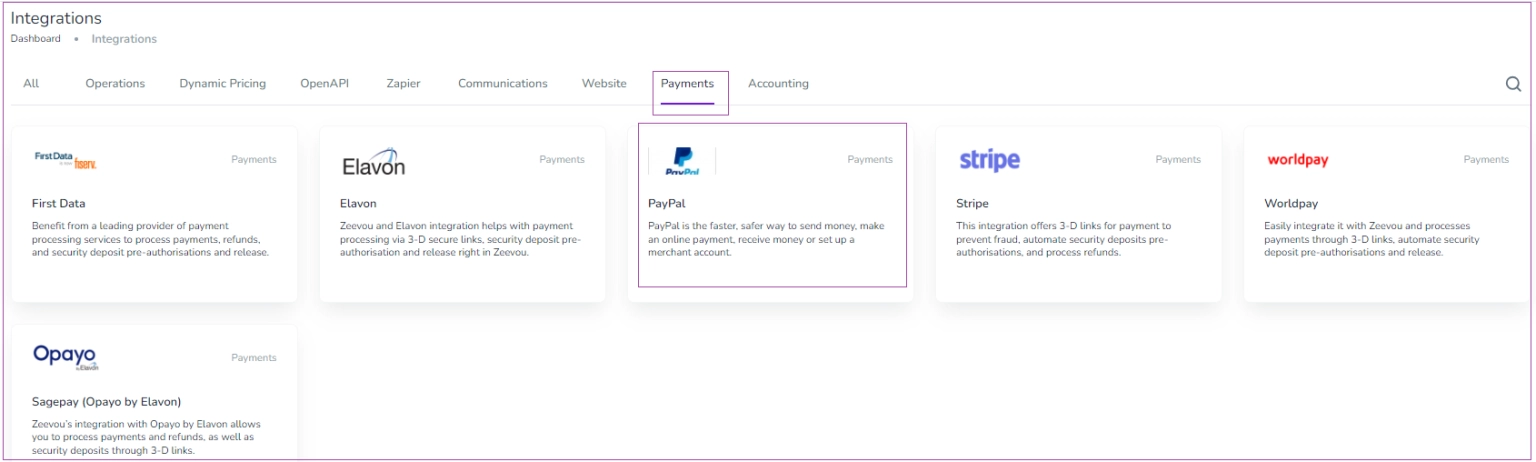
Select PayPal.
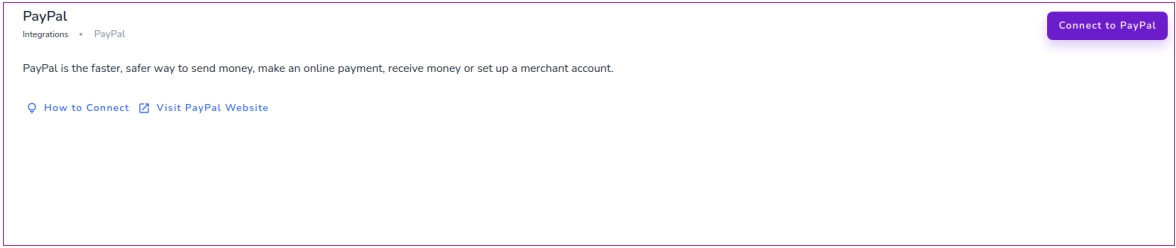
Click Connect to PayPal.
Enter your Client ID.
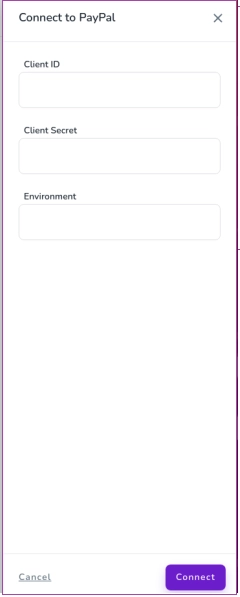
Enter your Secret.
Make sure the PayPal environment matches the environment you are connecting.
Enter the appropriate environment value in Zeevou.
Click Connect.

Zeevou will confirm when the connection has been completed successfully.
Go to Settings → Finance.
Find the Payment Methods section.
Turn on the Card toggle.
Select PayPal from the gateway dropdown.
Click Save.
PayPal is now configured as the gateway for card payments.
If you want to collect refundable security deposits through PayPal:
Go to Settings → Finance.
Find Security Deposit Collection Methods.
Turn on the Card toggle.
Select PayPal.
Click Save.
Visit your booking website.
At checkout, select PayPal.
Log in to your PayPal Sandbox account (use test credentials from PayPal Developer Dashboard).
Complete the test payment.
Check your PayPal Dashboard - the test payment should appear.
You're Ready!
Guests can now choose PayPal at checkout. They can either:
Log into their PayPal account to pay.
Pay with any credit/debit card through PayPal (without needing a PayPal account).
View your payments: Log into your PayPal Dashboard to see transactions and transfer funds to your bank.
Connect Opayo to process payments if you have an existing Elavon, WorldPay, or FirstData merchant account.
What is Opayo?
Opayo is a payment gateway that connects Zeevou to your existing merchant account. It works as a bridge:
Your merchant account (Elavon, WorldPay, or FirstData)
↓
Opayo gateway (handles the technical connection)
↓
Zeevou (your booking system)
↓
Your guests (make payments)
You need both an Opayo account and a merchant account with Elavon, WorldPay, or FirstData.
What You'll Need
Approximately 30–45 minutes for the Zeevou configuration
An Opayo account (sign up if you don't have one)
An active merchant account with Elavon, WorldPay, or FirstData
Your merchant account number(s)
Your Opayo integration credentials
If you do not already have an Opayo account:
Contact the Opayo Sales Team.
During signup, provide your merchant account numbers from Elavon, WorldPay, FirstData, Barclaycard, etc.
Opayo will email you with the requirements for your account.
Complete the onboarding documentation and e-signature process.
Once signed, it goes to their onboarding team, which takes 3-4 working days usually.
Get the Live Account Credentials from them (they may tell you to test, but there’s no need to do so as testing has been done by us).
Continue with the Zeevou configuration below.
Some Opayo features need to be enabled before you can use security deposits and pre-authorisations. Contact Opayo Support and request activation of:
Tokens - Required for security deposits and pre-authorizations
Without this, you'll get error: "Failed transaction type not supported"
"Defer" Option - Required for pre-authorizing payments
"Release" Option - Required for refunding payments
This usually takes 1-2 business days to complete. In the meantime, you can continue with the remaining configuration (up to Step 7).
3D Secure adds extra security to card payments (where guests verify with their bank):
Log in to your Opayo account.
Go to Settings → 3D Secure.
Create a 3D Secure rule according to your Opayo configuration.
Enable the rule for the relevant transactions.
Save your changes.
Note: The 3D Secure option might not appear for 2-3 days after account creation. If you don't see it yet, wait a few days and check again.
Opayo should have emailed your Integration Key and Password. If you can't find the email:
Log into Opayo (use the LIVE environment, not Test).
Log in as an Administrator.
Go to the Administrator tab.
Find Password details.
Select Create API credentials.
Confirm that you understand that creating new credentials may affect existing API integrations.
Click Create API credentials.
You will need the following information:
Environment: LIVE (confirms you're in the live environment)
Vendor Name: Your account vendor name
Integration Key: Your username for the API
Integration Password: Your password for the API
Keep these credentials secure. You will need them to connect Opayo to Zeevou.
In Zeevou, go to Integrations → Payments.
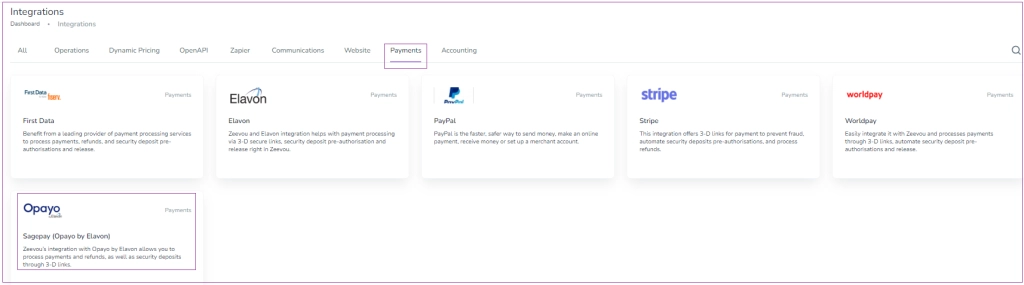
2. Select Opayo.

Click Connect to Sagepay (Opayo by Elavon).
Enter the required credentials.
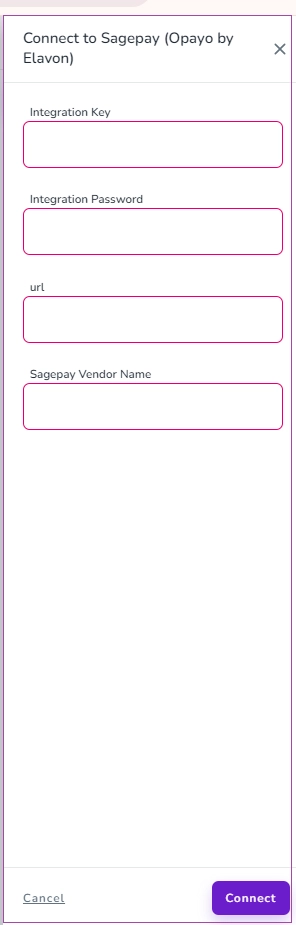
Enter:
Integration Key
Integration Password
Sagepay Vendor Name
URL: https://pi-live.sagepay.com/api/v1
Click Connect.
Zeevou will confirm when the connection is successful.
Once you have had confirmation that the settings requested in Step 2 have been completed by Opayo’s support team, you can finalise the integration:
Go to Settings → Finance.
Find Payment Methods.
Turn on the Card toggle.
Select Opayo from the gateway dropdown.
Click Save.
Your Opayo connection is now configured for card payments.
If you want to collect refundable security deposits from guests:
Go to Settings → Finance.
Find Security Deposit Collection Methods.
Turn on the Card toggle.
Select Opayo.
Click Save.
Your default Opayo admin login cannot see transaction details. To view fraud warnings and full payment information:
Log in to your Opayo account.
Go to Settings → Users.
Click Create User.
Enter a different email address.
Give the user View Transactions permission.
Save the new user.
Now you can log in with this new user to see full transaction details and fraud alerts in Opayo.
Visit your booking website.
Make a test booking with Opayo's test card:
Card number: 4929 0000 0000 6
Expiry: Any future date
CVV: Any 3 digits
Complete the test booking
Check your Opayo dashboard - the test transaction should appear
Check your merchant account portal (Elavon/WorldPay/FirstData) - the settlement should be scheduled
You're Ready!
Guests can now book and pay on your website. Payments flow through:
Guest pays → Card details sent to Opayo
Opayo processes → Forwards to your merchant account (Elavon/WorldPay/FirstData)
Merchant account settles → Funds transfer to your bank (usually 2-3 business days)
View your payments:
Opayo Dashboard - See all transactions and gateway activity
Merchant Portal (Elavon/WorldPay/FirstData) - See settlements and payouts to your bank
Once your payment gateway has been added, you can continue with Collect Security Deposits→
