To create an Owner Contract for a listing, you must create an owner profile for the property and have a Management Package. Please note that you can add only one owner per listing.
You must create an Owner Profile before you can manage owner access and properties. Follow the steps below.
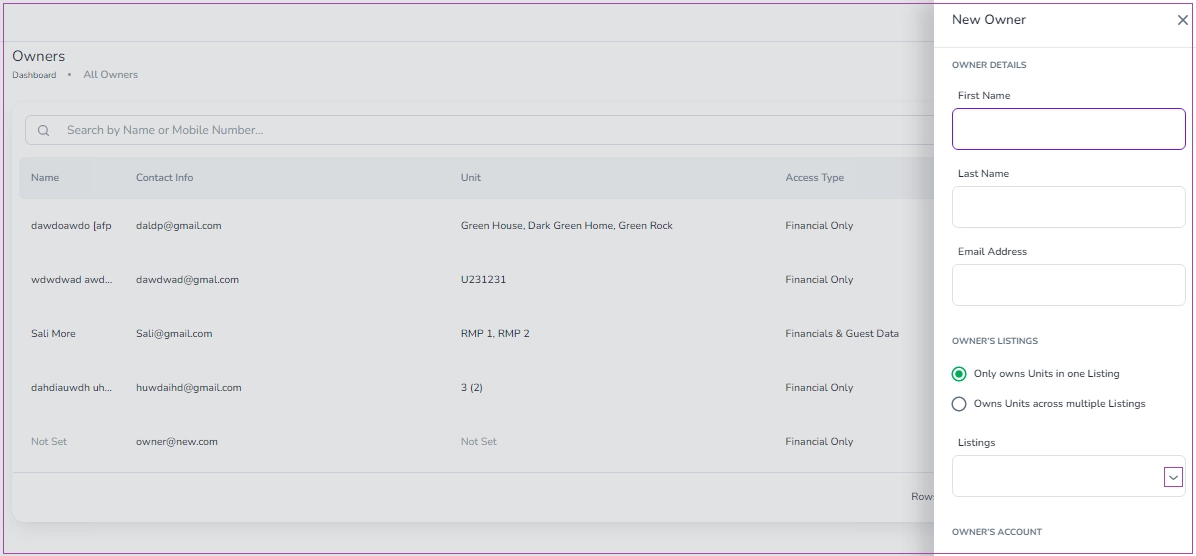
Go to Owners Dashboard.
Click Create an Owner at the top right.
A side panel will open.
Enter the Owner’s Details such as First Name, Last Name and Email Address.
Note: Each email address can only have one Zeevou account per organisation. You can’t invite a user who already belongs to another organisation.
Choose the correct option based on the owner’s setup:
Owner with one property
Select the first option.
Choose the property.
Select the related units from the dropdown.
Owner with multiple properties
Select the second option.
Choose the units from the dropdown list.
If you need to select units across multiple listings:
Click the Units image inside the box.
A drawer will open.
Select the required units.
Click Select to confirm.
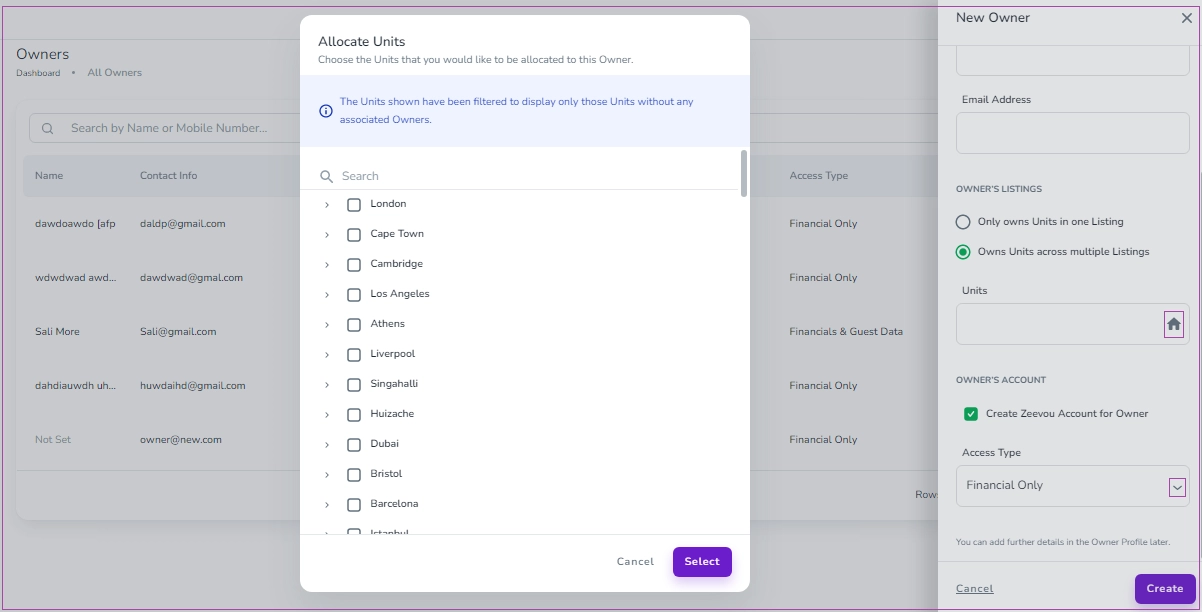
Tick Create Zeevou Account for Owner if the owner needs login access.
Open the Access Type dropdown.
Select the correct access level.
Click Create to finish.
The Owner Profile is now ready.
You can view and manage all owners from the Owners Dashboard. Use the three dots next to each owner to access key actions.
Go to Owners Dashboard.
Find the owner in the list.
Click the three dots next to their name.
Select View or Delete.
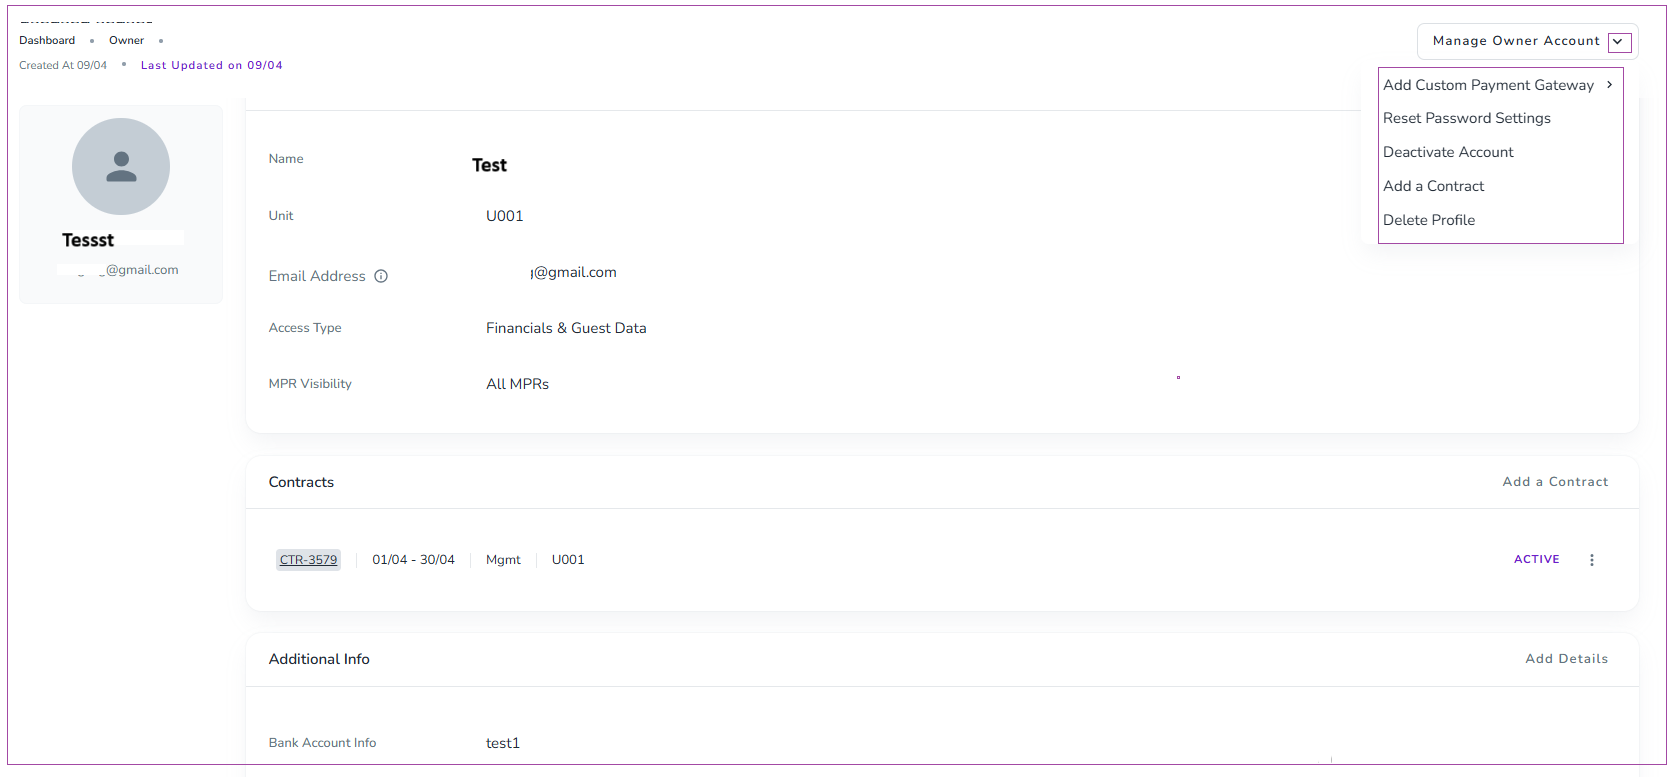
Open the Owner’s page.
Click the Manage Owner Account dropdown arrow.
Choose one of the following options:
Reset Password Settings
Deactivate Account
Add a Contract
Delete Profile
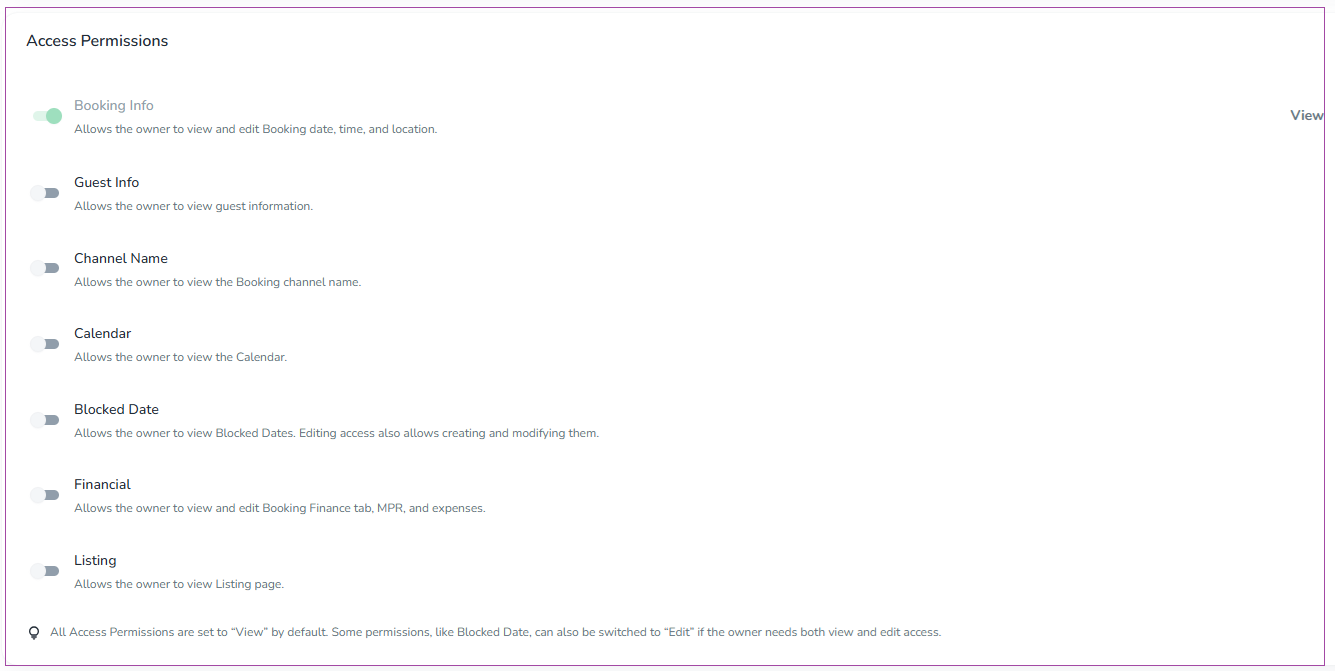
To manage an owner’s access permissions in Zeevou, open the Owner account from the Owner Portal and locate the Access Permissions section. From here, you can toggle specific permissions (such as Booking Info, Guest Info, Calendar, Financials, and more) on or off depending on what the owner should be able to view or edit. By default, most permissions are set to “View,” but certain options can be upgraded to allow editing where needed. Adjust the toggles as required, and the changes will apply immediately.
Note: Managing owner access permissions requires the Financial Reporting module. If this module is not enabled on your account, access permissions will be restricted.
A lock icon appears next to owner access permissions. Clicking or editing these settings opens the Unlock Financial Reporting popup. To unlock this feature, select Unlock Financial Reporting to open the Upgrade Flow and purchase the module. Once enabled, the lock icons are removed, and you can edit owner permissions.
Hosts can connect custom payment gateways (such as Stripe, PayPal, Opayo, or WorldPay) directly to an owner’s account.
To add a custom payment gateway, open the Owner Account page and navigate to the Custom Payment Gateway section. Clicking Add a Custom Payment Gateway will open a sidebar where you can integrate the owner's gateway.
Note: Connecting a custom payment gateway to an owner’s account requires the Financial Reporting module. If this module is not enabled on your account, clicking to add or proceed with an owner gateway will display the Unlock Financial Reporting prompt, directing you to the Upgrade Flow to purchase the module and activate the feature.
Owners can access the Notifications page via Profile → Notifications to configure their preferred settings. Notifications are displayed according to the permissions assigned to each owner, and they are triggered based on the actions enabled in the notification settings
You need a Management Package to define how you share income with an owner.
If the property is rented or owned by you, skip this step and go to Create a Contract.
Go to Owners in the main menu.
Click Management Packages.
Click Create a New Management Package.
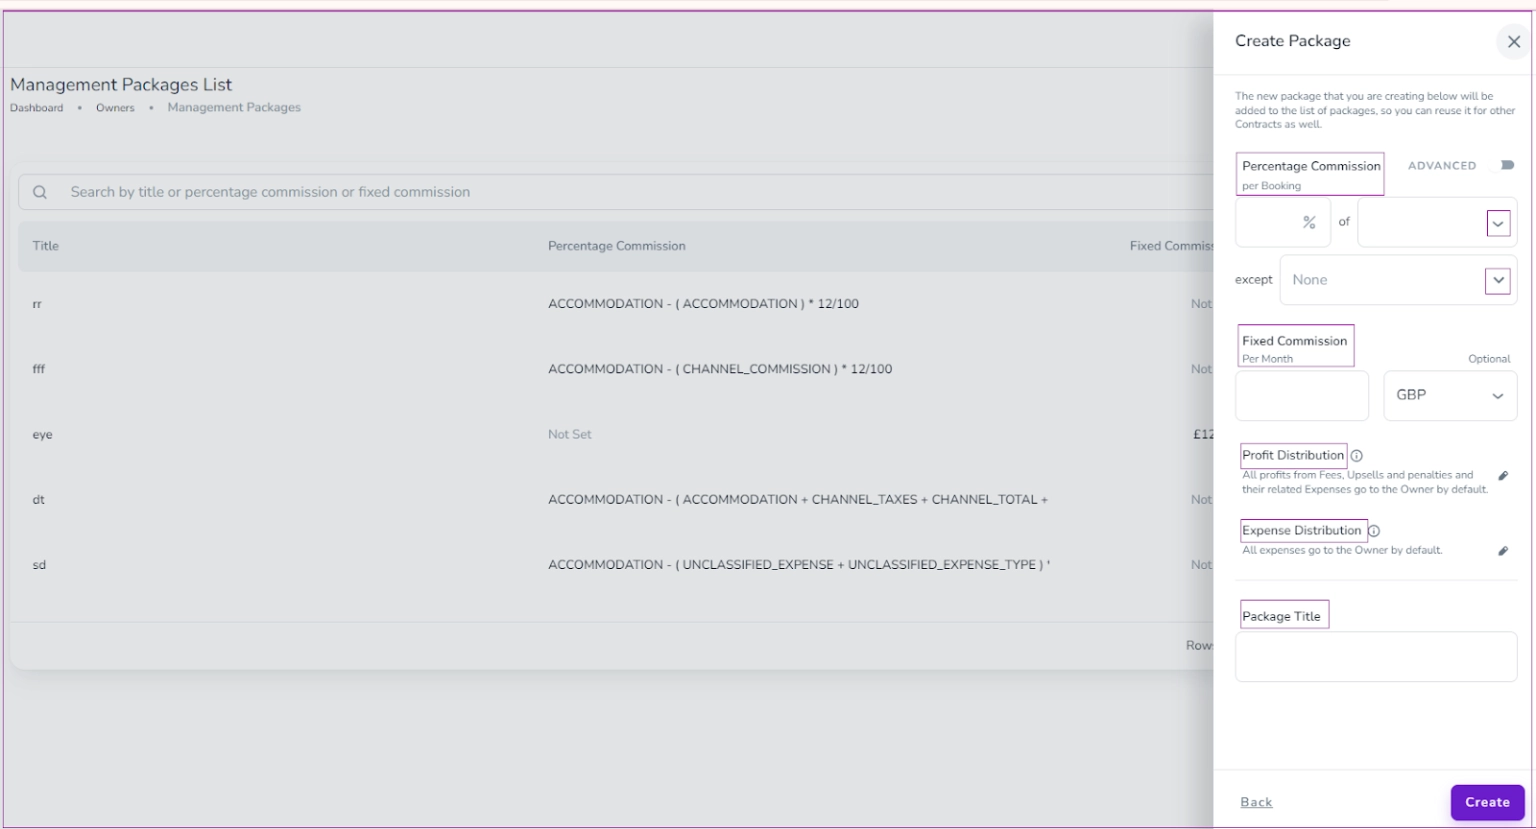
You can add a percentage and/or a fixed monthly fee.
Choose Percentage Commission per Booking from the dropdown.
Select what the percentage applies to:
Accommodation
Channel Total
Total Price
Total Sale
(Optional) Add a Fixed Commission per Month.
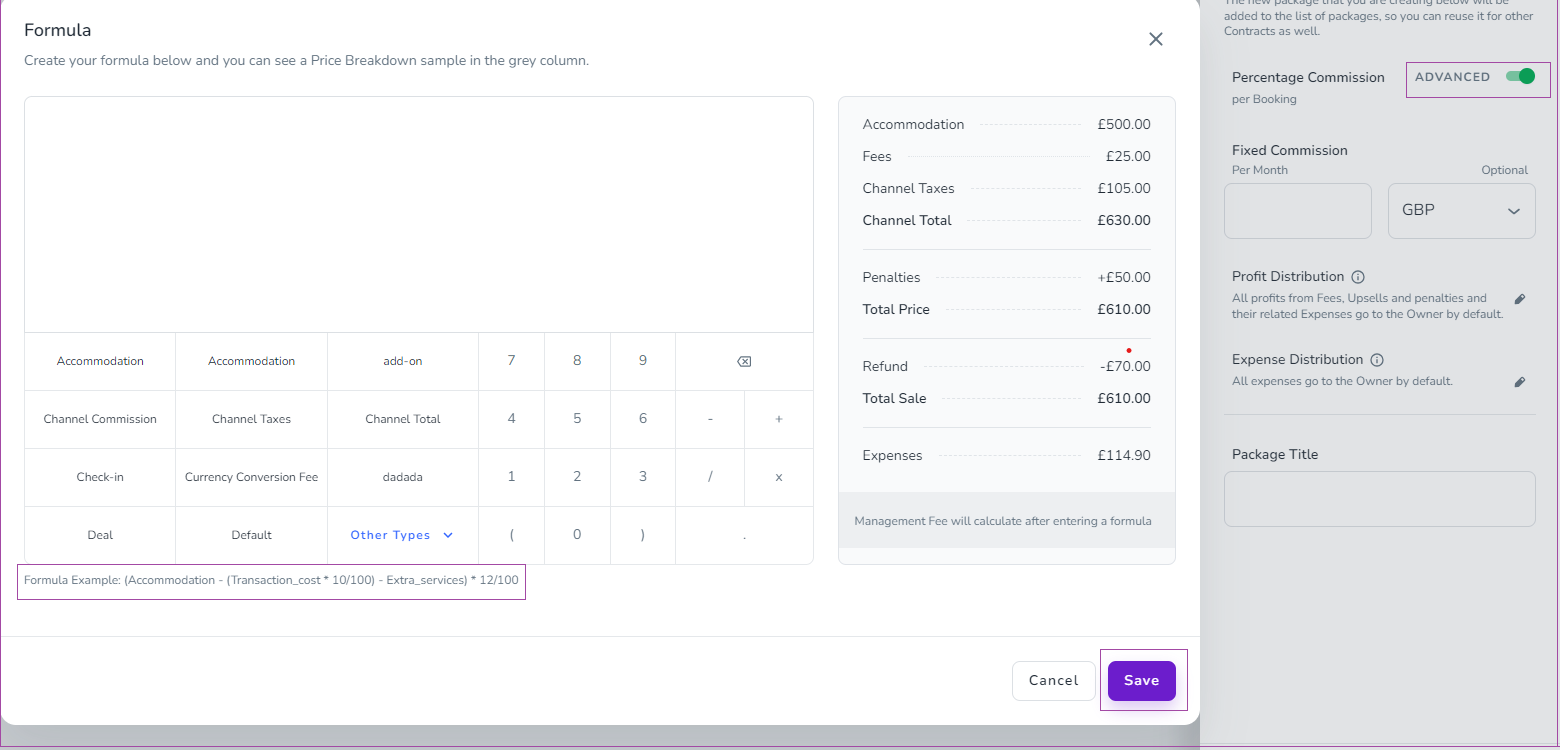
If you need more control:
Turn on the Advanced toggle.
Set your own custom formula.
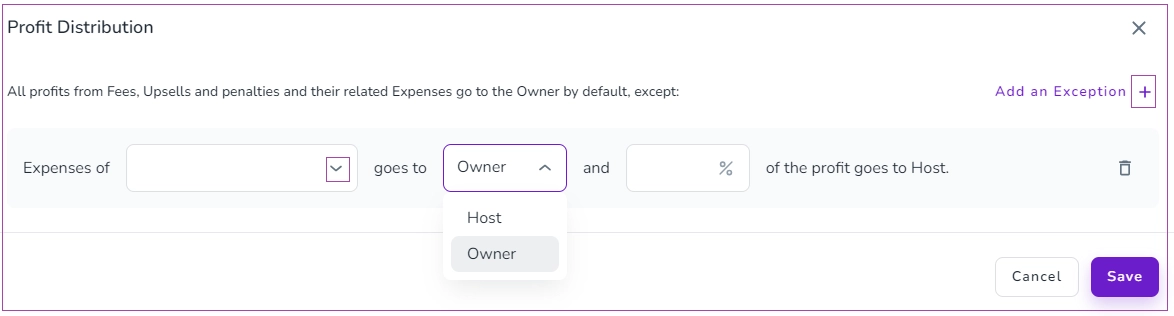
By default:
All profit from Fees, Upsells, and Penalties
And their related Expenses
Go to the Owner
If you want to change this:
Click Add an Exception.
Select the expense from the dropdown.
Choose Host or Owner.
Enter the percentage.
Click Save.
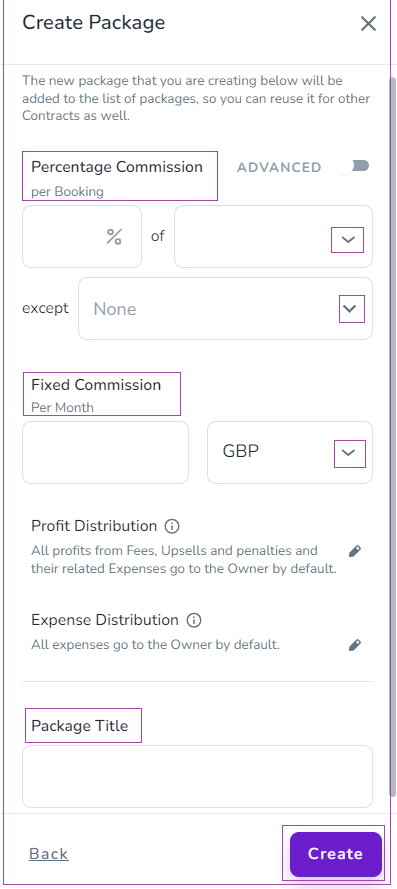
Enter a Package Title.
Click Create.
The new package will appear in your list. You can reuse it for other contracts.
Go to the Management Packages dashboard.
Click the three dots next to a package.
Select View or Delete.
Note:
If a package is already linked to a contract, you can’t delete it.
You must create a Contract to link an owner to units and define financial terms.
Go to Contracts from the main menu.
Click Create a New Contract.
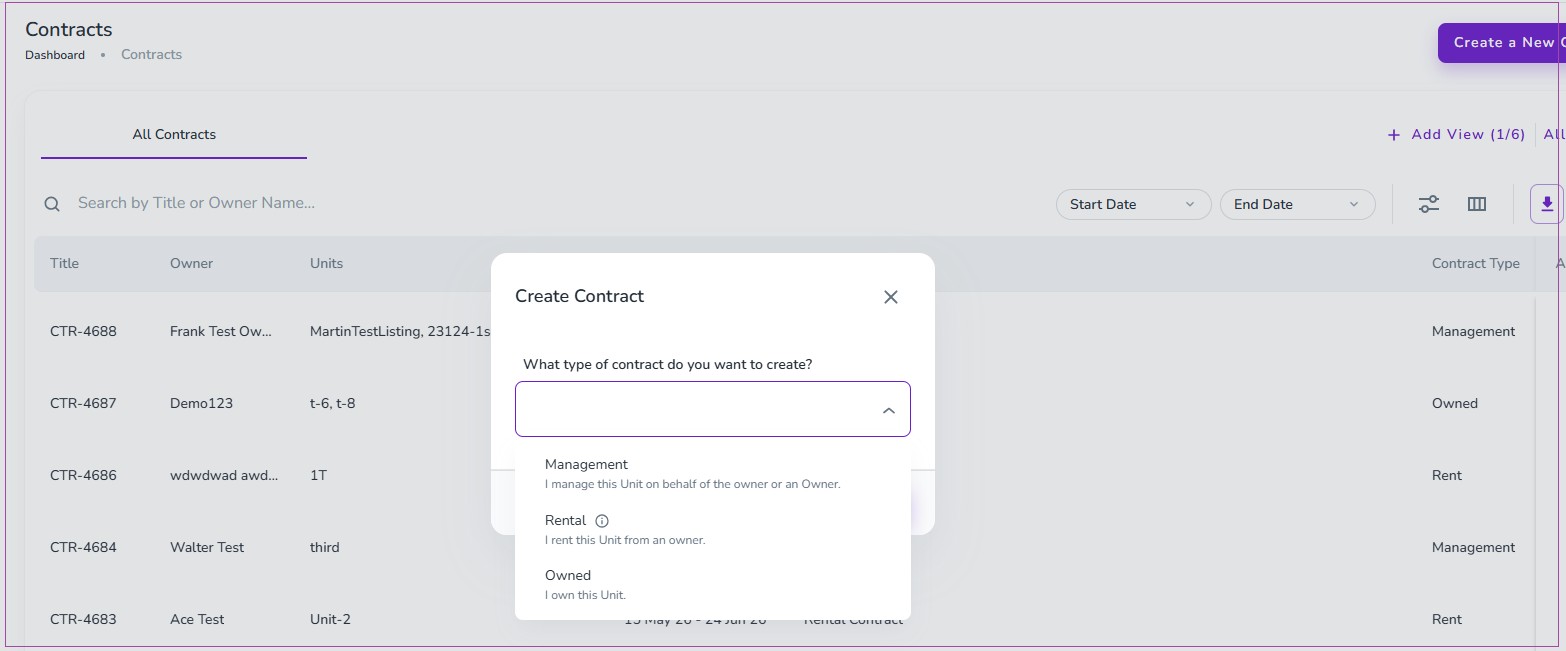
Select the Contract Type from the dropdown:
Management
Rent
Owned
Click Proceed.
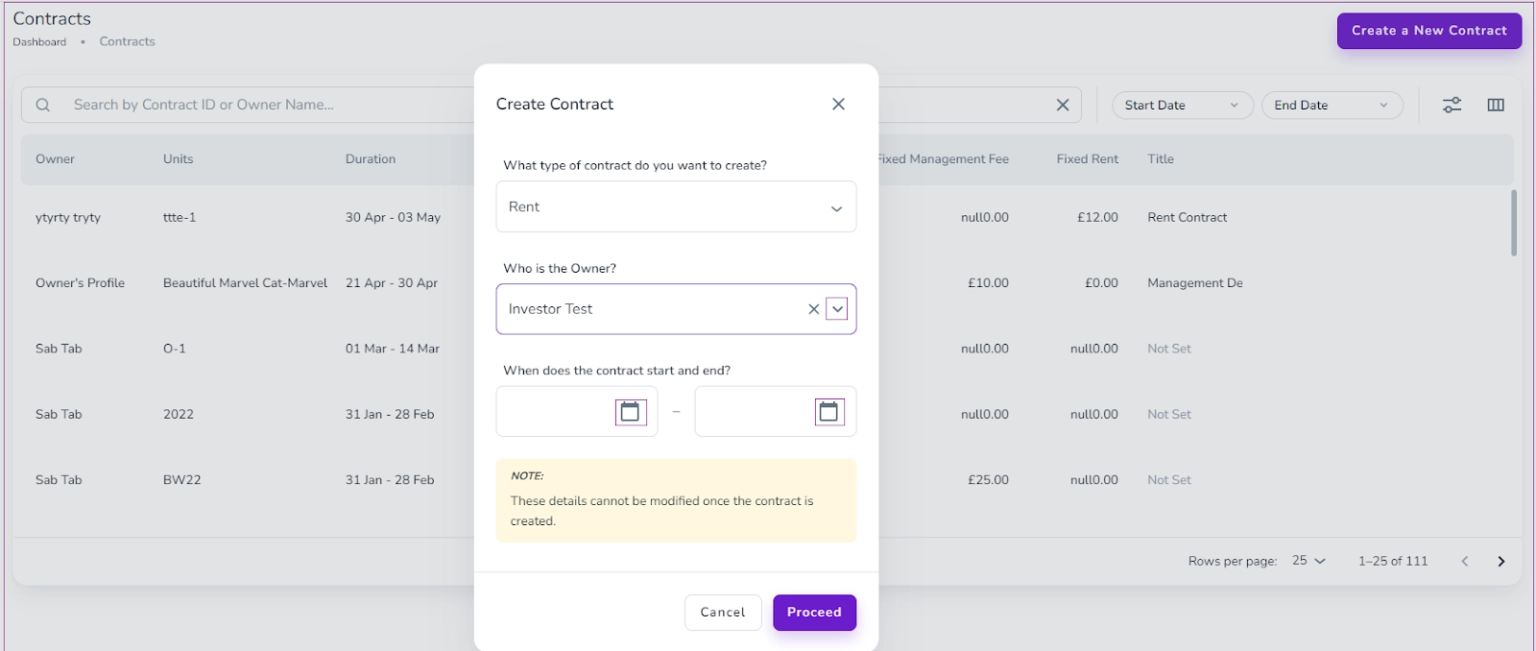
Select the Owner from the dropdown(not for Owned Contract).
Choose the Start Date and End Date using the calendar icon.
Click Proceed.
Important: You cannot change the owner or contract dates after creation.
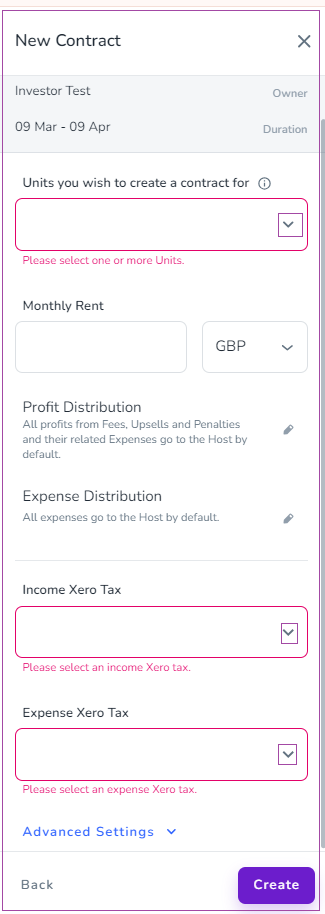
A side panel will open. You must:
Select at least one unit.
Choose an Income Xero Tax.
Choose an Expense Xero Tax.
(Optional)
Enter the Monthly Rent (for rent contracts).
Edit Profit and Expense Distribution if needed.
Click Create to finalise.
Note 1: During contract creation, if the seller's identification details are not already available in the system, an additional drawer will automatically open after you submit the contract information. Use this drawer to enter the seller's identification data before proceeding with the contract creation process.
Note 2: The Xero fields only appear if your account is connected to Xero.
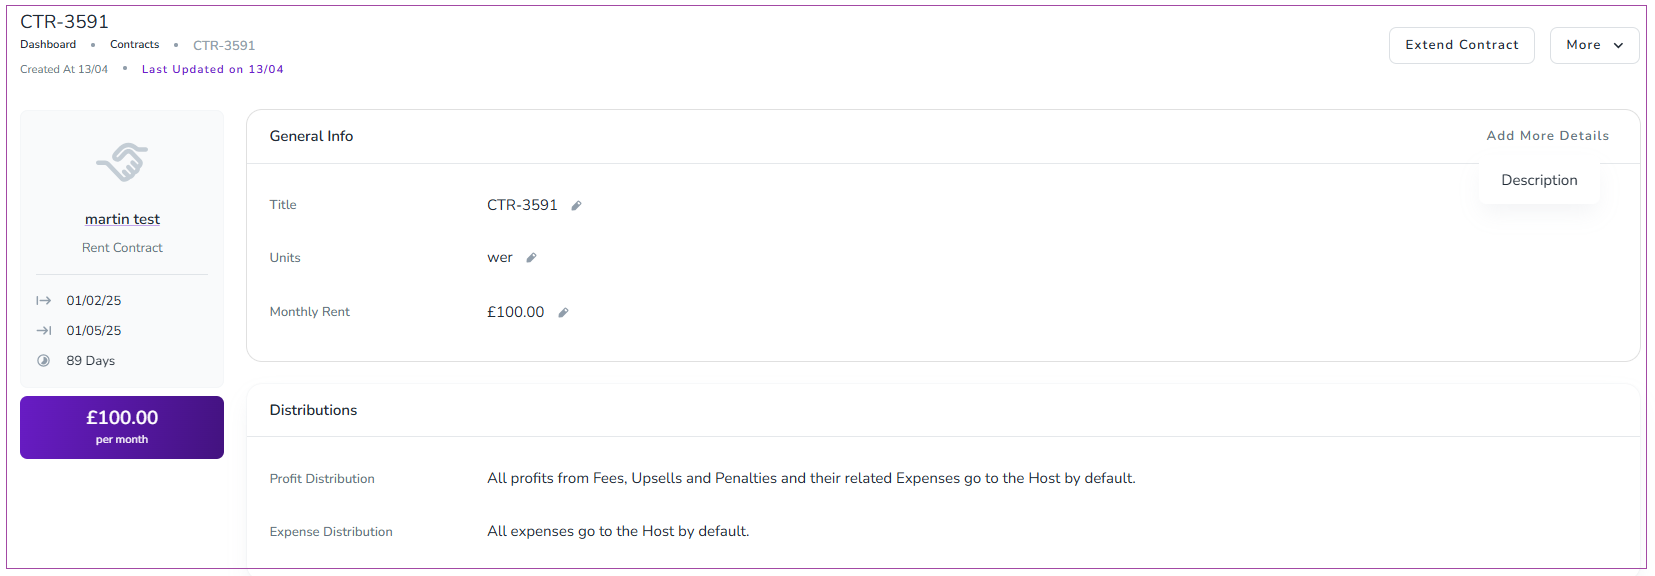
Once created, the contract page includes five sections:
General Info
Distributions
Financial Settings
MPRs
MPR Recalculation Queue
On the General Info card:
Click the pencil icon to edit items.
Click Add More Details to add a title or description.
On the Distributions card:
Some changes will recalculate the MPR.
This may significantly affect financial reports.
Only edit these settings when necessary.
Go to the Financial Settings card.
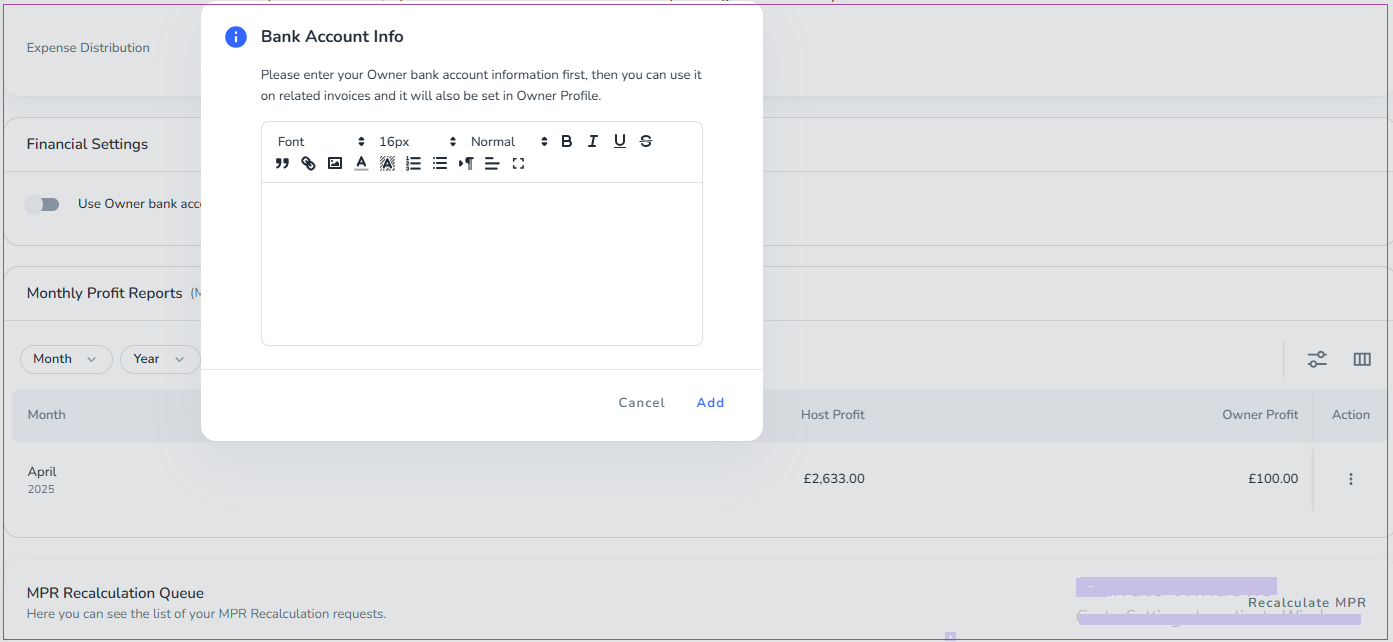
Turn on Use Owner bank account info on related invoices.
Enter the Owner’s bank details first.
These details will:
Appear on related invoices
Be saved in the Owner Profile
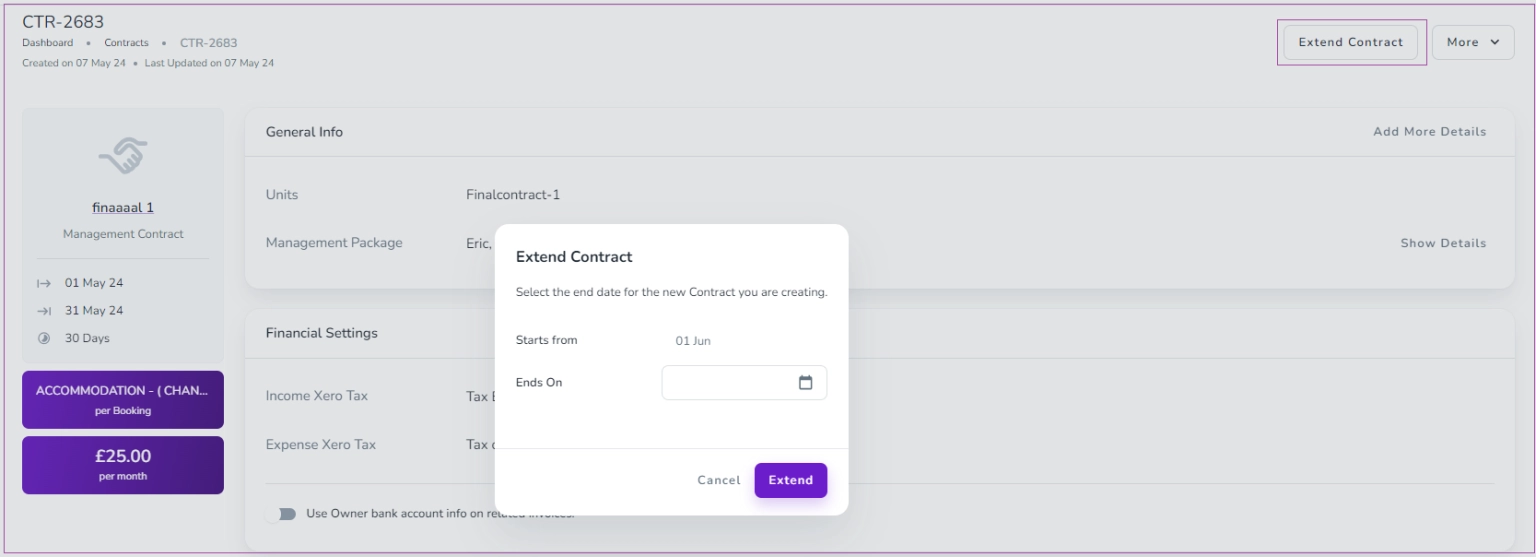
Open the contract.
Click Extend Contract.
Enter the new End Date.
Click Extend.
Open the contract.
Click the More arrow.
Select Shorten Duration.
Choose a new End Date using the calendar.
Click Shorten.
To do so, go to Calendar -> Calendar Toolbox and click View Blocked Date List.
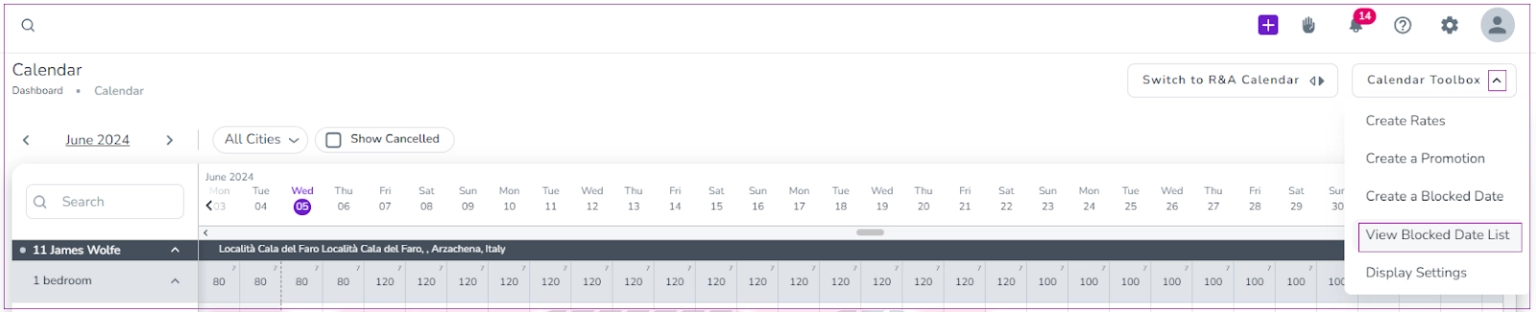
On the open page, click on the Settings icon on the top right. A window will pop out in which you can select your brand and click on Proceed.
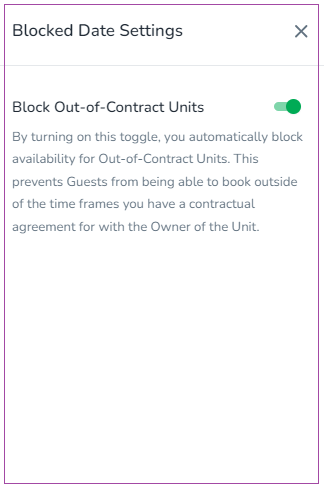
Note that if you have only one brand, this window will not pop out and you will be directed to the Blocked Date Settings drawer.
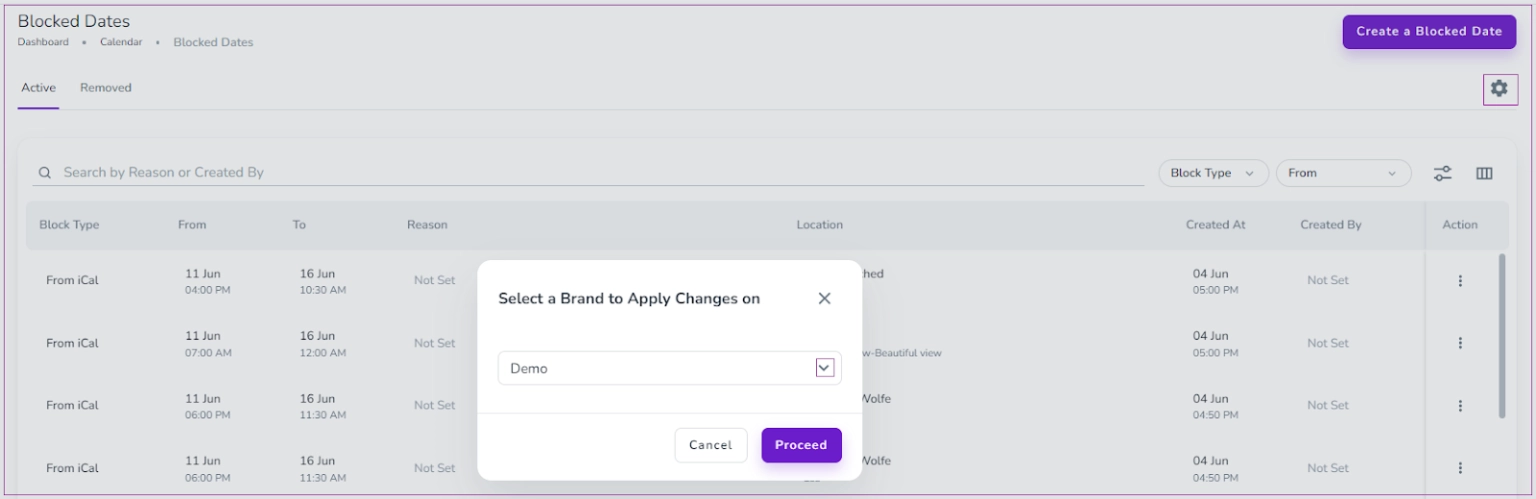
In the open drawer, turn on the Block Out-of-Contract Units toggle. By turning on this toggle, you automatically block availability for Out-of-Contract Units. This prevents Guests from being able to book outside of the time frames you have a contractual agreement for with the Owner of the Unit.
Once you have invited your owners, you can continue with booking your verification call to go live!
