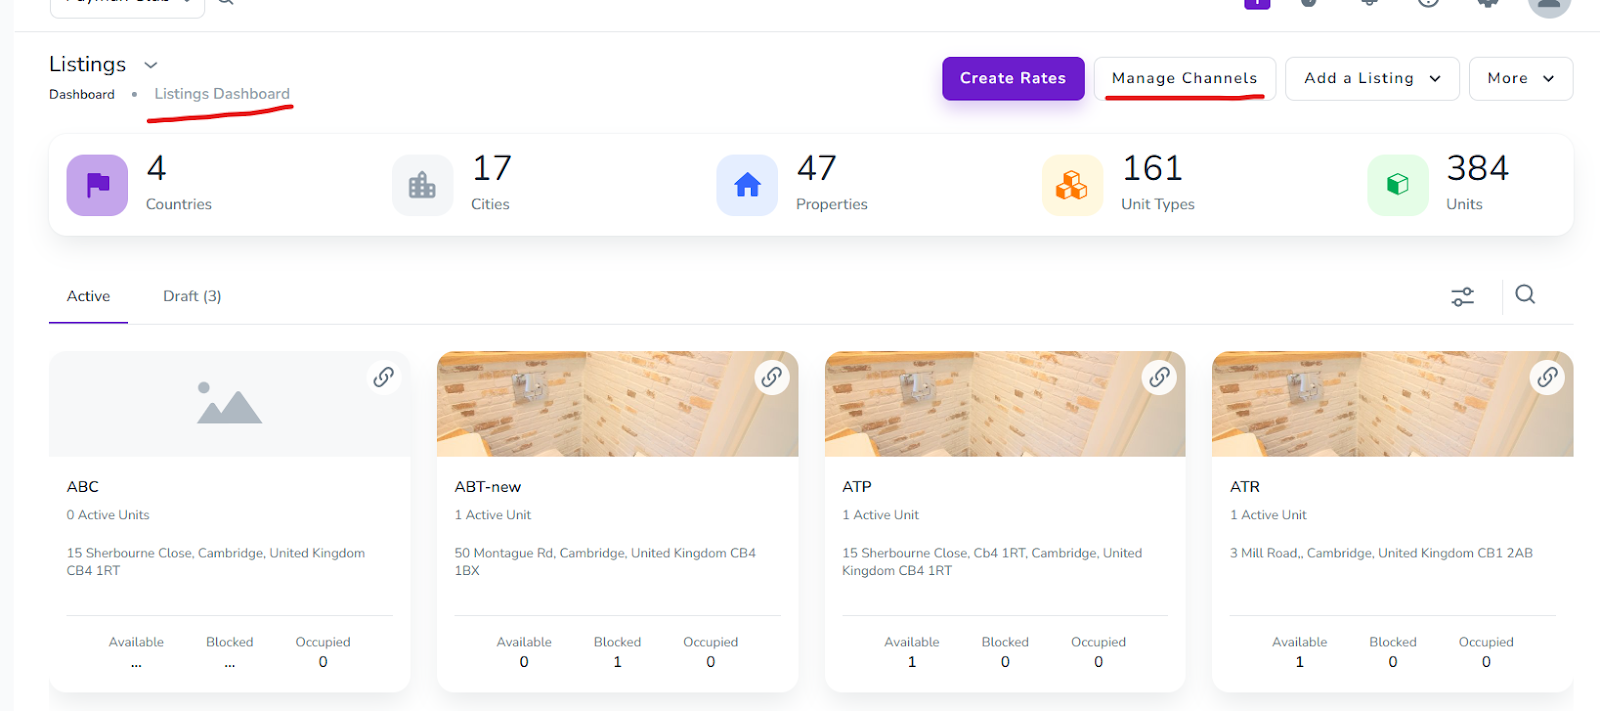
Note that before any step, if you log in to app.zeevou.com and see the below figure in your Listings Dashboard page, please follow Connection Type A Instructions. Otherwise, go ahead with Connection Type B Instructions.
In order to connect the Zeevou listing to the Vrbo, the each of following requirements must be met to be able to get connected
Company profile (phone number, email address and so on).
Address (Street name and number, Post code) and Location (Geo-coordinates) need to be complete;
The licence number must be provided
Description: minimum 400 characters, maximum 10,000 characters;
Bathroom: At least 1 bathroom. The bathroom in Zeevou needs to have at least a toilet as an amenity and one of the following: shower, bathtub, bath with shower. Only then the additional amenities for the bathroom will be displayed in Vrbo.
Kitchen: There must be a kitchen at the property.
Photos: Minimum 6 photos (minimum width: 1024 px; minimum height: 768 px) are uploaded, and the number of photos cannot exceed 50;
Bedding composition across rooms needs to be provided;
Prices and availability are provided for some seasons;
Cancellation Policy: Cancellation Policy is selected;
Arrival information, Normal check-in and check-out times, and Arrival instructions are provided.
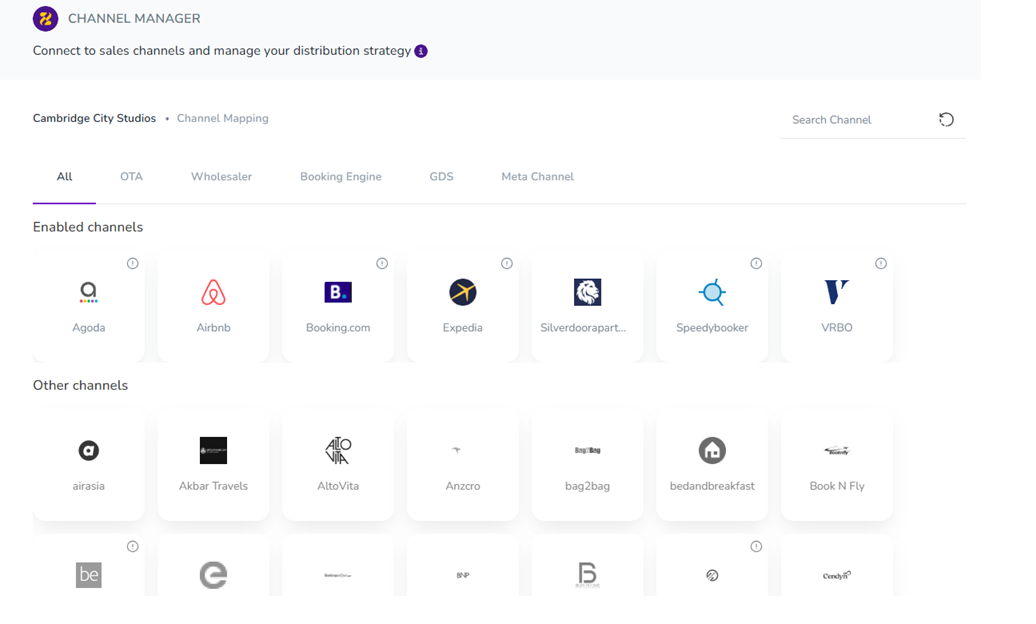
Log in to app.zeevou.com, go to Listings, and click on Manage Channels in the top right.
Select VRBO and click on Connect.
You’ll have two options to continue:
A. First Property:
If this is your first property, follow these instructions:
Follow How it works: Read about how this channel connection works and confirm you understand and agree with its terms and conditions..
Currency: Select the currency in which prices will be sent to Vrbo. Note that the VRBO breakdown is displayed in the advertiser’s set currency (currently GBP) and is not recalculated by the platform. The currency used is indicated in the reservation report. To receive VRBO reservations in USD, the advertiser’s currency can be updated accordingly.
Default channel markup: Vrbo commission: 5-15% taken from your rates
Vrbo Cancellation Policy: If you wish to change the cancellation policy you are sending to Vrbo, you can click on Map, then three dots and select Edit. Then click on Add to Override the Cancellation Poilcy.
Prepayment: Vrbo allows you to charge a down payment at the time of booking. enter here how much you will be charging if you require it
Minimum guest age: Specify the minimum age the guest needs to be to rent
Connect properties: Connect your inventory to Vrbo. You can add markup and downpayment here.
Note that you may have properties not ready to publish, so please improve those properties content to be able to publish them. Download the Quality Check report in xlsx to see which contents are missing or wrong.
Further Instructions: Your properties have been connected, now please go to Vrbo and follow the instructions as it is mentioned.
Then, you should tick the box of below:
Attestation* I completed the registration form in Vrbo
Finally, click on Save& Next.
In the meantime, your connection will show as pending. You’ll need to contact Vrbo support to confirm your listing using the Advertiser ID displayed at the top of the page and your channel manager as QuickConnect.
The account owner must submit an integration request to Vrbo’s Onboarding Team via this link. Once you begin the Vrbo self-onboarding process, a pop-up with onboarding steps will appear on the Vrbo channel mapping page until your connection is confirmed and approved. Select “Rentals United” when asked what software you are using to connect to Vrbo rather than Zeevou.
After connecting the property to the channel, you may look up its connection status any time you want. The connection status page clearly indicates if your property is successfully connected to Vrbo or requires your action to clear away anything that may prevent it from being listed on the Vrbo website.

Pending - This is the default status the property enters after connection to Vrbo. You need to wait until Vrbo completes all the necessary steps on their side in order to successfully connect your property. Usually, it may be signing a contract, completing the account set-up and so on. The status will change after the live link to your property listed in the Vrbo website appear. You may wait up to few days for the status to change, and if you do not hear from the channel, you should contact them.
If your listings are already published on the channel and the connection and mapping have been confirmed on the channel side, but the status is still showing as Pending, follow the steps below:
Open your listings on Vrbo and copy the public URL for each listing individually.
In Zeevou, open the corresponding listing page.
Navigate to Channel Mapping, select Vrbo, and paste the public URL into the designated field (as shown in the attached screenshot).
Once these steps are completed, the connection status will change from Pending to Active.

Active - The property has been successfully connected and is listed on the Sales Channel website. You can receive reservations at this point.

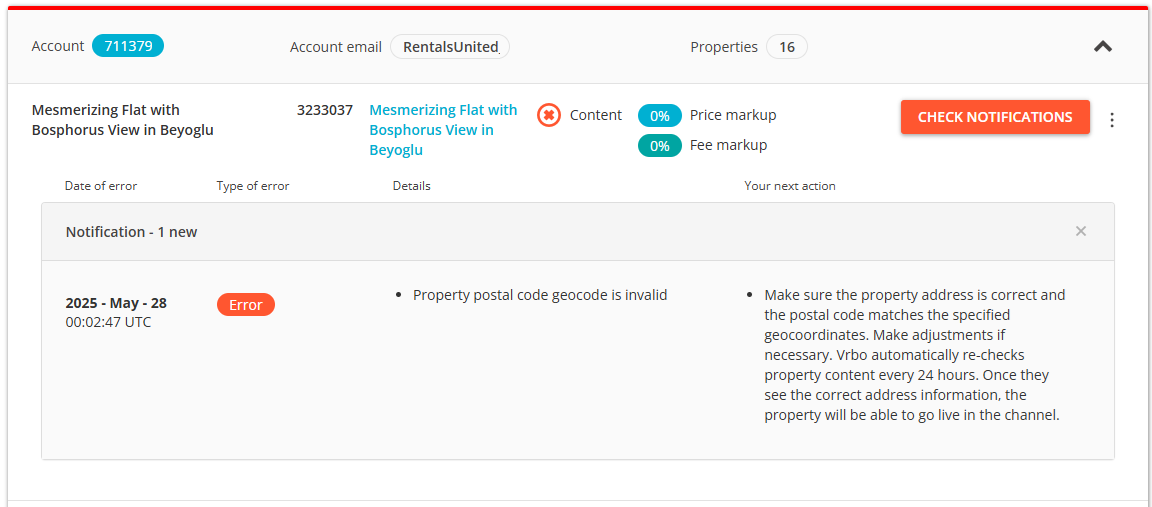
Not connected - An error occurred while connecting to Vrbo, which prevents the property from being listed.
This status may indicate that the property is missing some descriptive content, for example, the photos are to big or the description is too short. You can check the summary of the invalid content that caused this status by clicking the Check notifications button and review the areas needing improvement. Please, edit the property content according to the mentioned suggestions and wait until the Vrbo attempts to reconnect the property upon the next synchronization time - see Static content.
To add another existing property:
Click Add Property.
Select your desired Zeevou property (rate plan) from the list.
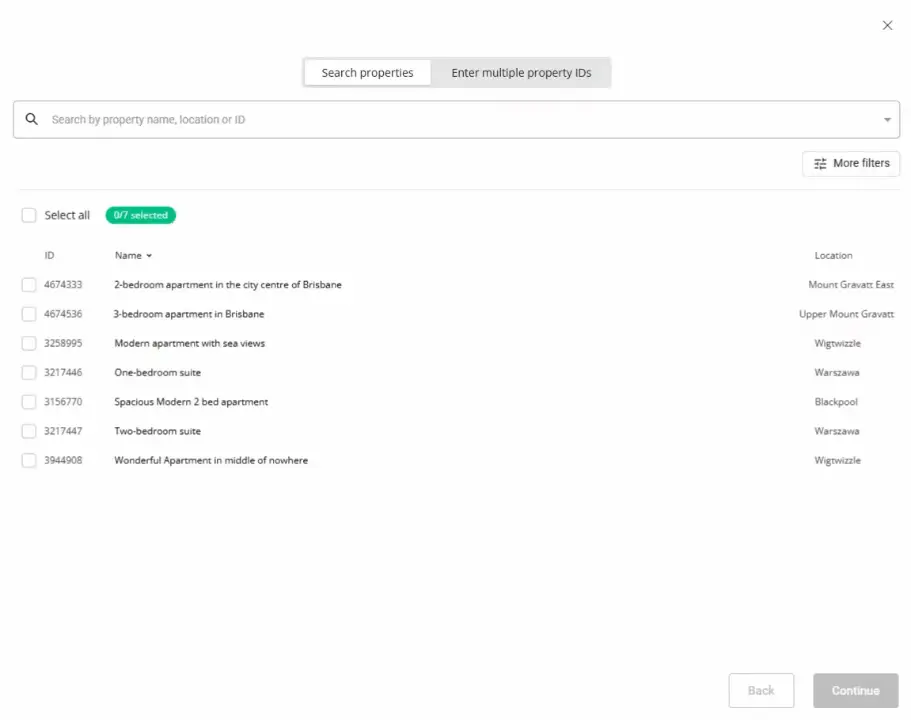
Click CONTINUE twice.
If your property is ready to be published, you can set the price markup and down payment, then click on PUBLISH PROPERTIES. The published properties enter the Pending status.
The listing status changes to Active.
Note: If you are in the middle of the onboarding process with Vrbo, your properties won't go live immediately. Vrbo publishes them after you have completed the onboarding process.
Connecting to additional Vrbo accounts requires manual generation of additional Advertiser IDs by our Support Team. Please use the chat function on the bottom right on app.zeevou.com and indicate how many additional accounts you need to integrate besides the one you have already integrated.
Before you begin mapping, we recommend you have the following information ready.
Descriptions – If you already have a listing with Vrbo, recommend copying information from the extranet
Listing features – Sports & Adventure, View, Attractions, Leisure Activities, Local Features
Payment Type, Cancellation policy, House Rule Agreement – PDF format, Images
You should contact the Vrbo account manager to understand the terms and changes (if any) before proceeding.
When a property is ready, proceed with the onboarding steps.
Connecting your Vrbo account is a straightforward process. Follow these comprehensive steps to complete your setup smoothly.
Step1. Go to app.zeevou.com and click on Listings.
Step 2. Open your desired Listing, click on Manage Channels on the top right.
Step 3.Click on VRBO from list.
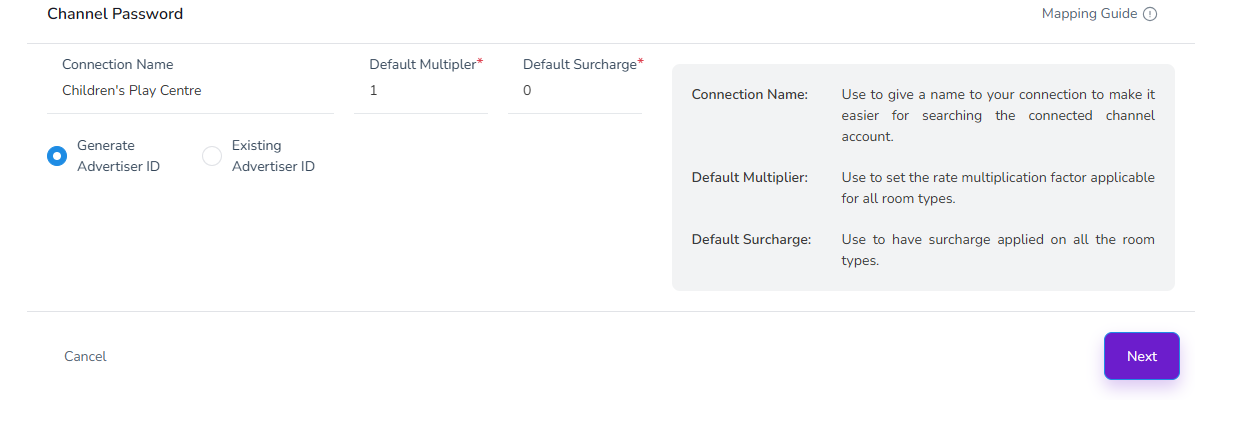
Step 4. Then assign a Connection Name.(Optional)
Step 5. Configure a Default Multiplier and Surcharge (if needed) using a formula to manage rates.
Step 6. If your listing does not already exist in VRBO, click on Generate Advertiser ID. Click Next to proceed.Otherwise, select Existing Advertiser ID.
Note: When mapping a new listing to VRBO in Zeevou, you should choose Generate Advertiser ID if this is a brand-new connection and the listing hasn’t been mapped to VRBO before.
A window will pop up where you can copy the ID and then click Proceed.
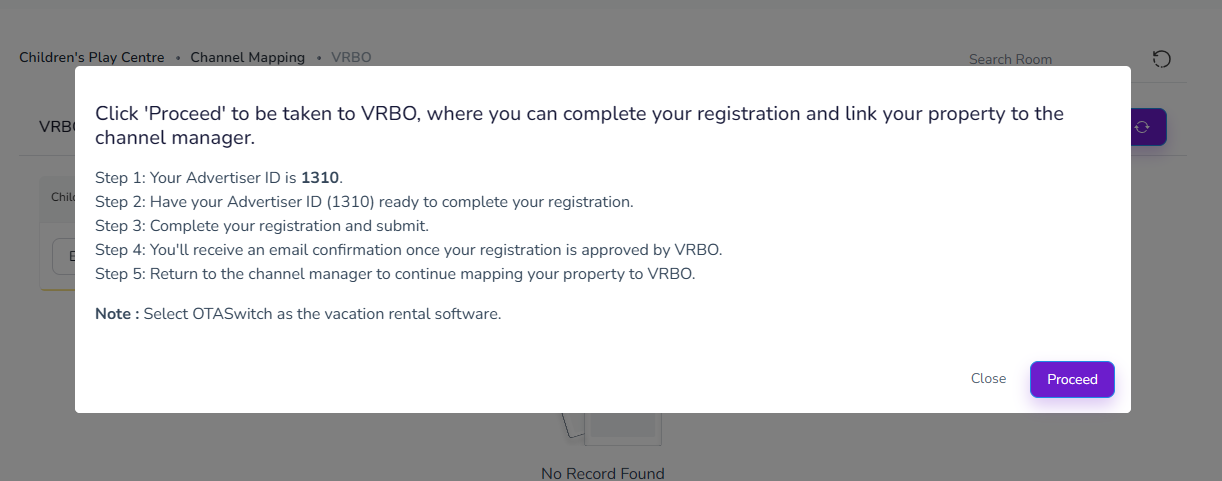
Your Advertiser ID will be automatically generated.
Carefully read the pop-up message—it outlines critical next steps. Note that select Zeevou as your channel Manger (Holiday/Vacation Rentals Software).
Save your Advertiser ID. You'll need it during your Vrbo registration.
When ready, click Proceed to continue.
Once you have started the Vrbo self-onboarding process, the pop-up message outlining the onboarding steps will appear each time you access the Vrbo channel mapping page. This will continue until your connection is confirmed and approved.
Important: If you’ve already completed the onboarding steps and are awaiting confirmation, do not start a new registration.
After submitting your request:
Vrbo will review your connection request.
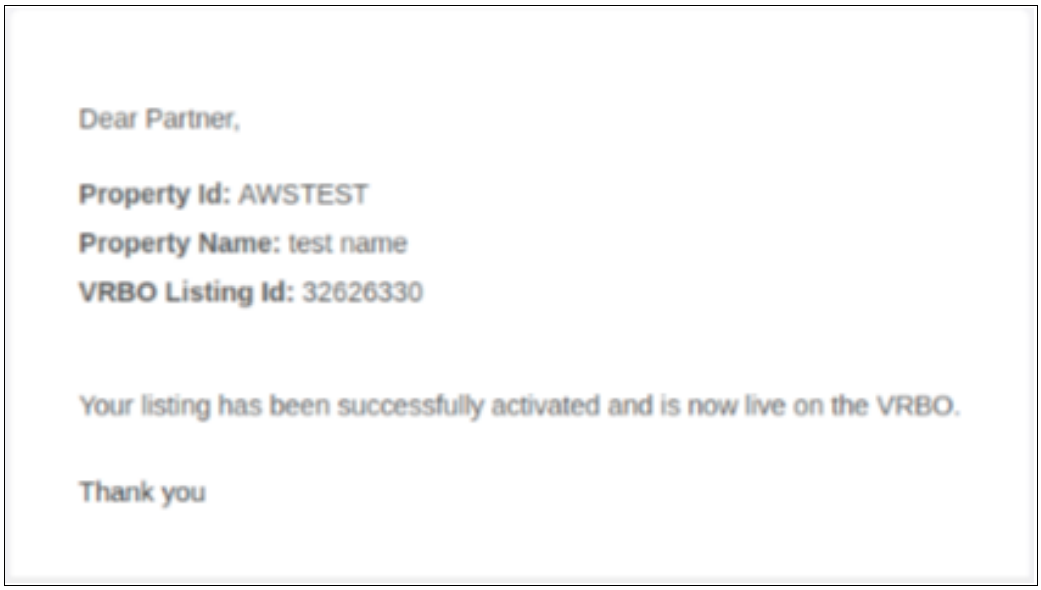
Upon approval, you will receive an email notification confirming the connection.
Once approved, you can complete the mapping.
⚠ Until confirmation is received, avoid restarting the registration process.
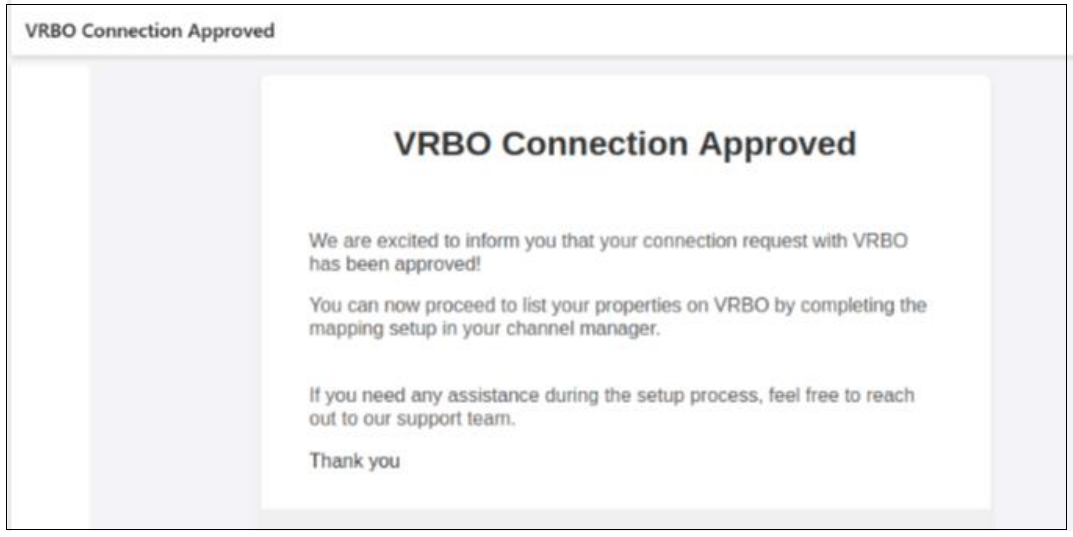
After your connection is approved:
1. Go to app.zeevou.com and click on Listings.
2. Open your desired Listing, click on Manage Channels on the top right.
3.Click VRBO from list.
4. Click Map button in front of your listing name.
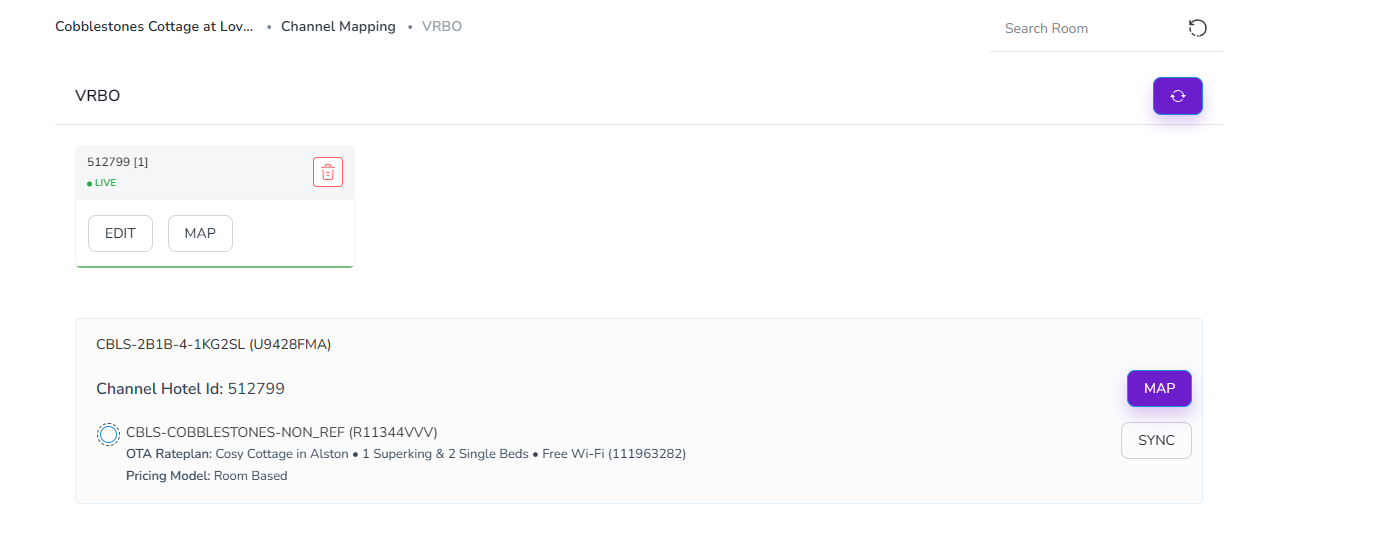
5. Go through the mapping wizard (Listings, Unit, Availability & Booking Settings) and fill out the necessary information (starred ones).
6. Finally, click Save & Next to complete mapping wizard.
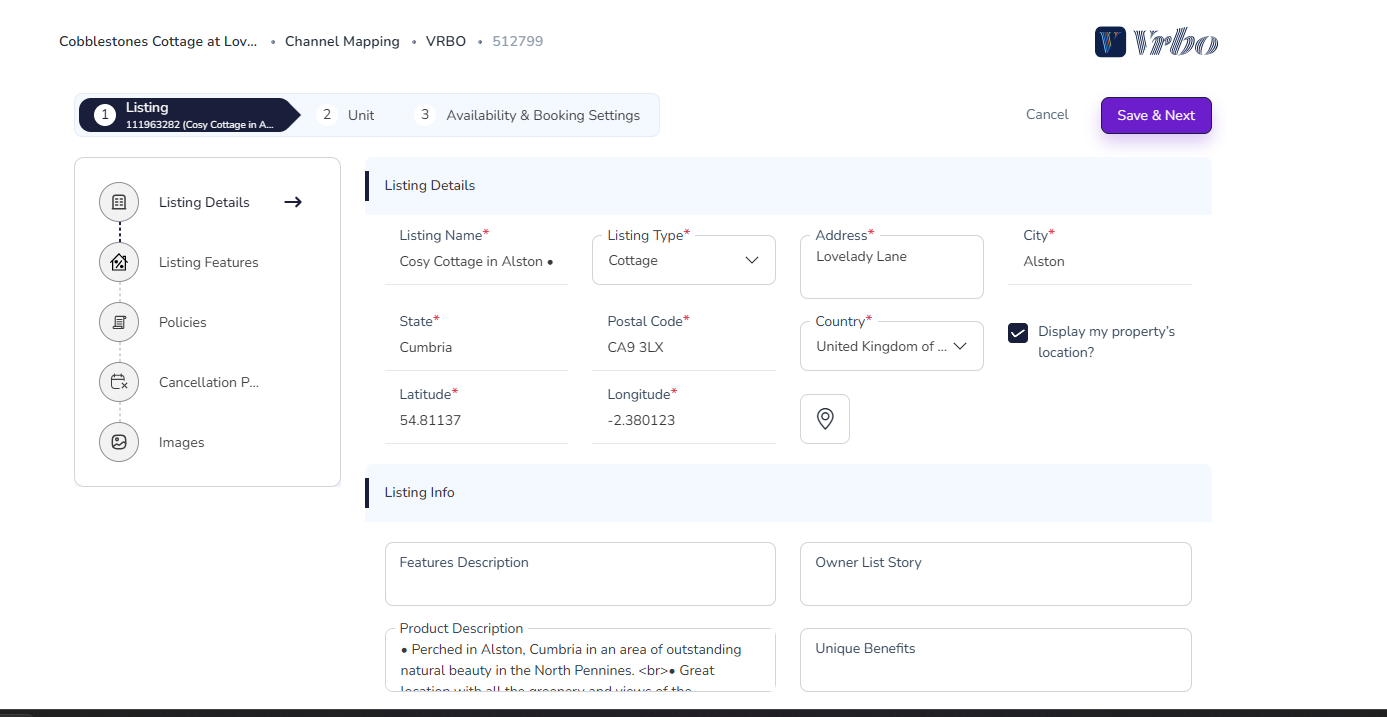
Then your Listing Status gets Approved and Bookable.

To map existing Vrbo listings:
On the mapping screen, locate your VRBO Room-Rate.
Select the corresponding Zeevou Room Name and Zeevou Rate Name.
Click Map.
Enter all required fields and complete the setup wizard.
Note that in both states of Advertiser ID, once Vrbo verifies the mapping, a confirmation email will be sent.
Adding Promotions to your VRBO Listings (Type B)
If you need to add promotions to your Vrbo listings, you must do so through the mapping page. This is because Vrbo does not allow you to manage promotions directly on their platform once your account is connected to a Channel Manager.
Accessing the Promotions Section
Go to app.zeevou.com and click on Listings.
Open your desired Listing and click on Manage Channels on the top right.
Select VRBO from the list.
On the mapping page, locate the three dots (⋯) under the Actions column and select Promotions.
Creating a New Promotion
Click the “+” icon on the Promotions page.
Select your desired Promotion Type and Discount Type.
Enter the discount value and configure the necessary conditions, including:
Stay restrictions
Booking window
Specific booking and travel dates.
Click Save to create the promotion
Available Promotion Types
Last Minute: Targeted at guests booking close to their check-in date.
Early Booking: Rewards guests who plan and book well in advance.
Mobile Only: Exclusive discounts applied only to users on mobile devices.
Member Only: Targeted at logged-in Vrbo members to build loyalty.
New Listing: A specialized boost used to gain initial traction for brand-new properties.
Note 1: Ensure the full mapping process is completed before attempting to set up promotions.
Note 2: You can run multiple promotions simultaneously based on your configured conditions.
