15 minutes
A Stripe account (create a free account if you don't have one)
Your business details (for new accounts)
Log into app.zeevou.com
Click the gear icon (top right) → Integrations.
Select the Payments tab.
Click Stripe → Connect to Stripe

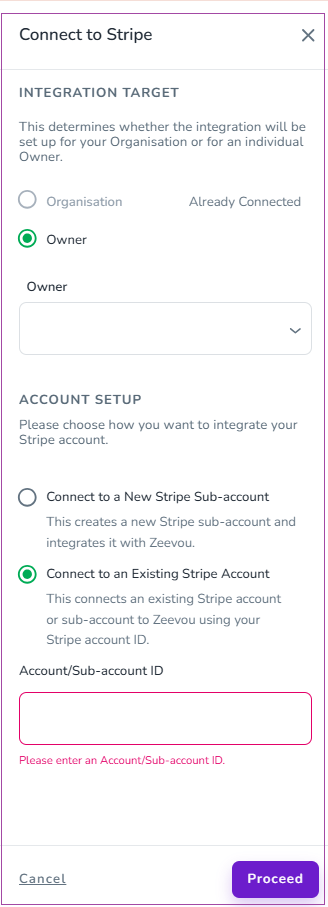
Select one:
Organisation - All payments go to your company account. (most common)
Owner - Each property owner gets paid separately. (for property management companies splitting revenue)
Option A: Create New Stripe Account (Recommended if starting fresh)
Click the message button (bottom right) to get your unique setup link.
Click the link - you'll go to Stripe's website.
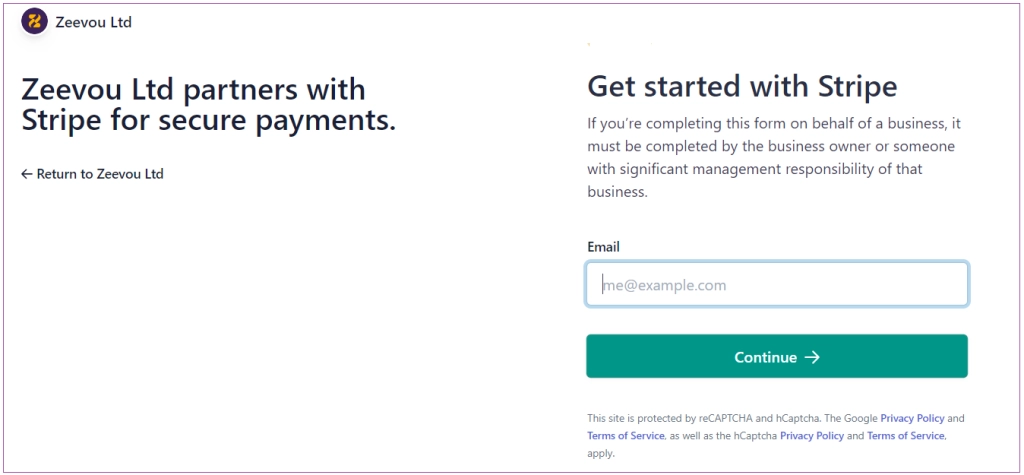
Enter your email address.
Complete Stripe's signup. (business details & bank account)
Stripe confirms the connection and shows your Account ID.
Copy your Account ID.
Return to Zeevou and paste the Account ID.
Click Proceed.
Option B: Connect Existing Stripe Account.
Select "Connect to an Existing Stripe Account"
Get your Account ID from Stripe:
Log in to your Stripe Dashboard.
Click your profile picture. (top right)
Your Account ID appears. (starts with "acct_")
Copy it.
Paste the Account ID into Zeevou.
Click Proceed.
Important: Only Standard, Express, or Custom Stripe accounts work. If you have a Platform account, contact [email protected].
Click gear icon → Settings → Finance
Find the Payment Methods section.
Turn on the Card toggle.
Select Stripe from the dropdown.
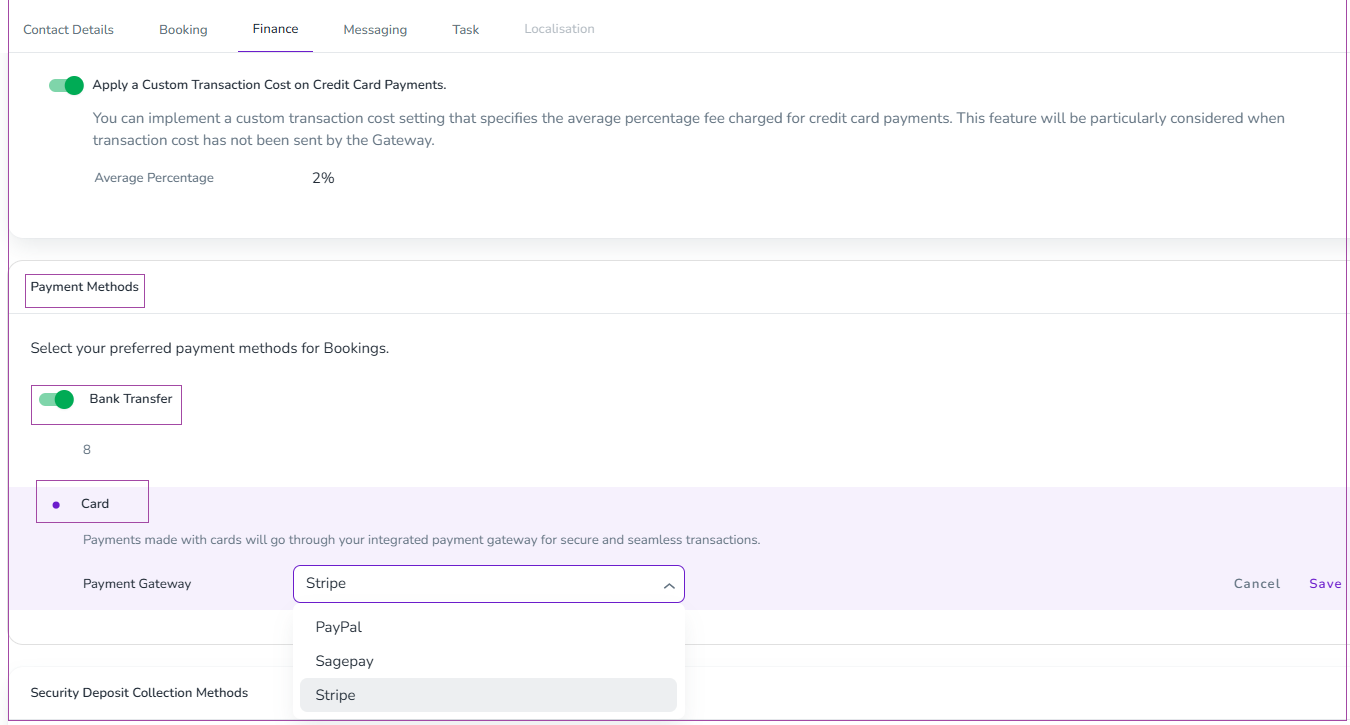
Click Save.
If you want to collect refundable security deposits from guests:
Set the Security Deposit Timeline under Listings → Set Listing Defaults → Security Deposit Timeline for new Listings, and override it within the Listing → Policies → Security Deposit Timeline for existing Listings.

Settings → Finance → Security Deposit Collection Methods
Turn on the Card toggle.
Select Stripe.
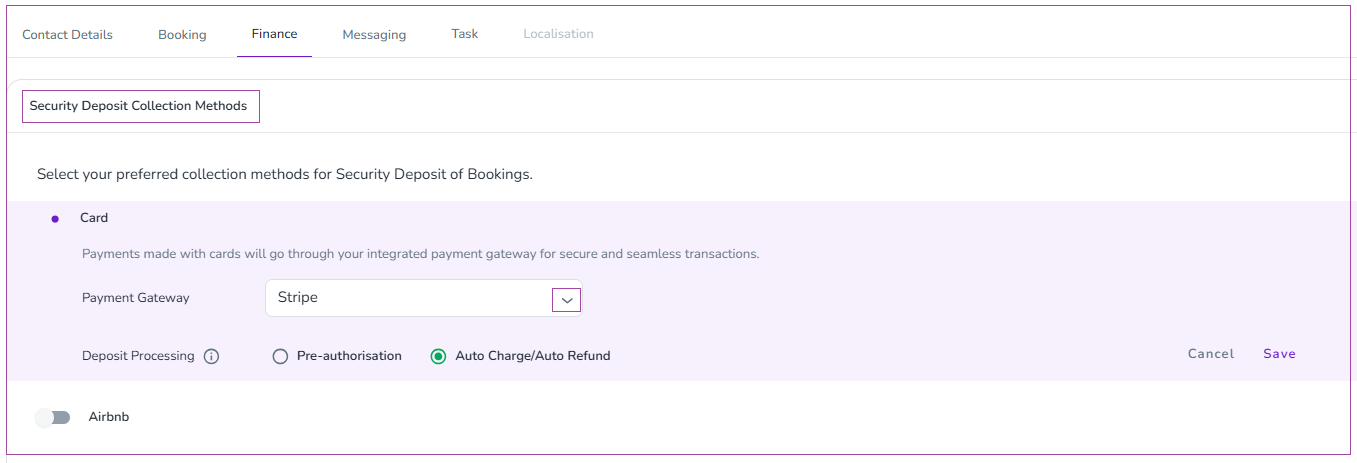
Check one of the boxes (Important: Read this section before deciding.)
Auto Charge/Auto Refund (automatically collects the deposit before arrival and refunds it after check-out).
Pre-authorization (only freezes funds in the guest’s account and releases them after their departure).
Click save.
Stripe can only hold pre-authorisations for 4/5 days. We have developed two options to reduce the risk of being out of pocket for longer bookings. You can choose either method, but they both have their disadvantages:
Pre-authorisation Holds - Automatically attempts to renew the authorisation every 4/5 days until checkout
Disadvantages:
There is no guarantee that a renewal will succeed (e.g., the guest may use the funds post expiry before the renewal attempt can be processed).
Guests will see multiple transactions on their account and may think you are capturing multiple lots of funds rather than renewing the hold.
Auto-Charge/Auto-Refund - the deposit is treated as an actual charge (captured) and then automatically refunded based on your configured timeline.
Disadvantage: Stripe will charge you when the system charges the deposit and when it refunds the deposit.
Select Auto-Charge/Auto-Refund for the most reliable security deposit handling.
Visit your booking website.
Make a test booking.
Use Stripe's test card numbers:
Successful payment: 4242 4242 4242 4242
Use any future expiry date and any 3-digit CVC.
Complete the test booking.
Check your Stripe Dashboard - the test payment should appear.
Guests can now book and pay instantly on your website. Stripe will automatically transfer funds to your bank account based on your payout schedule (usually 2-7 business days).
View your payments: Log into your Stripe Dashboard anytime to see transactions, payouts, and guest details.
Once you have added your payment gateway, you can continue with inviting your owners.
