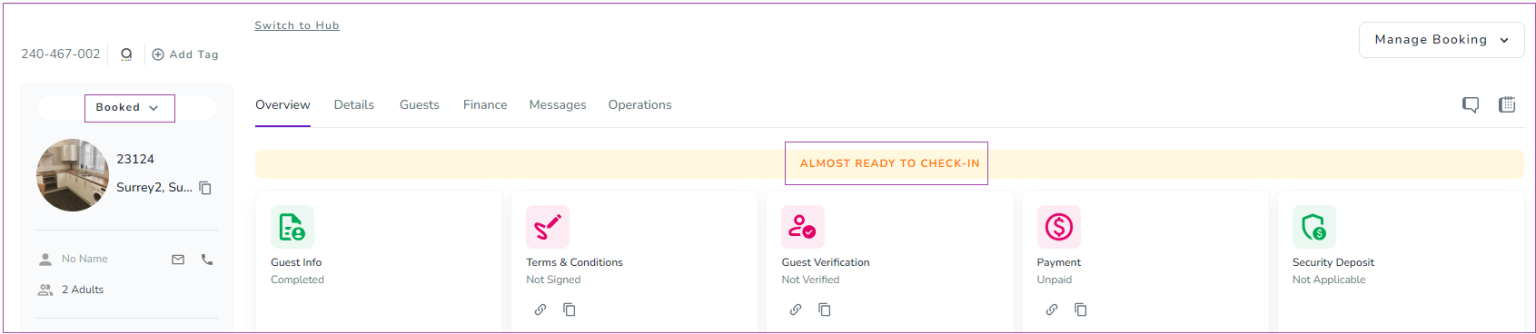
You can land on the Booking View page by clicking the booking row in the booking lists or clicking on the booking number. Each page includes a Booking Summary in a separate card on the left, the Manage Booking option on the right, and six tabs for Overview, Details, Guests, Finance, Messages, and Operations.
Note 1: If the Booking status is Booked, you can see the Overview tab for that booking.
Note 2: If the booking has completed all requirements, it is ready for Check-In, and it becomes green.
If the booking has met some of the requirements, it is almost ready for Check-In, and it becomes yellow.
If the booking has not met any of the requirements, it is not ready for Check-In, and it becomes red.
Each booking View Page has its Booking Summary in which many details can be accessed by hovering over them as shown below.
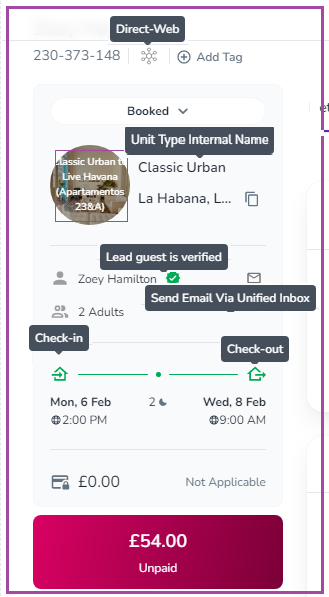
If your profile time zone, differs from the property’s time zone, a Globe icon will appear on the left of the arrival/departure times. Hovering on it, will show you the times in your local time zone.
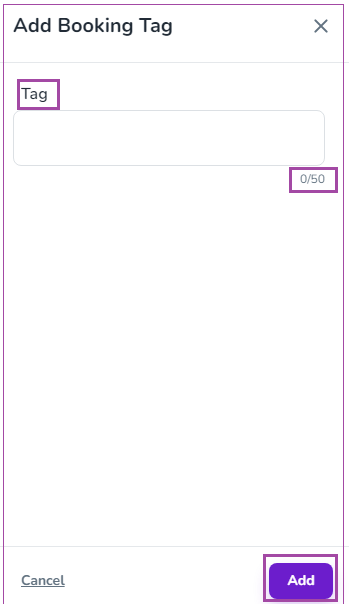
There are some editable details such as Add Tag and Booking Status. If you click Add Tag, a window pops up and you can make the changes you wish.
You can not only view the Booking Status but can also edit it by clicking the arrow to select your desired status from the drop-down.
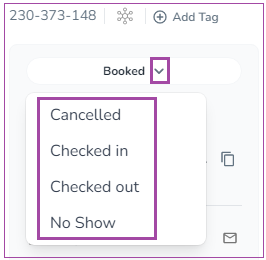
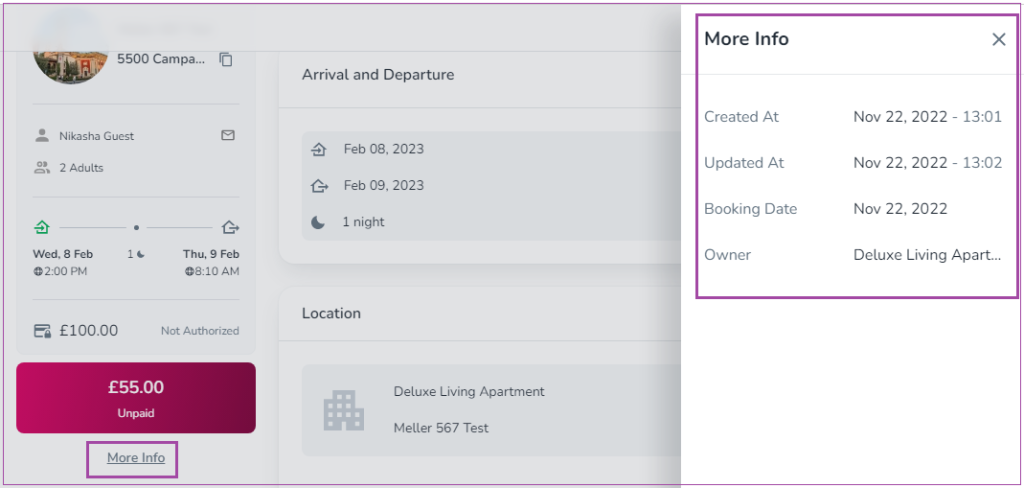
Note: If you click More Info, you can view more details about the booking.
You can also click the Manage Booking arrow on the right side of the page to select your desired action from the drop-down. You can select and copy different links by clicking Copy Links.
Any link that is selected, is copied to the clipboard and can be pasted.

Note: If the action is disabled for you, it means that you are not allowed to perform this action. To find the reason why you cannot do it, click the Search Lamp Icon to read the related article about it.
Let’s explore each tab in more detail.
Under Details, you can view the information related to Arrivals and Departures, Location, Terms & Conditions, Fees and Upsells, Booking Source, Internal Name (Optional), Attachments (Optional), and Related Bookings in separate cards.
In the Arrivals and Departures card, you can view the Arrival and Departure dates and the booking duration. You can also edit the arrival and departure times by clicking on the pen and then saving it.
Note: You can view the fee amount for Early/Late Check-in/out Time. You can edit this amount in the Price Breakdown.
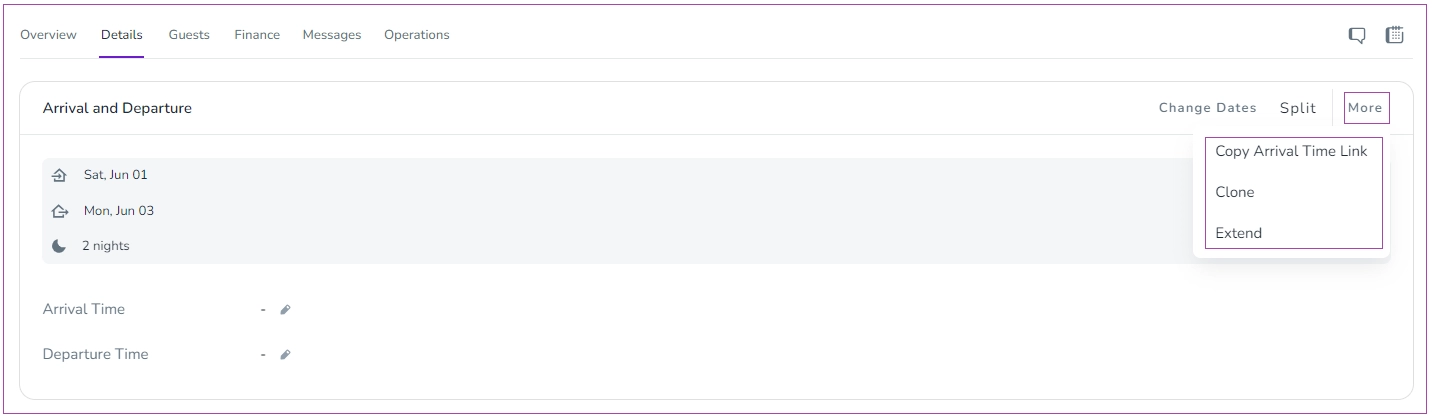
When you click on More on the right corner, a window will open in which you can apply more actions such as Copy Arrival Time Link, Clone, and Extend. You can also click Change Dates to change the arrival/departure date.
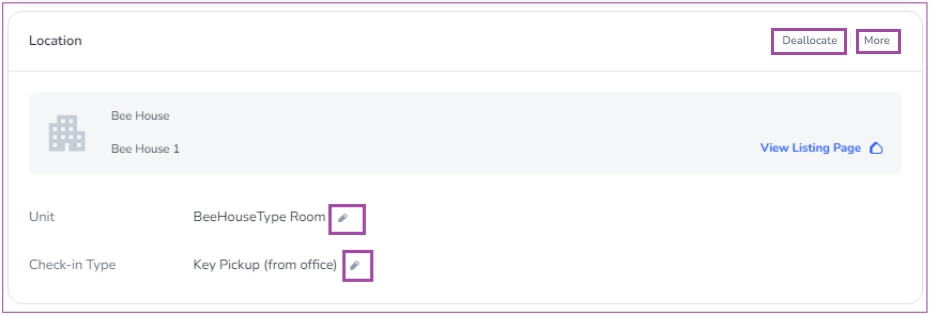
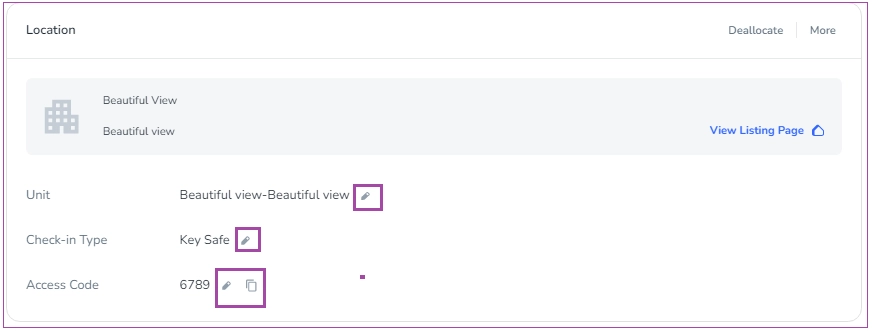
With this card, you can view the property name, the full address and the current unit allocation status of your booking.
To assign a unit to the booking:
Click the pen icon next to "Unit."
Choose or enter the unit details.
Save the changes.
Click the "More" button at the top right to select from the dropdown options:
"Add a Check-in Instruction" – Include instructions for guests on how to check in.
"Add a Check-out Instruction" – Provide details on check-out procedures.
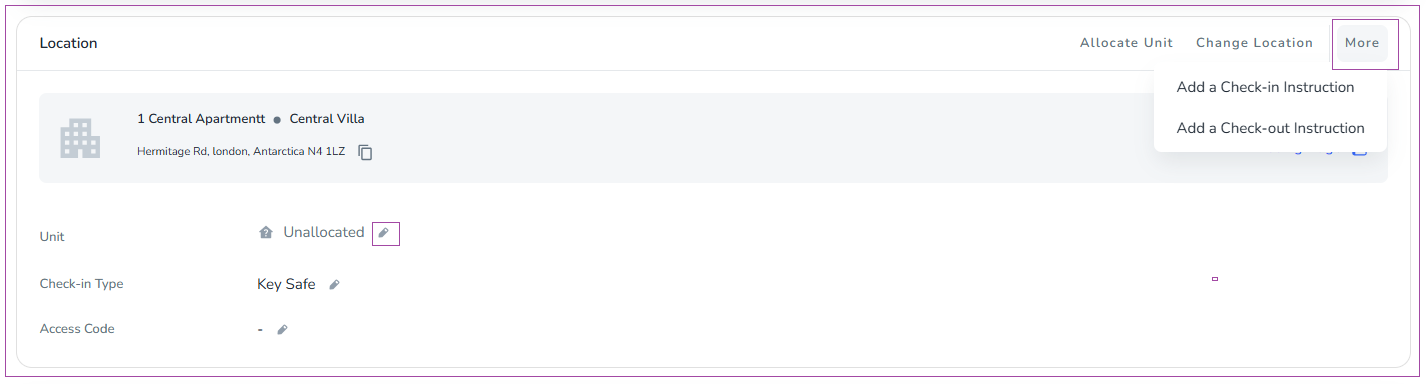
When you click Add a Check-in/out Instruction, a window will open to provide specific check-in/out instructions for that booking by clicking Add.
Deallocating a booking: If your booking has a unit, youcan click Deallocate. Then, a window will open in which you can confirm it. You can click on the pen next to each for editing if you want to change your unit or Check-in Type.
Depending on your check-in type, an "Access Code" may be shown to you; if you are allowed to edit it, you can see the pen icon.
Note: These check-in types do not have access codes: Meet & Greet, Concierge, Key Pickup (From Office), Mobile App, and Code Entry.
Note: These check-in types have access codes, but they cannot be edited: SmartLock and KeyNest
You can view the Terms & Conditions Title, its Status, and Terms & Conditions Link. The toggle of Required is on by default. By disabling this option, the guest won't be required to sign the Terms & Conditions before check-in.

Note: When the Terms & Conditions section is signed for the booking, you can view its Signer IP Address and its sending date. You can also click Download PDF to have it as a PDF file or click Reject to ask the Guest to sign the Terms and Conditions again.

Fees are the add-ons already included in the Rate Plan of each Unit Type’s booking.
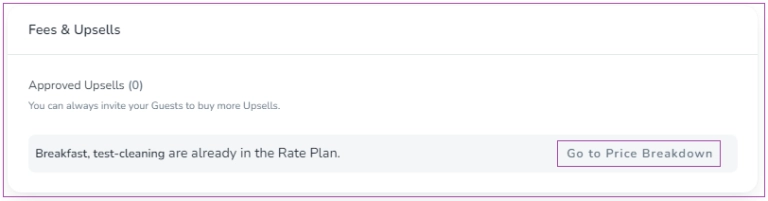
When you click Go to Price Breakdown, you are directed to the Finance Tab. You can disapprove or edit the Fees by clicking the pen icon there.
Upsells are the ones that will be added separately to the booking when the booking is created. Here, you can Approve or Reject Upsells.
The Booking Source section provides essential details about a booking, including:
Person Booking: The individual associated with the booking.
Channel: The source of the booking (e.g., CAP Worldwide Serviced Apartments).
Brand: The specific brand under which the booking or property is listed within your account.
Booking Request: The original inquiry submitted before a booking is created. (When a booking is generated from a request, the system links the two and displays the related Booking Request information in the Booking Source card for easy reference and access.
Booking Date: The date when the booking was made.)
Additionally, this section contains options to Add a Company or Add Booking Reference.
Note 1: The booking reference can be modified only by manually created bookings.
Note 2:To modify each mentioned detail, click the edit icon (pencil) next to the field.
Note 3: In the Booking Source card, a row titled Booking Request appears when a booking is connected to a request. This row shows the Booking Request Number and provides a View Request button that allows you to quickly open the related request page.
Note 4: If your booking has no tag, you can click Add Tag.

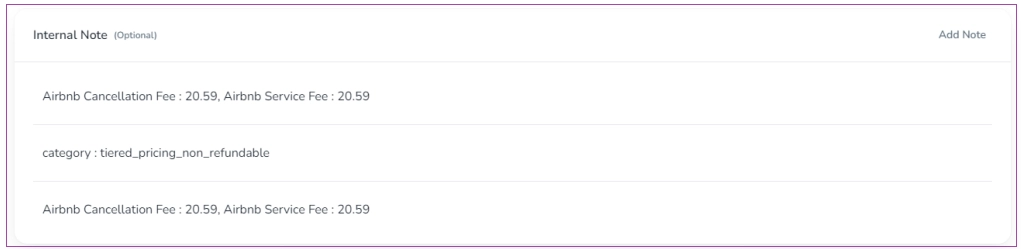
You can view the notes you have added for this booking and the notes from the channel (description such as rate plan,..). You can also add more notes by clicking Add Note.
You can upload PDF files, Excel Sheets, screenshots, images, or any attachments related to this booking.

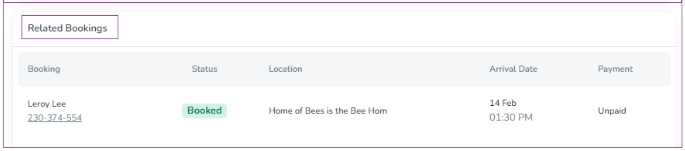
You can view related bookings such as any group bookings from channels, extended bookings, or split bookings with details. Note that this card will appear for bookings that have related bookings.
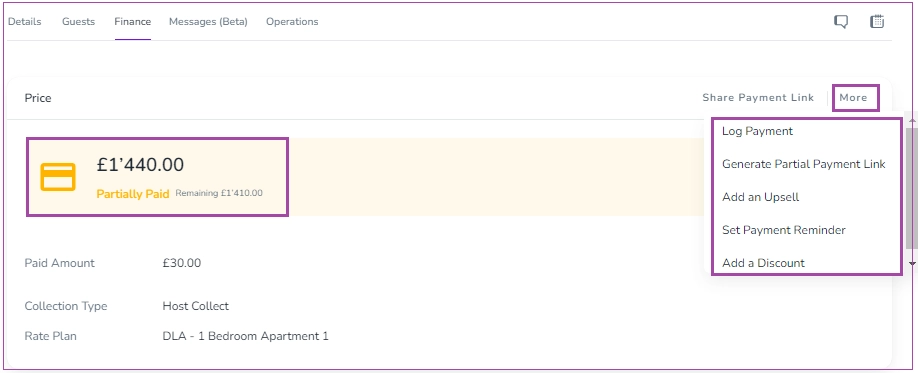
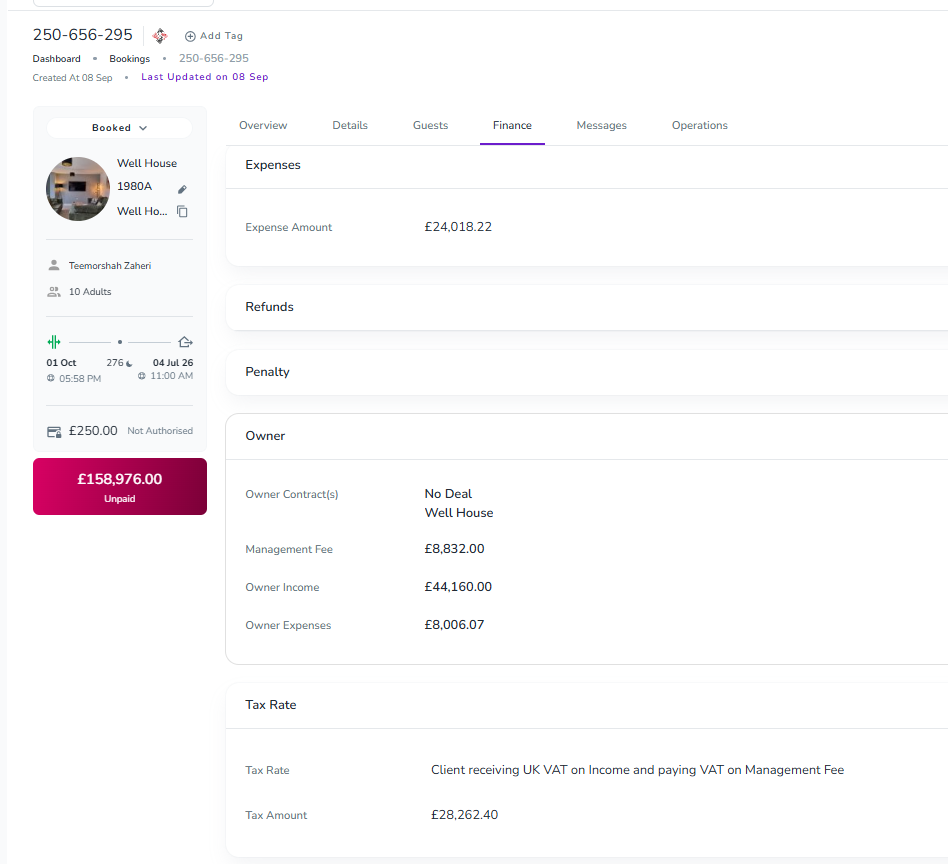
You can keep track of your finances with the Finance Tab in Booking View! Under the Finance Tab, you can view Price, Security Deposit, Guest Invoice, Expenses, Refunds, Penalty, Owner information, Payment Terms, and Tax Rate in separate cards.
With Finance in Booking View, you can easily view the Collection Type, Rate Plan and manage Price Breakdown. If you click the Share Payment Link, you can select Copy or View Link.
Depending on the payment status (Paid, Unpaid, Partially Paid, Credit), you can edit each by clicking More.
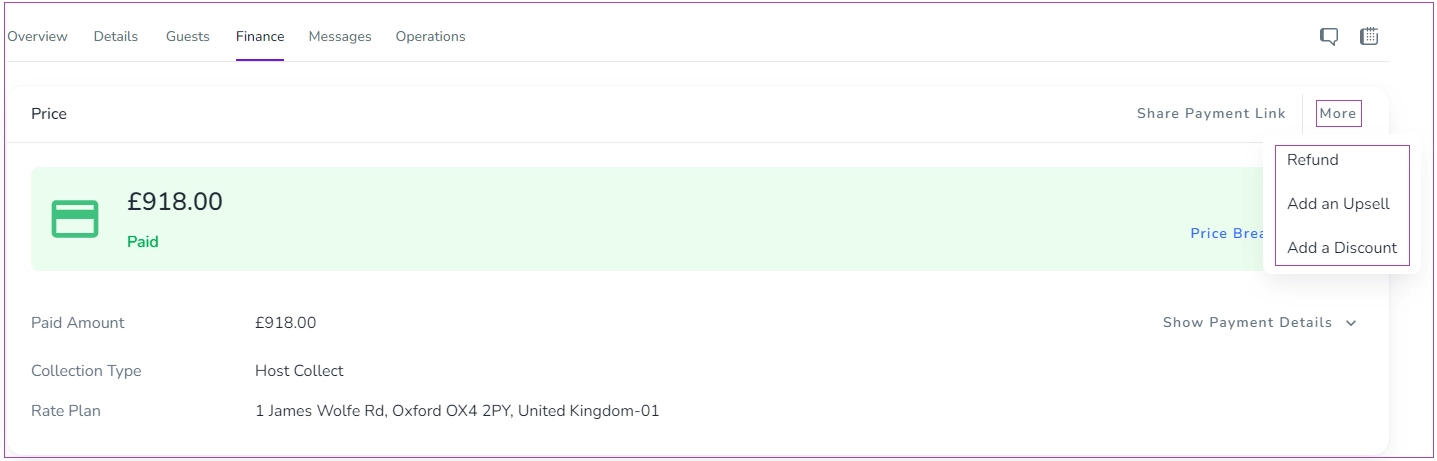
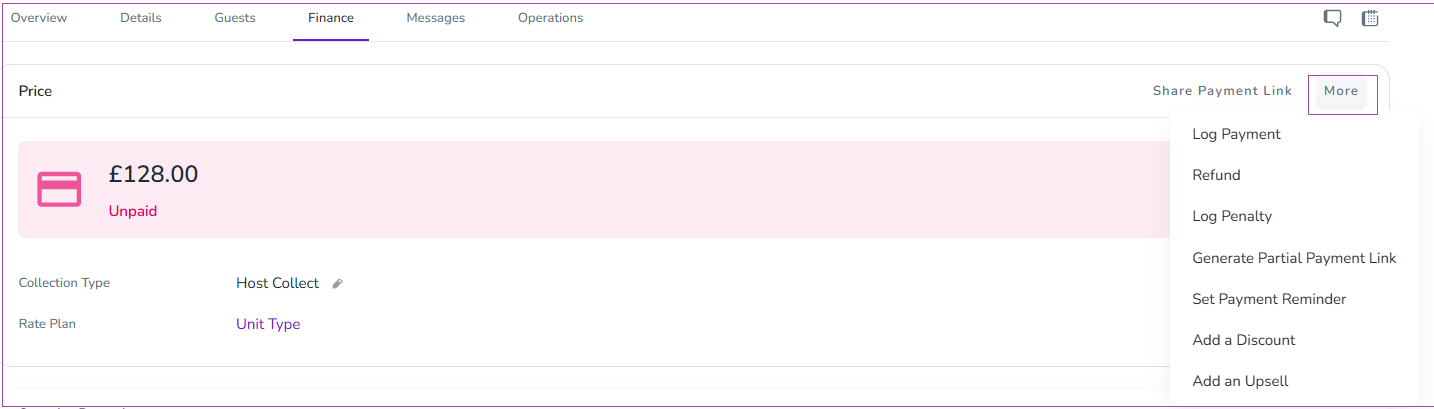
Log Payment: Use this option to record a payment made by the guest. It helps you keep track of completed transactions.
Refund: If a guest needs a refund, this option allows you to process it efficiently.
Log Penalty: In case of a penalty charge, you can log this charge to ensure it’s recorded correctly in the system.
Generate Partial Payment Link: This option is useful when the guest has made a partial payment, and you need to create a link for the remaining balance.
Set Payment Reminder: If the payment has not been received yet, use this option to set up a reminder for the guest.
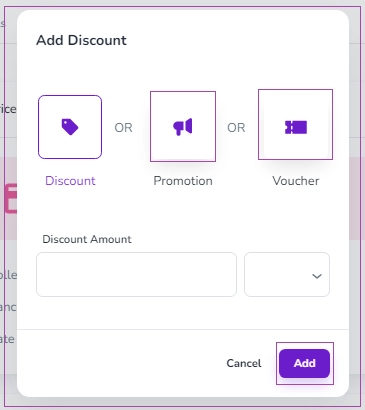
Add a Discount: You can apply a discount to the booking price, which will be reflected in the total amount.
Add an Upsell: This option allows you to add additional charges for upsell services like room upgrades or extra amenities.
Note: When the payment status is Partially Paid or Unpaid, you can generate a link to receive the rest of the payment by clicking More and selecting Generate Partial Payment Link.
Then, a window appears in which you can set your desired amount and click Generate.

Note 1: When you click Log Payment, a window opens in which you can insert the Amount and select date, time, and Payment Type from the drop-down. Inserting the Reference and Description is Optional.
Finally, click Log.
Note 2: When you click Add Discount, a window will appear in which you can select Discount and insert its amount, or select the Promotion from the drop-down, or enter the Voucher code.
Once done, click Add.
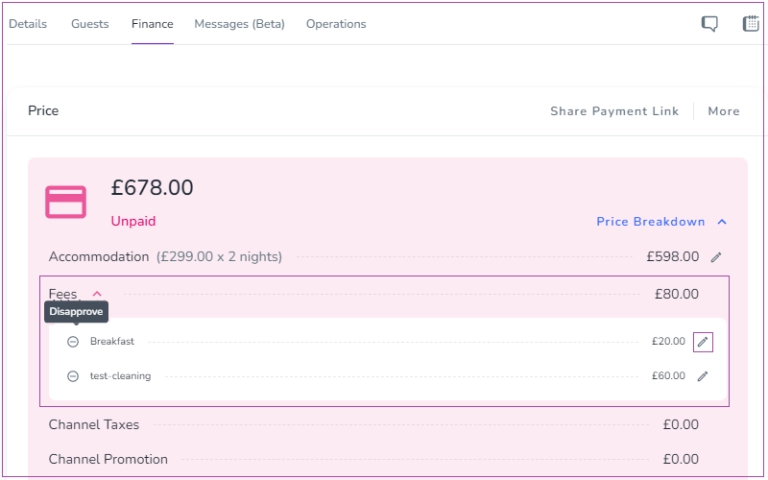
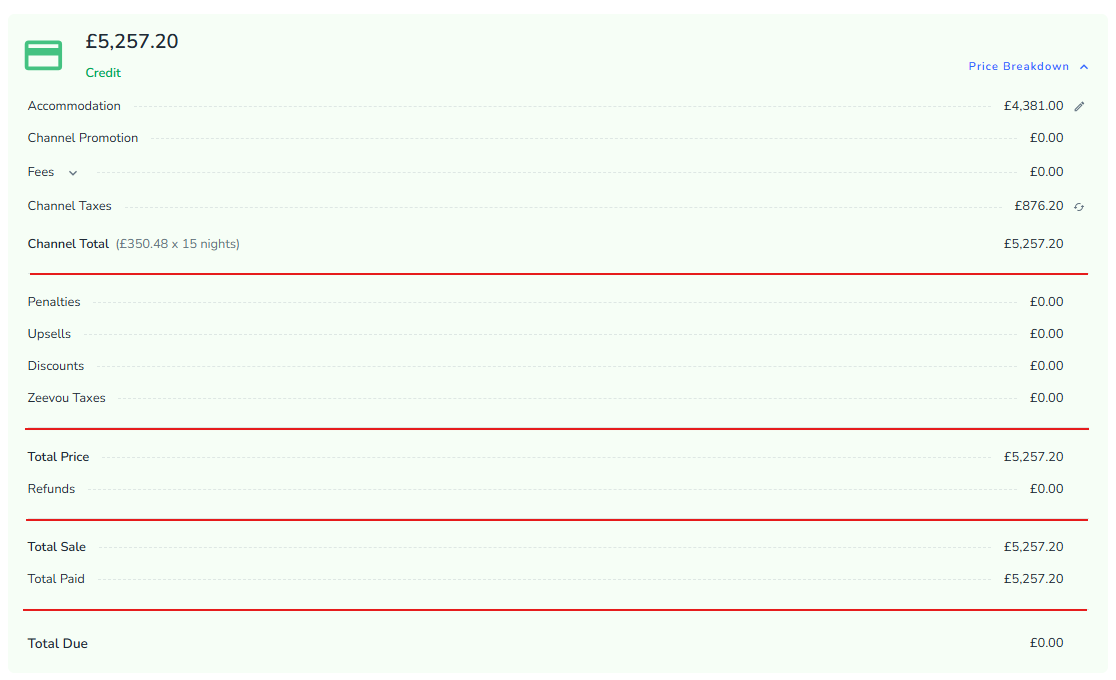
If you click on the arrow in front of the Price Breakdown, the details of prices will appear.
This is the net amount of accommodation which the host receives from the guest. This value doesn’t contain any tax or discount.
Discounts added by Rate Plan while creating a booking, will be considered as Channel Promotion. Sometimes they can be adjusted from the website during the booking creation.
These are Add-ons which are added to the booking during the booking creation process. Sometimes they come from the OTAs when the booking creation source is Channel Manager. Some other times they come from the Rate Plan Add-ons and will be added to the booking according to the selected Rate Plan.
When a booking comes from the Channel Manager, the system will consider the Tax value has been included in the JSON/XML file sent by channel. But when the booking is created manually via website or application wizard, the system will calculate the Channel Tax according to the defined Tax Rate in the related Rate Plan.This amount is exactly the tax amount that has been added only on the Accommodation and Fees.
This is a variable which contains SUM of all previous items. Actually it’s equal to the below equation:
Channel Total = Accommodation + Fees + Channel Tax - Channel Promotion
Most of the time, penalties are the items which the host adds for extra charging the guest due to encountering an issue with guest staying like breaking something or damaging an item. Sometimes it could be like capturing the deposit and some other times it would be as a Logged Penalty that has been paid by cash.
This is similar to Fees because it's an Add-on but the difference is they are not mentioned in the Rate Plan and the host adds them after booking creation.
This item is similar to the Promotion because its nature is subtractive. But the difference is that the discounts get added after booking creation.
This tax amount comes from the defined Tax Rate in the related Rate Plan and has been only applied on the Penalties and Upsells. It does not show the tax amount of the Fees or Accommodation here.
Again, this is a variable that contains the sum of previous values. Its equation is as below:
Total Price = Channel Total + Penalties + Upsells + Zeevou Taxes - Discounts
When a host makes a decision to return an amount to the guest, that amount will be shown here as a subtractive item. It will decrease the payable amount of the booking.
A variable that contains the sum of Total Price and Refunds as below:
Total Sale = Total Price - Refunds
Equal to the all paid items by the guest. In the other words, every confirmed payment made by the guest/corporation will be shown in this item.
As a last variable of booking price breakdown, it contains the difference of Total Sale and Total Paid. Actually it shows the difference between Total Payable items and total paid items. Total Payable items are all participants in the price breakdown like Accommodation, Fees, Upsells, Penalties, and etc. And total paid items are all payments made by the guest. For a balance booking, this value always must be 0.
An Example:
You can see the below image as an example.
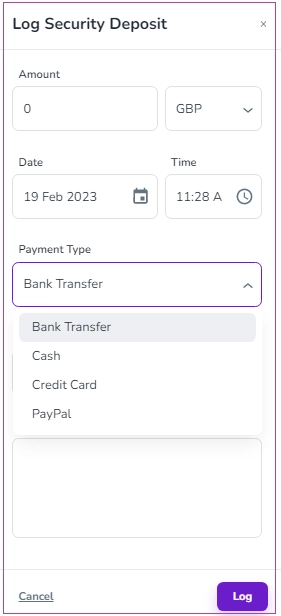
Log Security Deposit
You can view the Amount and Status of the Security Deposit here. You can Log Security Deposit if you click More. Then, a window will open in which you can insert the amount, date, and time, and select the Payment Type from the drop-down.
Note that the Reference and Description are Optional to insert. Finally, click Log.
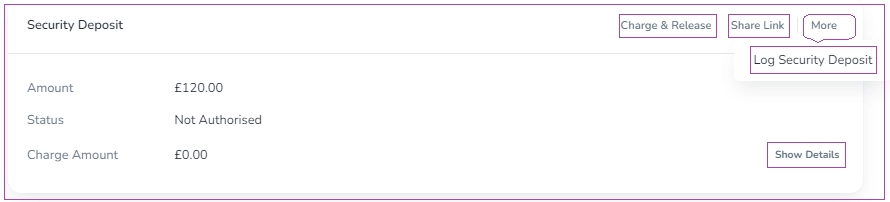
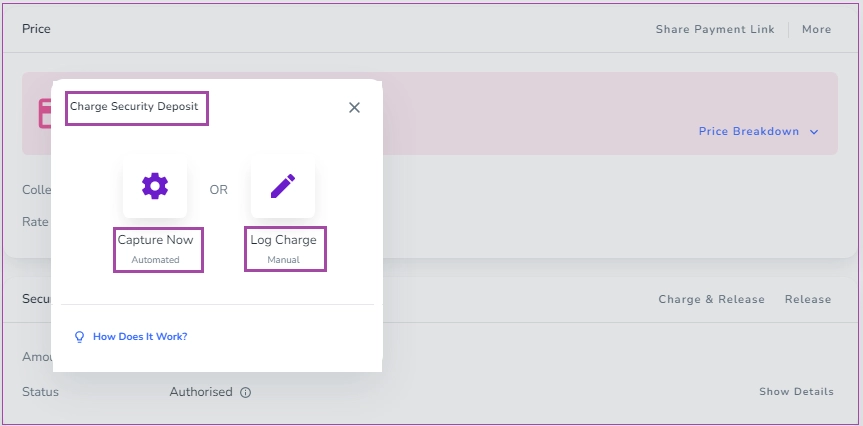
Note: When you pay the security deposit by the gateway, and you click Charge & Release, a window appears in which you can choose how to charge: Capture Now or Log Charge.
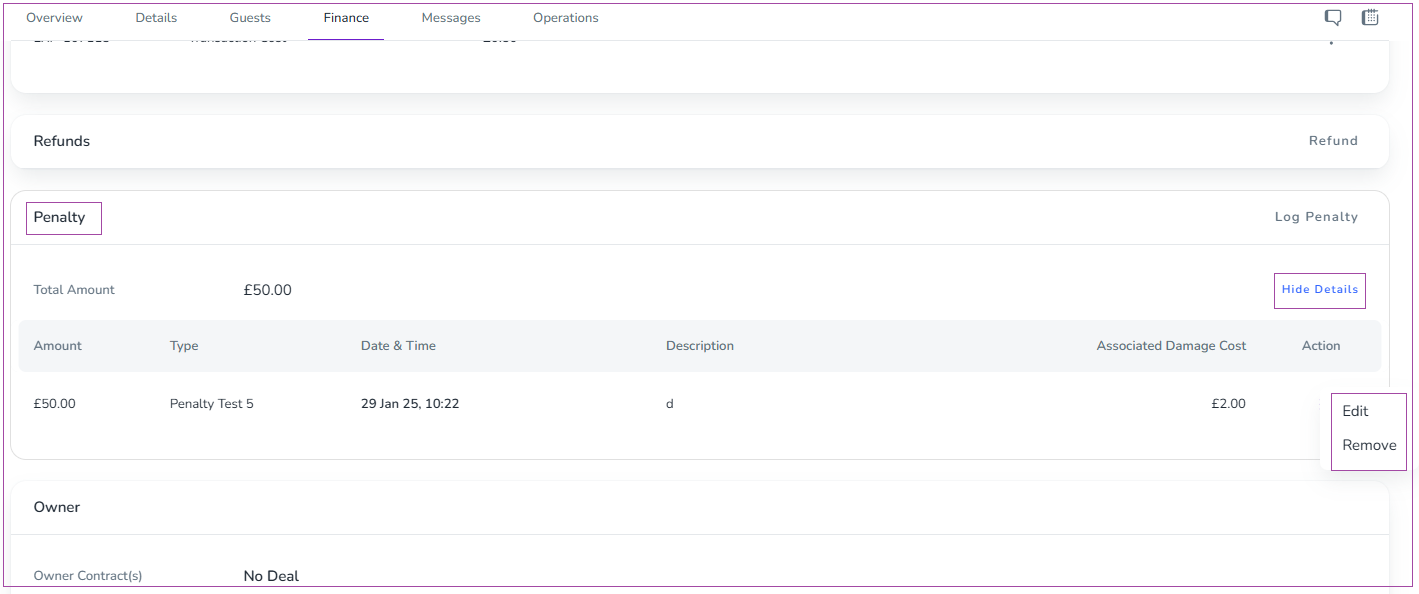
You can click on Show Details to view and edit more details about the Penalty. You can also click the three dots to Edit or Remove Penalty.

Guest Invoice
You can view the details of the Guest Invoice, its Entity and Status, and the Recurring Invoices on this card.
You can turn the first toggle to Include Security Deposit on Invoice.
If you turn on the Bank Transfer toggle, the "Bank account info" will appear on the guest invoice, and bank transfer will be enabled for this booking. Turning the toggle off will disable bank transfer in the online check-in process.
Note: This option is only available if bank transfer is enabled at the brand level in Settings > Finance. Otherwise, this option will be disabled.
If you turn on the Card toggle, the "Pay Now" button will appear on the guest invoice, and card payment will be enabled for this booking. Turning the toggle off will disable card payment in the online check-in process.
Note: This option is only available if card payment is enabled at the brand level in Settings > Finance. Otherwise, this option will be disabled.
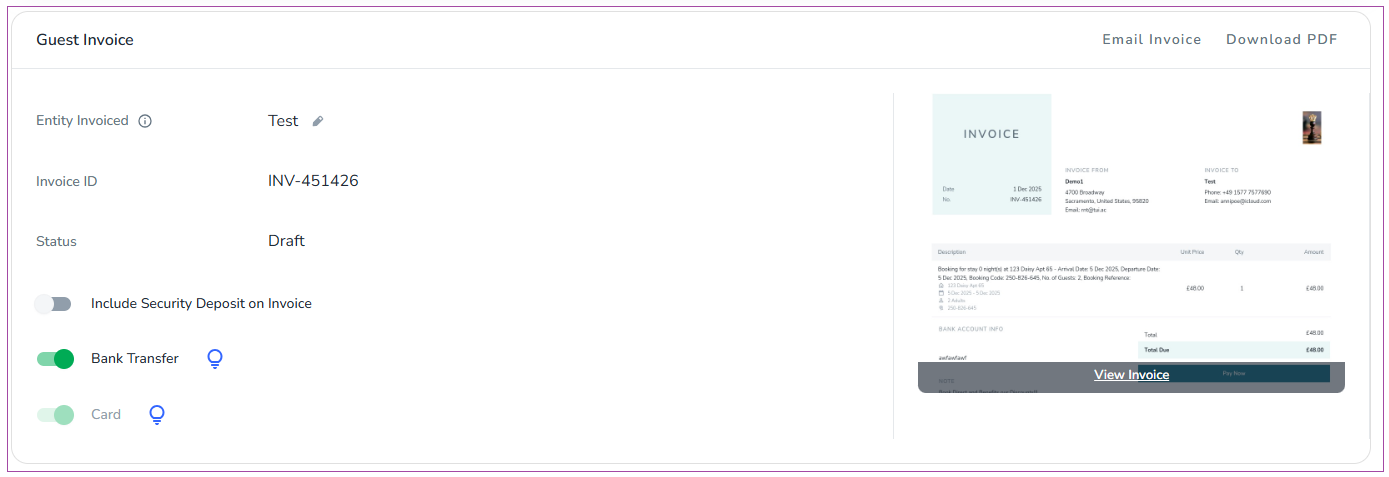
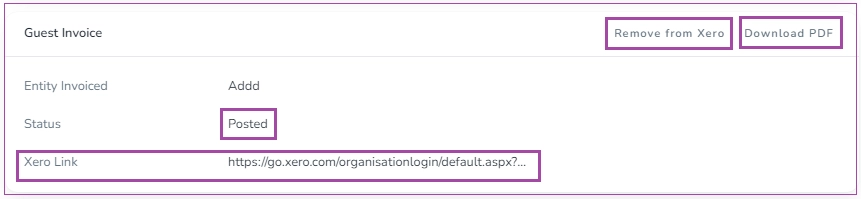
When the booking is checked out, the invoice status changes from Draft to Completed.

When the status is completed, you can send the invoice to Xero by clicking Post to Xero. Then, the invoice status changes from Completed to Posted. Then you can see the Xero Link, and you may remove the invoice by clicking Remove from Xero.

Note: You may share each Invoice or get a PDF version by clicking the download sign in front of each invoice.
You can view and edit the information about the Expenses on this card. The details of Expenses are demonstrated by clicking Show Details. You can also click on the three dots for each expense to View Monthly Supplier Bill or Edit Total Amount.
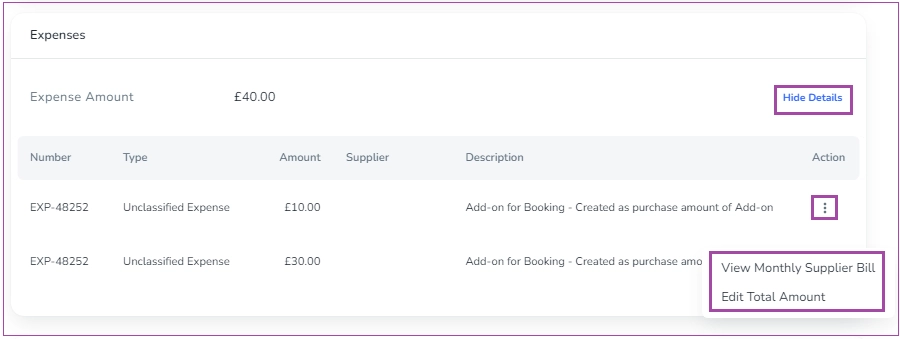

Note 1: You can only delete the Expenses which are created manually.
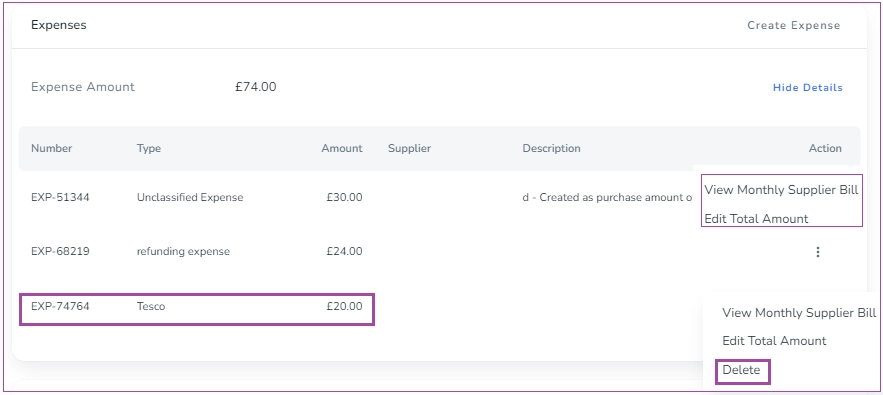
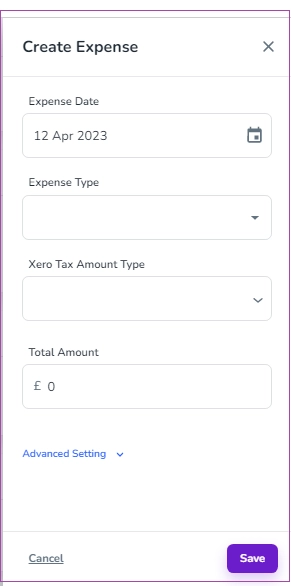
Note 2: If you click New Expense, you can create a new expense.
The Penalty section provides a structured way to track penalty types, amounts, and reasons, ensuring clear financial records for each booking. Click Log Penalty on the right to fill out the required fields:
Penalty Type: Select the type of penalty from the dropdown options.
Amount to Capture: Enter the monetary value of the penalty in GBP (£).
Date and Time:
Specify when the penalty is being logged.
Use the calendar and time picker to select the exact date and time.
Associated Damage Cost (Optional):
If the penalty is related to damages, enter the cost of repairs or replacements here.
This field can be left blank if not applicable.
Reason (Optional): Provide a brief explanation or description for the penalty.
Finally, click on Save.
Note that you can click Show Details to View, Edit, or Remove its details.
You can view the information about the Owner Deal(s), Management Fee, Owner Income, and Owner Expenses on this card. You can also click Show Details to view more details.
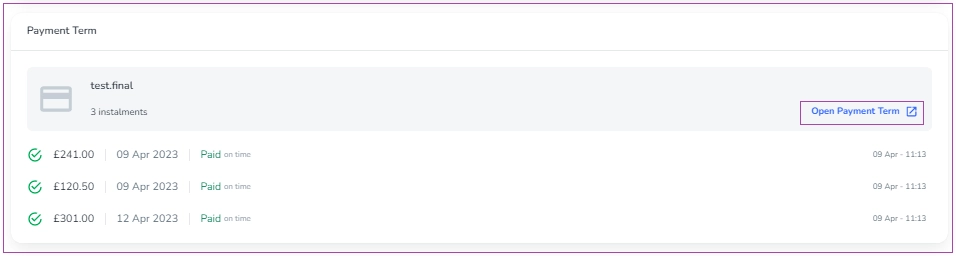
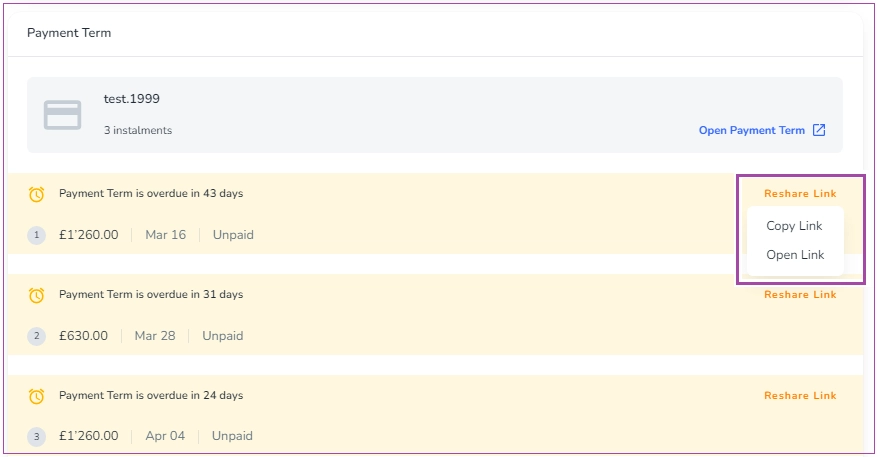
You can view the Payment Terms status here. You can also click Open Payment Terms to view more details about the instalment status, due date, instalment amount, and number of instalments.
Once the payments are complete, they will be shown like this.