If you want to update the rate, Min Stay, or Max Stay for one night or a few selected nights:
Go to Calendar → Rates and Availability Calendar.
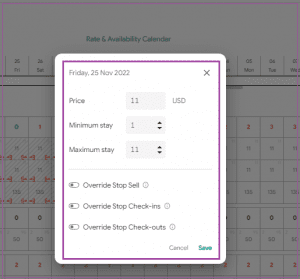
Select the date or dates you want to modify.
Click on the selected dates.
A pop-up window will appear.
Enter the new rate, Min Stay, or Max Stay.
The changes will apply to the selected dates.
Note: If you want the restrictions to be reflected on all your rate plans in Booking.com, please make sure that the rate plans are in XML format and mapped to or derived from the Standard Rate plan.
If you want to update rates or stay restrictions for an extended date range:
Go to Calendar → Rates and Availability Calendar.
Click Create Rate.
Select the unit(s) you want to update.
Set the new rate, Min Stay, or Max Stay.
You can define different values for different days of the week.
Click Add if you want to create another date range.
Click Save and Close.
The updated rates, Min Stay, and Max Stay will automatically sync with connected channels and your website.
Note: If you only want to change the rate, you can leave the Min Stay and Max Stay fields empty.
Note: If you want the restrictions to be reflected on all your rate plans in Booking.com, please make sure that they are in XML format and mapped to or derived from the Standard Rate plan.
On your direct booking website, minimum and maximum stay restrictions are based on the arrival (check-in) date only, not surrounding dates.
This means guests only need to meet the stay requirement set for their selected check-in date, ensuring a smoother and more flexible booking experience.
You can control when guests are allowed to check in or check out by applying Stop Check-ins/Check-outs in the Rates & Availability Calendar.
Log into app.zeevou.com and go to the Rates & Availability Calendar.
Scroll to the desired Property/Unit.
Drag and drop across the date range you want to update.
In the pop-up window, locate the Override Stop Check-ins/Check-outs toggle.
To stop check-ins/check-outs: Select Prevent Check-ins/Check-outs.
To allow check-ins/check-outs: Select Allow Check-ins/Check-outs.
Click Save to apply the changes.
If you want to apply restrictions to specific rate plan(s) or selected days of the week, follow these steps:
Log in to app.zeevou.com and go to the Rates & Availability Calendar.
Click the Calendar Toolbox drop-down menu and select Create Rate.
Choose your rate type to open the Rate Settings wizard.
Locate the Override Stop Check-ins/Check-outs toggle.
To stop check-ins/check-outs: Select Prevent Check-ins/Check-outs.
To allow check-ins/check-outs: Select Allow Check-ins/Check-outs.
Click Next to proceed to the Apply To section.
Select the relevant Rate Plans.
Click Complete to finalise the process.
A Stop Sell prevents bookings for selected dates, properties, or rate plans. This is useful when you want to block availability temporarily.
Log in to app.zeevou.com and go to the Rates & Availability Calendar.
Scroll to the desired Property/Unit.
Drag and drop across the date range you want to update.
In the pop-up window, locate the Override Stop Sell toggle.
To stop selling (prevent bookings): Select Prevent Bookings.
To allow bookings: Select Allow Bookings.
Click Save to apply the changes.
To apply Stop Sell settings to specific rate plan(s) or selected days, follow these steps:
Log in to app.zeevou.com and go to the Rates & Availability Calendar.
Click the Calendar Toolbox drop-down menu and select Create Rate.
Choose your rate type to open the Rate Settings wizard.
Locate the Override Stop Sell toggle.
To stop selling (prevent bookings): Select Prevent Bookings.
To allow bookings: Select Allow Bookings.
Click Next to proceed to the Apply To section.
Select the relevant Rate Plans.
Click Complete to finalise the process.
Use Stop Check-ins/Check-outs when you want to control arrival or departure days.
Use Stop Sell when you want to completely block bookings for selected dates.
If you want the restrictions to be reflected on all your rate plans in Booking.com, please make sure that they are in XML format and mapped to or derived from the Standard Rate plan.
Once you have applied your desired rates and restrictions, you can continue with integrating your payment gateway.
